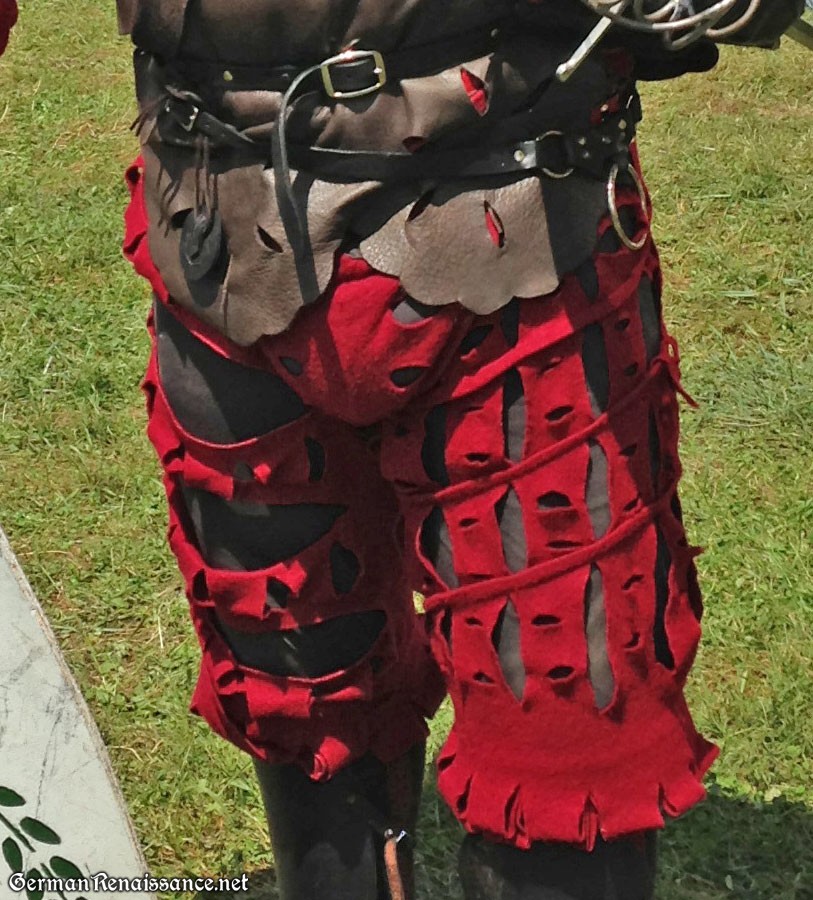
Gregor’s red hosen
Up to this point, the hosen (German slashed trousers) worn by Gregor have been my most challenging project. I have no qualms about admitting that I went through several incarnations before finally getting it right (or, at least, good enough for daily wear without ripping). I’ve made him two good pair of hosen to date, which he essentially wore every day for two weeks at Pennsic. He even fought in the various heavy armor and rapier battles with them. The hosen survived this abuse well — the only issue was some ripping of two of his slashings near his upper thigh during rapier battles (easily repairable with needle and thread).
If you want to learn how I made his hosen, you can skip down to the pattern instructions below.
My failures: I first tried the hosen pattern from Reconstructing History. They were good enough to wear to an event once, but ripped that same day (thankfully he was wearing a Waffenrock and you couldn’t tell). The second pair of hosen was patterned by the talented Mistress Melisant, but I didn’t finish them right away and made a mistake when I cut the second leg out (ever so slightly off the bias) which caused a bit of twisting when worn. Also, this pair wasn’t large enough in the waist and the front edges didn’t meet by a long shot (protip: taking too long to finish a project can result in size changes). I could have re-cut this pair from more wool, yes, but I didn’t. I think I was frustrated and tired of buying so much wool. Totally my fault!
My successes: One of my judges at the Middle Kingdom Arts & Sciences Competition was Duchess Elina of Beckenham, who makes and wears many lovely German items. She’s also wife to Duke Stephen, who is usually seen sporting great-looking hosen. So I asked her: “How does His Grace make his hosen?” And she told me, very succinctly, that he takes a pair of old, tight-fitting jeans, cuts them from waist to ankle at the back of the leg, then uses this as pattern for his material. (While this exchange happened before I began my Artisan’s Quest, I am choosing to add Duchess Elina and Duke Stephen’s names to my quest list of Persons Whom I Admire anyway.
My instructions: So here’s how I made Gregor’s hosen. I made his extra sturdy, with the unterhosen and hosen permanently attached. (Unterhosen, or under hosen/base layer, is the material you see under the slashes.)
1. We went to our local thrift store and found an old, tight pair of classic jeans that fit Gregor for $5. Do not buy low-cut jeans — you want the waist to be pretty high. Your jeans should be very snug and “friendly” in the crotch.
2. I bought two yards of cotton duck canvas and two yards of wool in a contrasting color. (First pair was 2 yards of black canvas and 2 yards of dark red wool, second pair was 1 yard each of red and black canvas and 1 yard each of red and black wool.) I pre-washed all materials. The wool was fulled by washing with hot water and a little soap, then put in the dryer with some tennis balls.
Note: The canvas provides a strong foundation for your hosen, which I find especially important if the wearer tends to be very active. I do not think this is historically inaccurate, as things like fustian and linen canvas were available in 16th century Germany. While I do not know if the Germans did this with their hosen, I do have evidence that it was used on several pair of trunkhose (as seen in Janet Arnold’s Patterns of Fashion 3, pages 74-77 and 88-89).
3. Gregor put on the jeans and I drew a straight line up the back of his leg with some chalk. He took them off and I cut them first at the crotch (so I had two halfs) then I cut them up along the chalk mark I made. They looked like this:
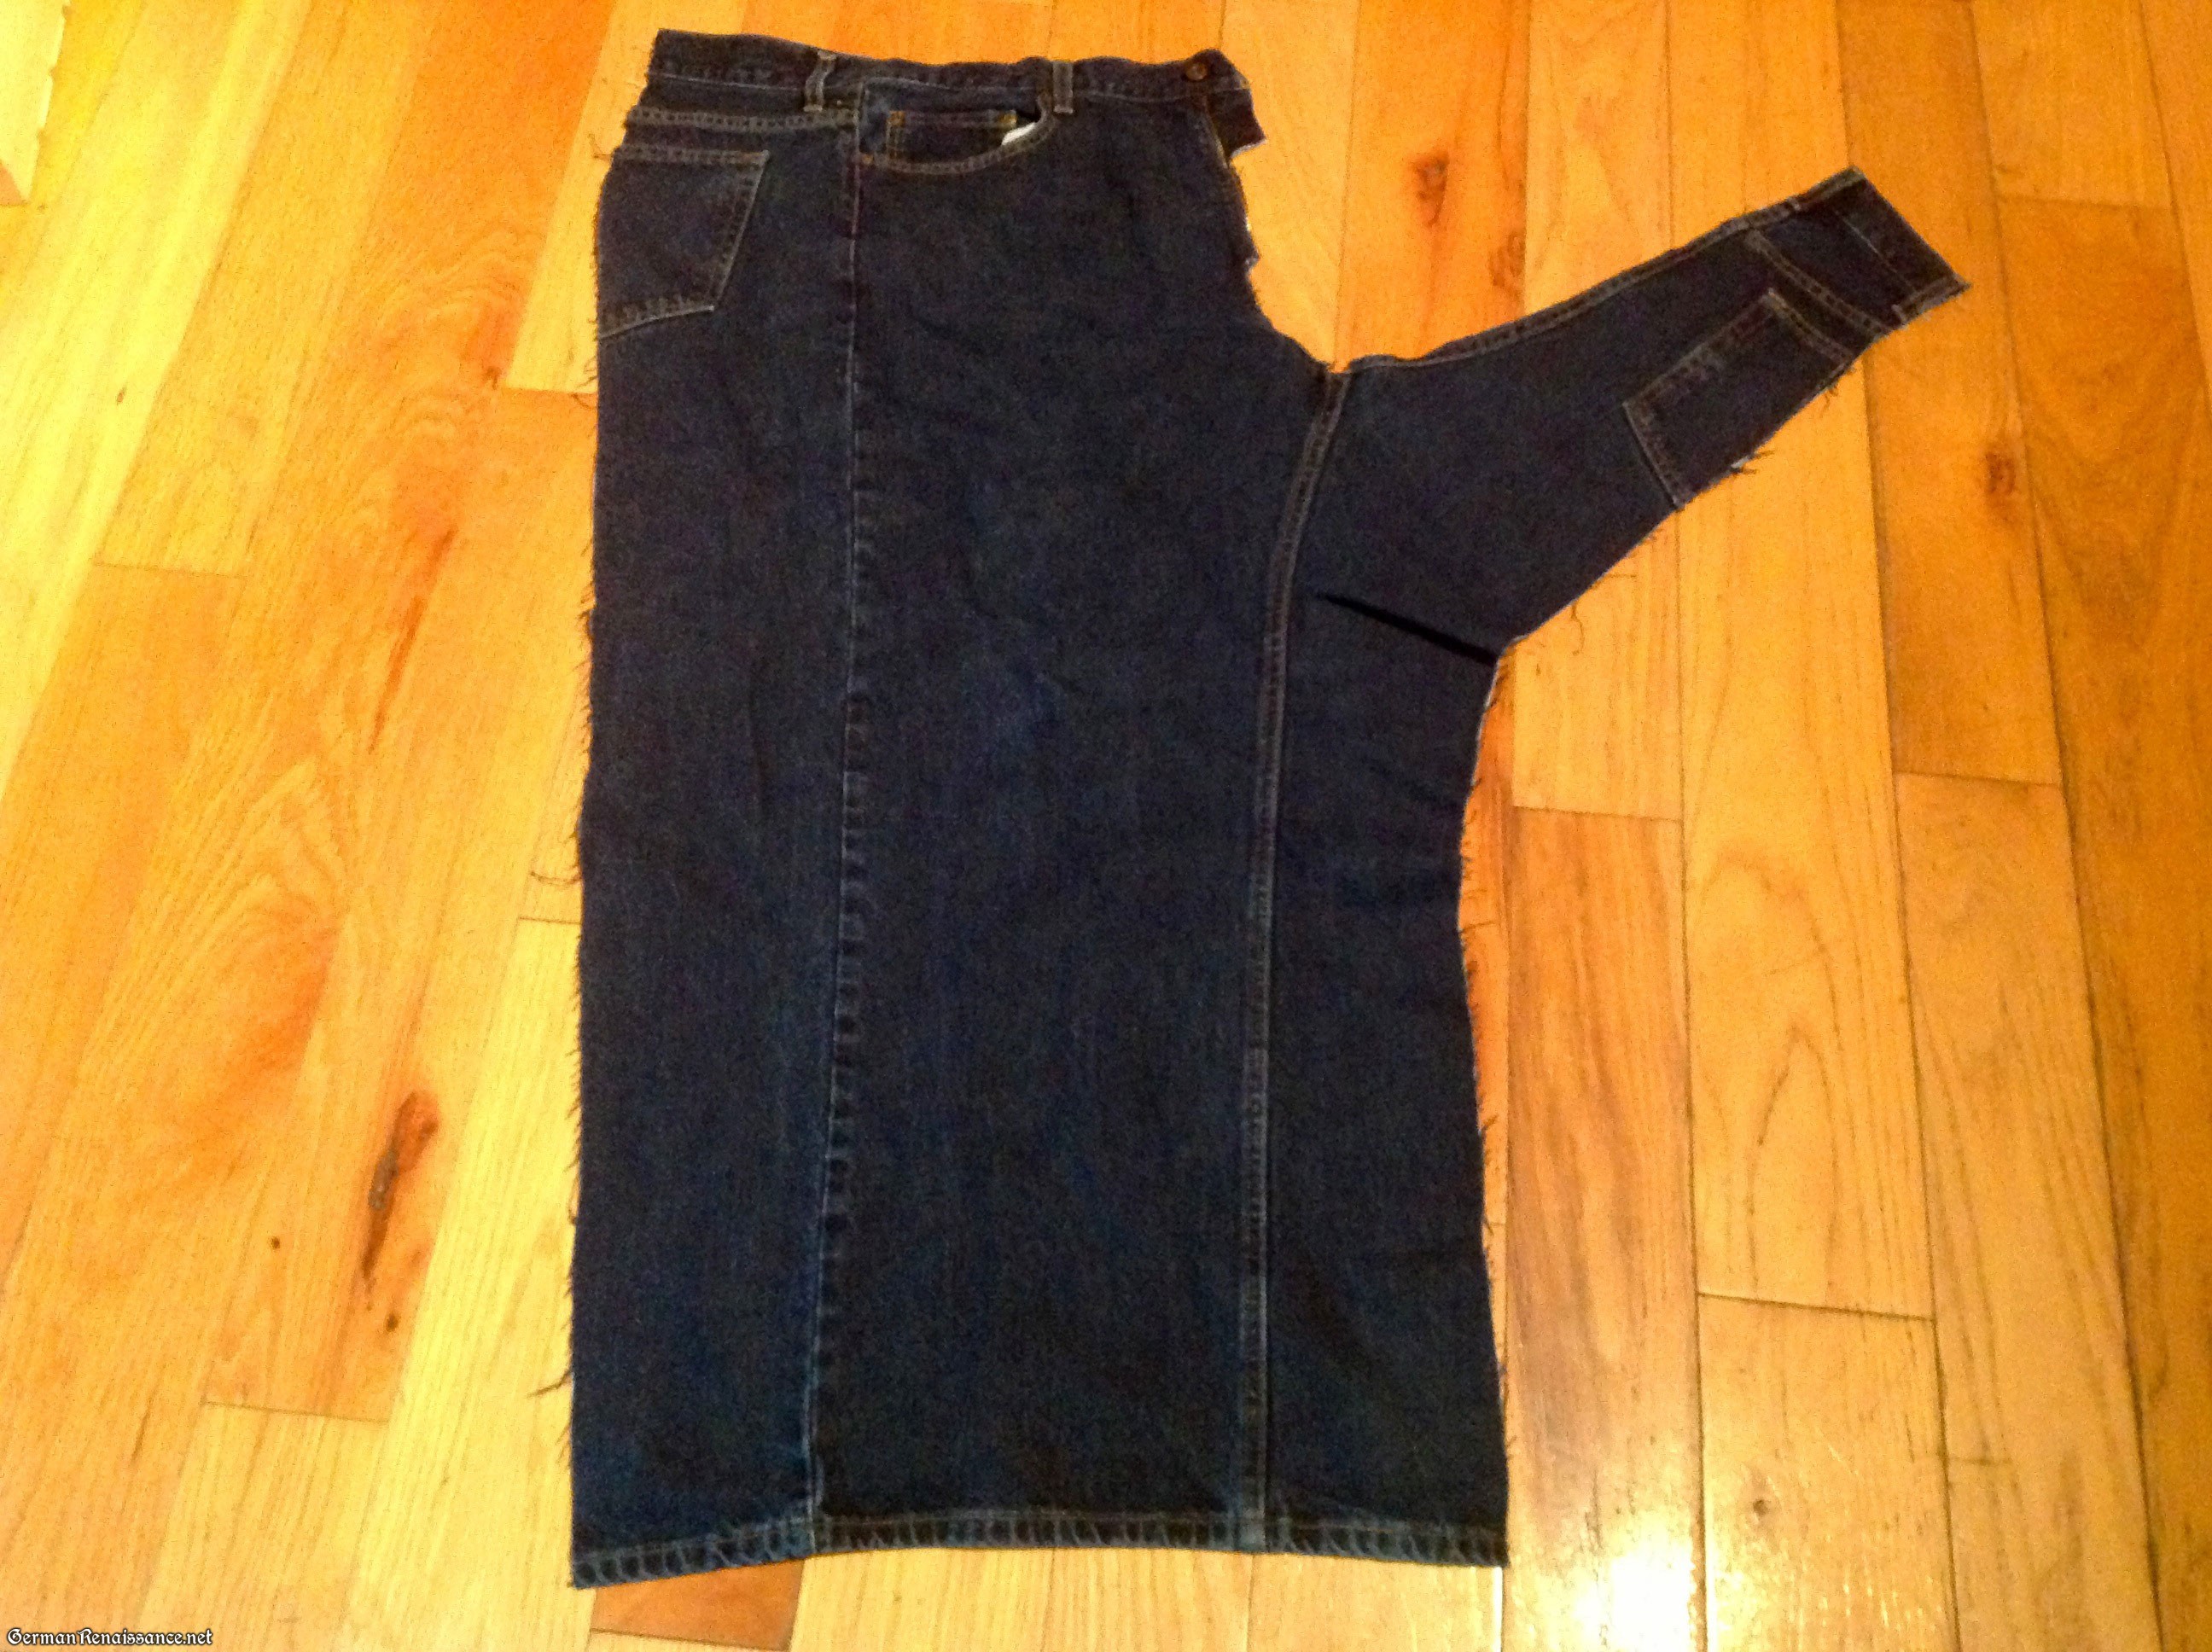
An old pair of jeans cut along the back of the leg.
And here is a diagram with the hosen pieces:
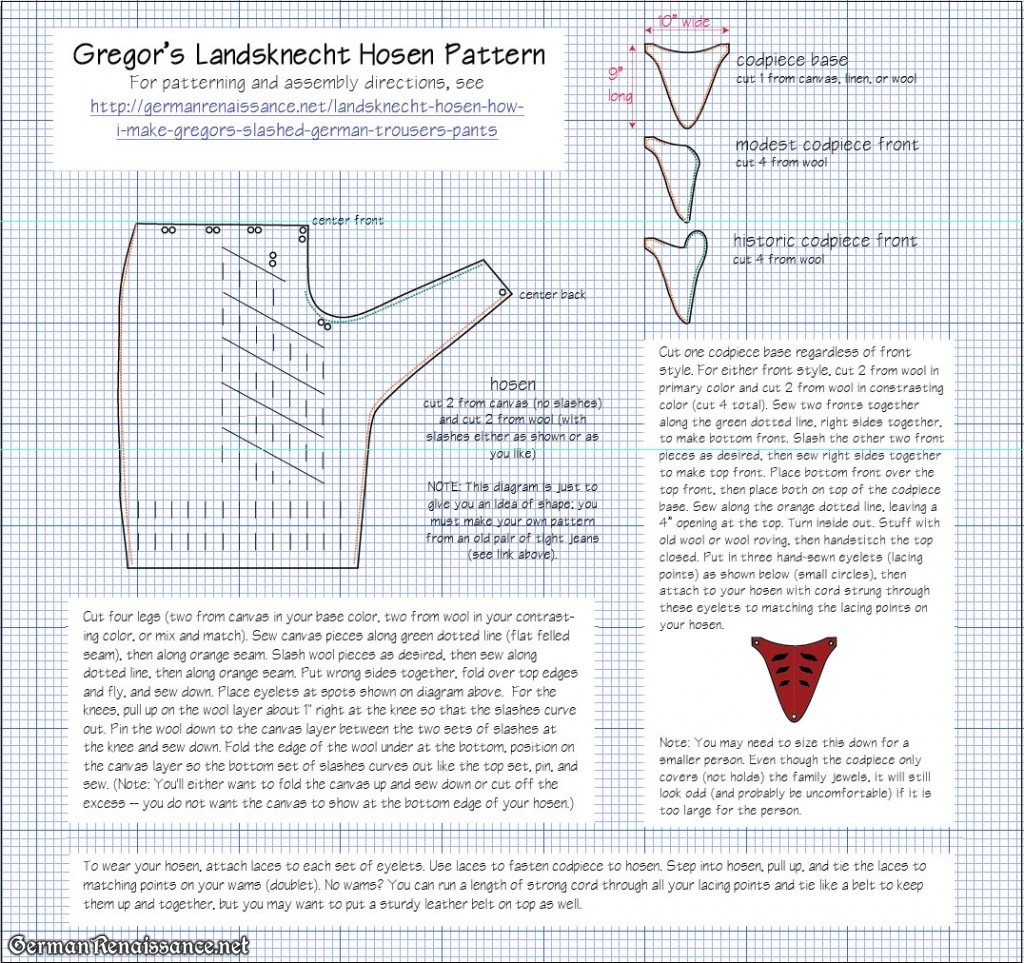
Click to view the PDF pattern
4. I layed out the pre-washed and pre-shrunk canvas so that the bias was perpendicular to me. (The bias is the diagonal line between the warp and weft. Watch this video if you need help identifying and cutting on the bias.) I placed the pattern from step 3 on the canvas so that the seams were as parallel to the bias as I could get them.
Very Important Note: I learned the hard way that this particular pattern method can cause issues with the rise if you are not mindful. If your jeans are like the ones we used, it’s likely they will not lie completely flat after being cut along the back. Note that there are some wrinkles on the right side. You want to keep the crotch area flat and allow the side to wrinkle up (just smooth it flat). If you try to bring that right side up so there are no wrinkles, it causes the rise to become too narrow. On the second pair of hosen, I did this by accident and the hosen did not fit him right — they were too tight in the crotch and when he did a test-squat, we heard a faint ripping noise. We had to re-cut them! (And this is why writing things down is so important!) Here is an informative post about pant rise and how crucial it is (includes a graphic if you need to understand what rise is better.)
5. I cut the canvas out along the pattern, adding in 1/2″ for seam allowances on the sides and 1″ for an allowance at the top. The bottom was cut about 6″-7″ below the knee, which wasn’t all the way to the ankle of the jeans.
6. I used the canvas I cut out in step 5 as my pattern to cut out the wool along the bias.
7. I sewed the two canvas legs together first at the crotch, then along the back seams. I used a flat felled seam for strength and appearance (the same type seam used on jeans). Here’s how to do a flat felled seam.
8. Gregor tried them on and they fit great. While they were on him, I looked at how they fit on his thighs and took measurements for where I wanted the slashing to go. He chose to have it only on the front and sides of his thighs (this is period, as is having it go all around).
9. I layed out the unsewn wool material I cut out in step 6 and identified the spot where the bottom edge of Gregor’s knee would be. Using chalk and scissors, I made two-inch-high marks two inches apart all along the width of the leg, then measured down two inches and chalked the same marks again. I marked the other leg in the same way.
10.With the material still layed out, I chalked the markings for the thigh. I used a ruler to get straight lines the same distance apart.
11. Now simply cut along your chalk marks with scissors. Some people use a sharp knife, but it’s never worked that well for me. One thing that is very important is to avoid slashing parallel to the warp or weft grain — if you do, the wool may want to fray, even fulled wool. If you need inspiration for slashing, check out the many woodcuts!
Optional: I was worried about fraying, despite the fulled wool and avoiding the grain, and I put Fray Block on the edges of my cuts. Your choice.
12. I sewed the two wool legs together at the crotch just as I did with the canvas base layer, then sewed up along the back seams.
13. I put the two hosen together (wool on top of canvas), nice and snug. I folded the top edge of the canvas over twice, then the top edge of the wool over once to cover the canvas edge, pinned in place, and sewed. I did the same for the fly.
14. For the knees, you need to pull up on the wool layer about 1″ right at the knee so that the slashes curve out. Pin the wool between the two sets of slashes at the knee and sew down. Fold the edge of the wool under at the bottom, position on the canvas layer so the bottom set of slashes curves out like the top set, pin, and sew. (Note: You’ll either want to fold the canvas up and sew down or cut off the excess — you do not want the canvas to show at the bottom edge of your hosen.)
15. I made a codpiece for Gregor by cutting one one codpiece base and four codpiece tops in wool (modest style) based on the pattern linked above. The wool tops were contrasting colors. I sewed two black fronts together along the green dotted line, right sides together, to make bottom front. I slashed the two red front pieces like shown in the pattern, then sewed right sides together to make the top front. I plaed the bottom front over the top front, then placed both on top of the codpiece base. I sewed along the orange dotted line, leaving a 4” opening at the top. I turned inside out and stuffed it with old wool scraps, then handstitched the top closed. I put in three hand-sewn eyelets (lacing points) as shown in the pattern (small circles), then attached to the hosen with cord strung through these eyelets to matching the lacing points on the hosen.
Here’s the original, well-worn pair of hosen, still going strong:
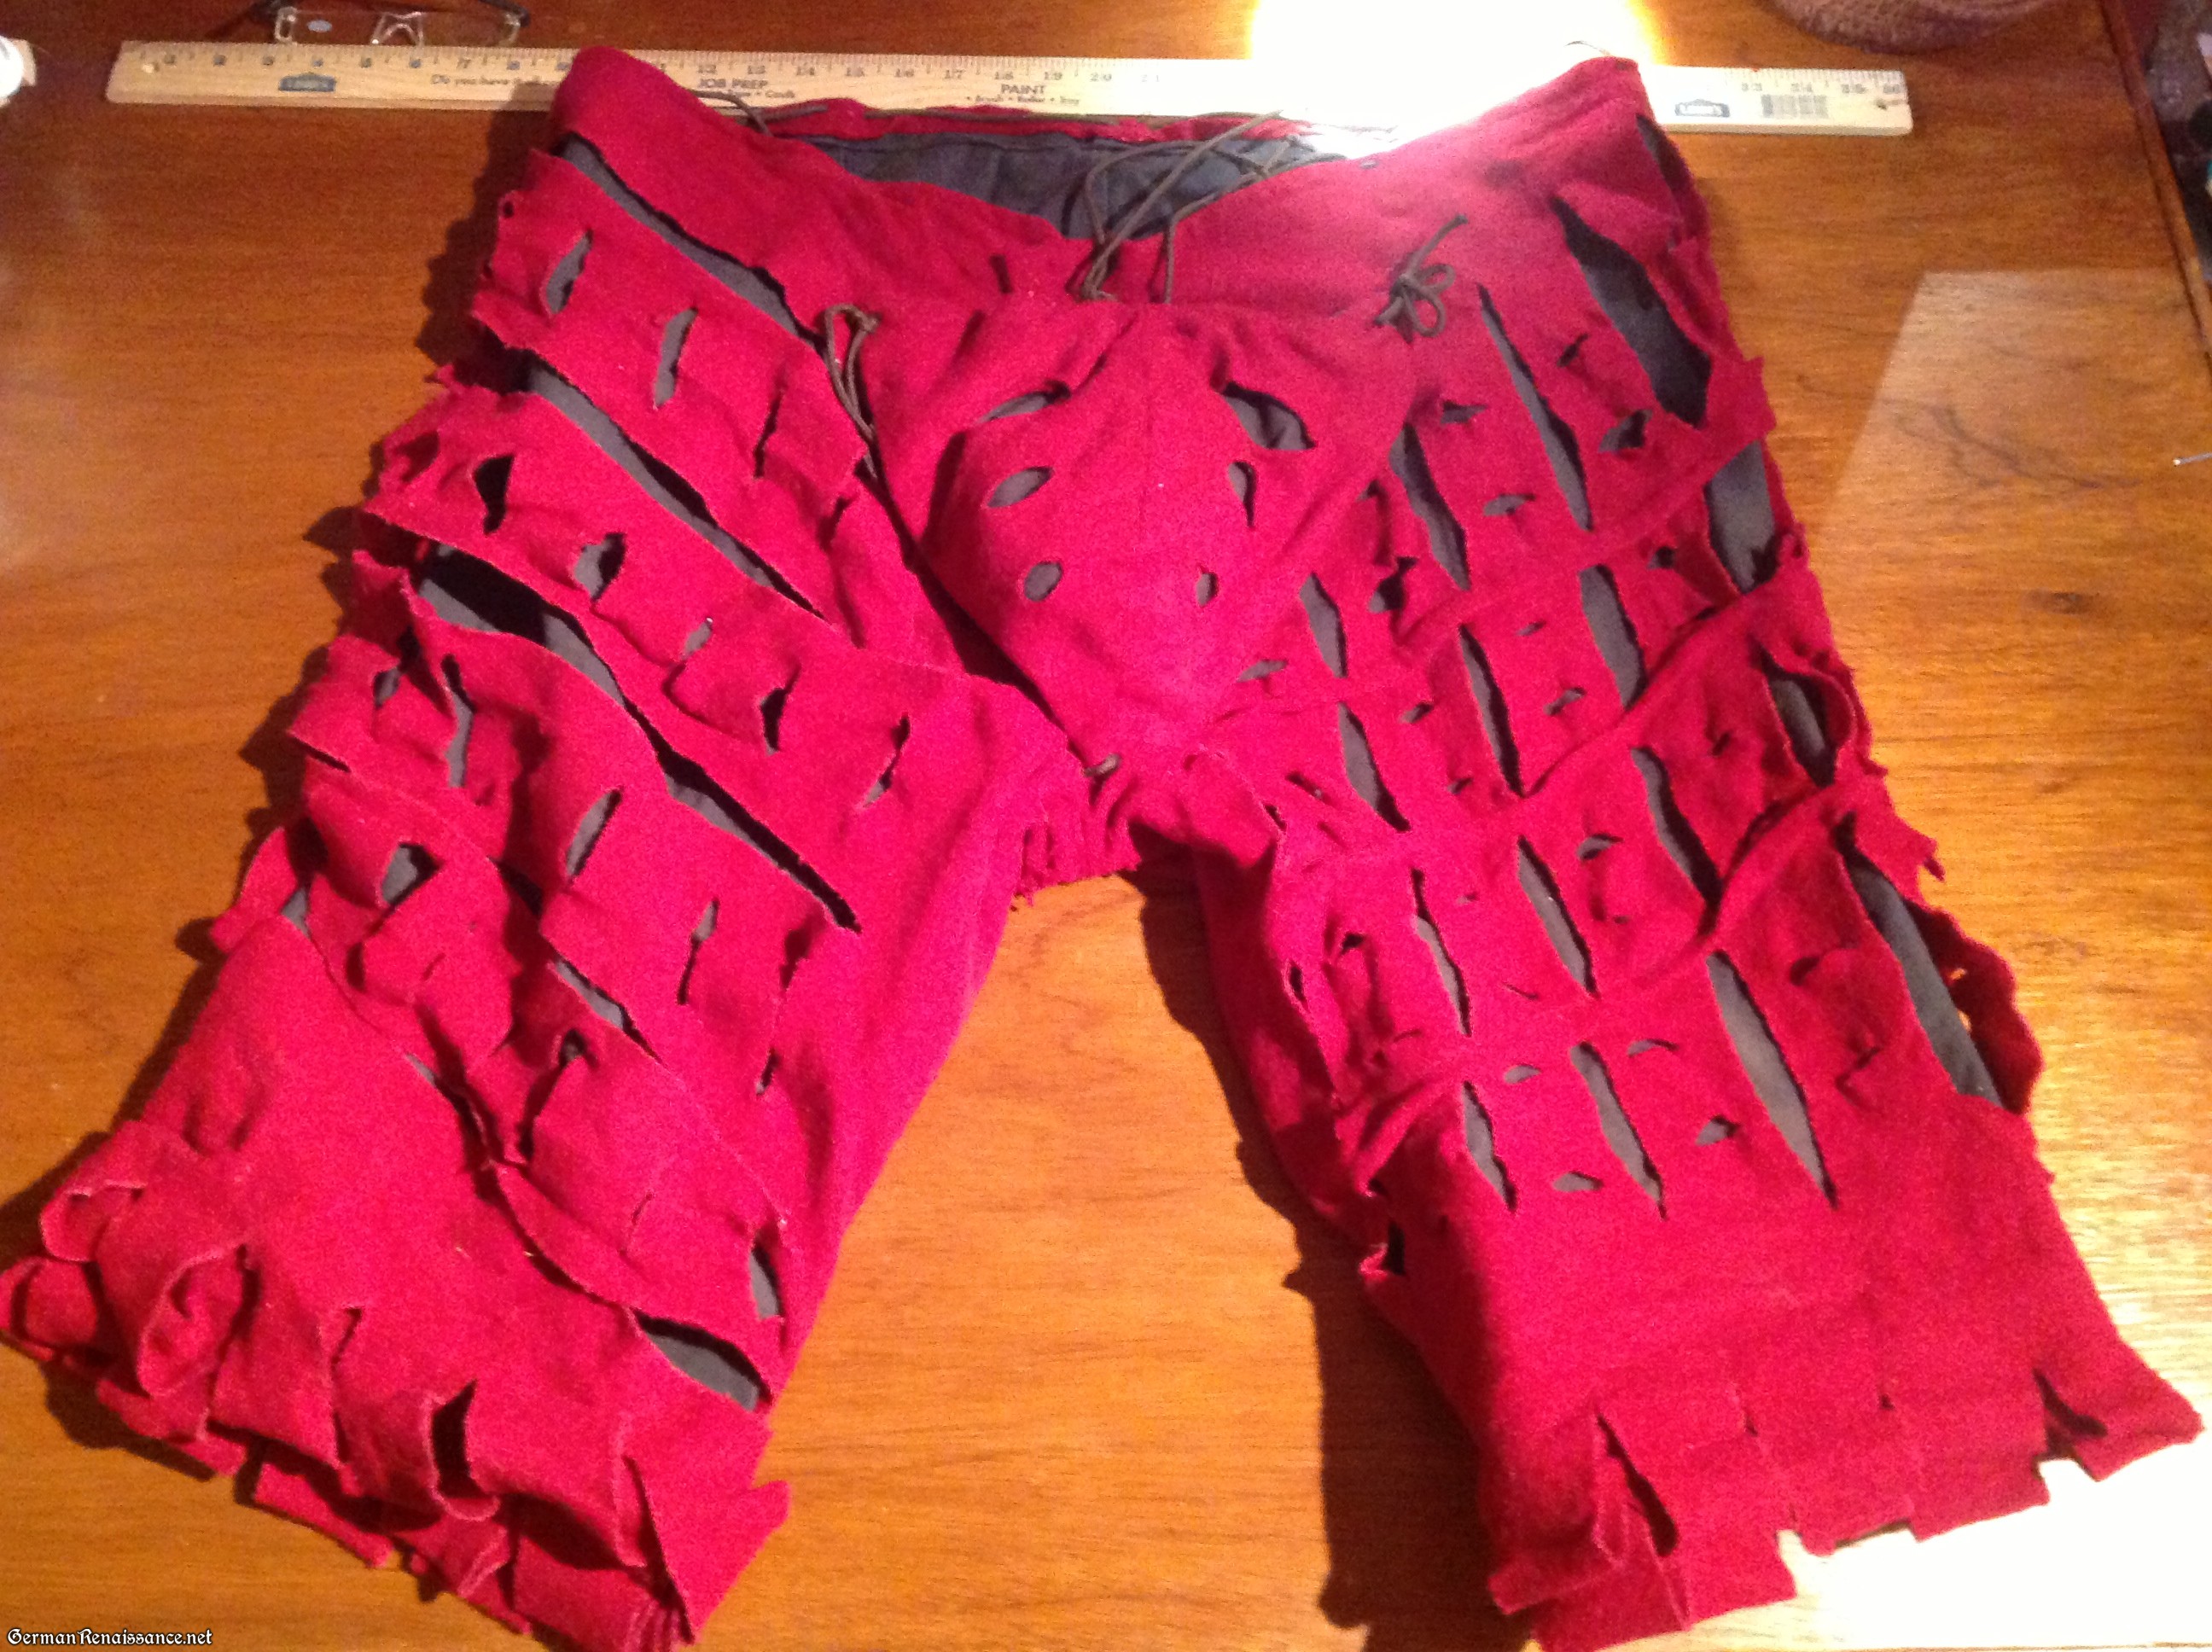
Well worn hosen
To wear hosen, you would normally attach laces to each set of eyelets, step into the hosen, pull up, and tie the laces to matching points on your wams (doublet). Depending on your body, you may even be able to attach your hosen to your wams first, then step into your wams then into your hosen and pull everything up (like this)! Gregor has no appropriate wams (yet), so he runs a length of strong cord through all his lacing points and ties the cord like a belt to keep the hosen up and together, then wears his squire’s belt over that as well.
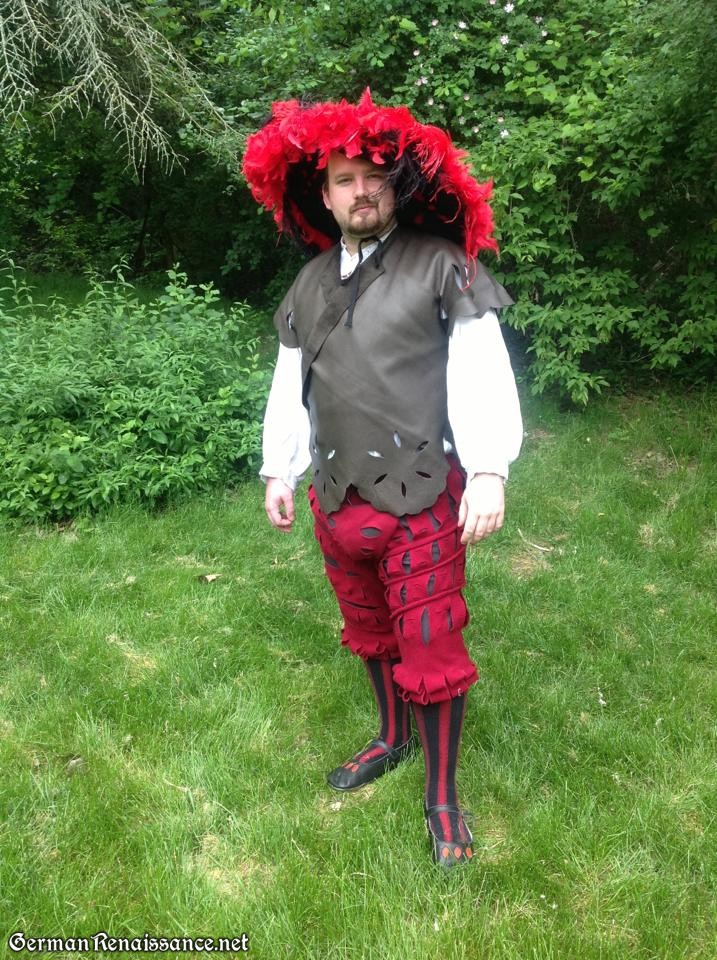
Gregor’s first pair of hosen!
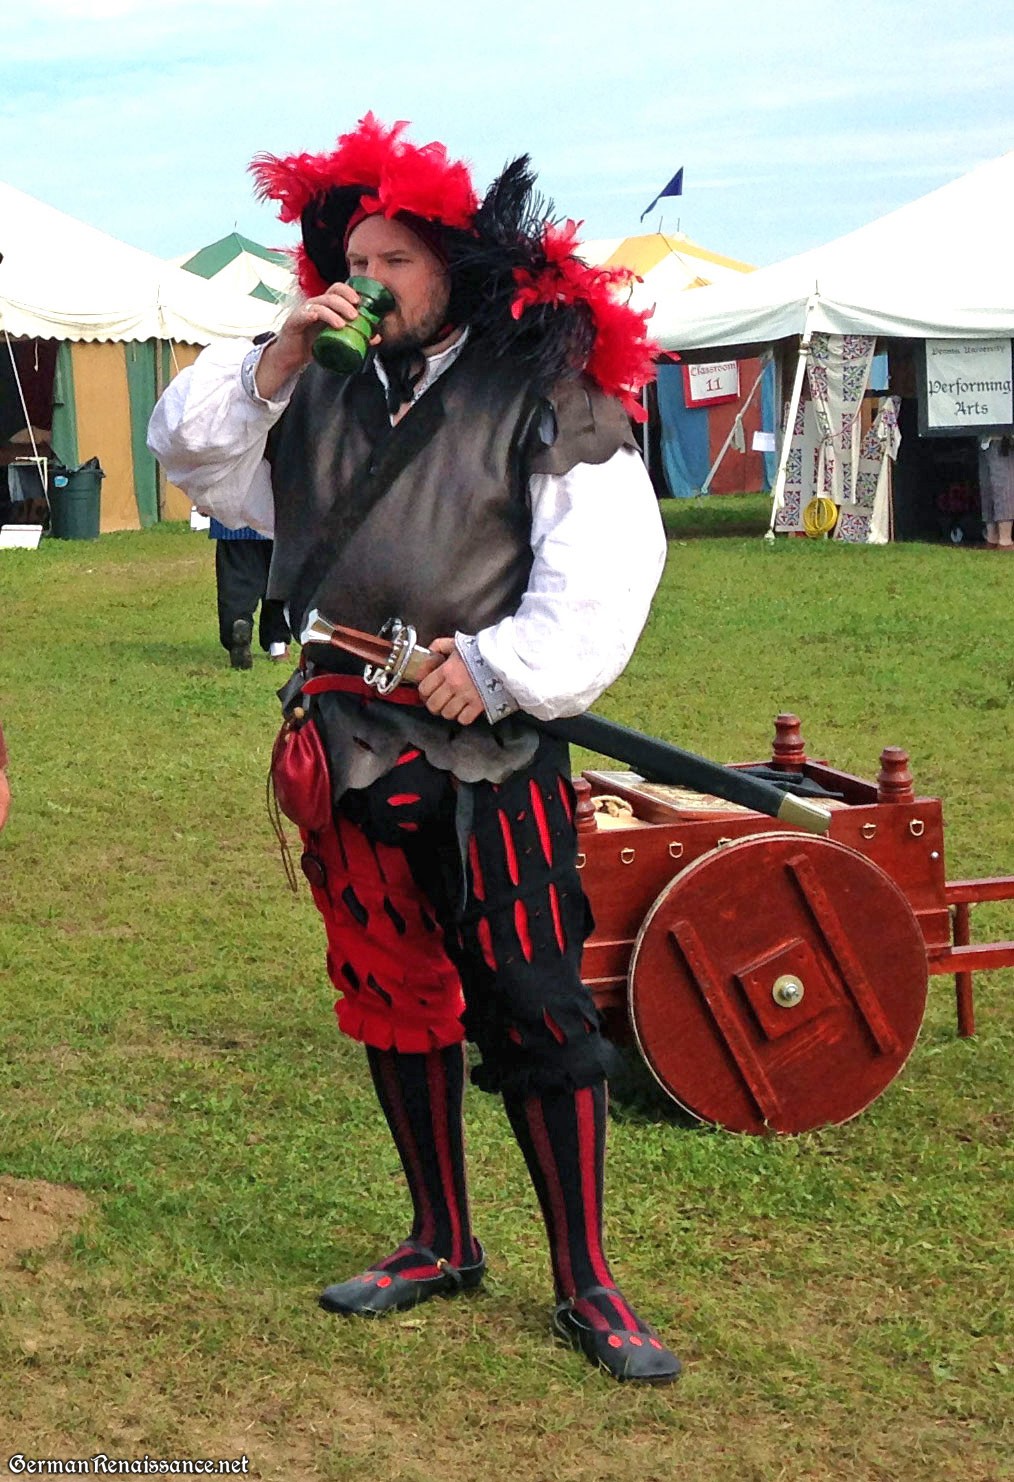
Gregor’s second pair of hosen.
There are certainly other ways of making hosen, such as this method posted by Kapten on Landsknecht.org and the full-length hosen pattern by Gottfried Kilianus. I plan to try the curved back seam version next. If you know of others, please share them with me.

Pingback: Kolskegg’s Outfit « Research Dumping Grounds