 For Pennsic this year I packed seven smocks for myself — some call them chemises or white linen underdresses, the German might say unterhemd (underdress) or Wäsche (the wash). My smocks are in a variety of styles and weights of linen, all worn before with success and all in good repair. Did I wear all seven over the course of the event? No. To my surprise I discovered I far and away preferred just one smock that I’d made a few days before Pennsic, and I wore it as often as I could because it was so comfortable and went with every gown I owned. I would actually alternate that favored smock with one of the others so I could wash and dry it for the next day. And, trust me, I wouldn’t have gone to all that work if I hadn’t REALLY liked it. I think I managed to wear this particular smock at least 8 or 9 days of the event. This is SO not my style — I’m the “I-like-to-wear-something-different-every-day” sort of girl.
What’s so special about this smock? It has several features I really liked that fit me, my particular wardrobe, and the warm, humid weather of Pennsic:
- Fabric weight: It’s made of white “tissue linen” from Jo-Ann’s (not to be confused with tissue linen from other places, like Fabrics-store.com). This tissue linen is 60% linen and 40% cotton. It’s light and airy, and feels great against your skin on hot, muggy days. Better than 100% linen, which has a heavier feeling than this based on my experience. I did several experiments at Pennsic last year, and this tissue linen was my definite favorite. (Note: I only recommend the tissue linen for hot weather — otherwise go for 100% linen.)
- Length: This smock does not go down to my knees (or further) like my other smocks — it’s only about mid-thigh length. So not only is there less material to deal with in general, but when I kirtle my German gowns in the Landsknecht fashion, you cannot see the edge of my smock peeking out below immodestly.
- Sleeves: The sleeves are big and poofy, which meant more air circulation and it allowed the sleeves to billow out nicely on my gown with the slashed sections. Also, I put elastic at the wrists (I would have smocked/pleated them for the same effect — it’s “medieval elastic,” you know — but I ran out of time) and this allowed me to push my sleeves up and stay cooler.
- Shoulders: My pattern shows a triangular section cut off at each shoulder, which moves the sleeve seam higher up so it is usually hidden under your gown strap. This construction method is period — it appears on Nils Svantesson Sture shirt from 1567 (on permanent display at Uppsala Cathedral in Sweden). I should not that this is NOT a raglan sleeve, as the seam does not go up to the collar, but rather just moves the sleeve up to a more vertical position when worn.
- Neckline: The smock has a high collar, but a long opening cut below it, giving the smock a deep V-neck appearance. This was comfortable and cool, and flattering on me.
- Collar: The collar is pleated in a simple and relatively large honeycomb pattern. It only took a few hours to do it and held up to stretching, pulling, and hand-washing, and it felt very authentic!
So I thought I’d share the pattern for this fantastic smock with anyone else out there who might be looking to make such a garment. My pattern is mostly one-size-fits-all, but feel free to adjust it. My inspiration for the smock came from Baroness Sylvie’s work on her own hemd, which you can read about on her blog (thank you!). And this smock is unisex — Gregor accidentally put it on thinking it was one of his and he looked great in it.

Yes, that collar is 22″ wide on both the front and the back, meaning it’s 44″ wide. But don’t worry — it all gets smocked down into a 16″-17″ wide collar.
Here are the step-by-step directions for my collared smock:
1. Purchase (or find) at least 2 2/3 yards of linen that is at least 48″ wide (the tissue linen I mentioned earlier is 54″ wide).
2. Pre-wash (and pre-shrink) your linen. Iron it.
3. Fold your linen in half so you have a square at least 48″ wide by 46″ long, with the fold on the 48″ length, as shown in the cutting pattern above.
4. Cut out your smock pieces as shown in the fabric. When done completely, you will have eight pieces — two sleeves that are 24″ long by 20″ wide, four gusset triangles, and two body pieces 43″ long by 36″ wide.
5. Sew the shoulder and collar seams of the two body pieces together, as shown below. I recommend a French seam or a flat-felled seam.

6. Decide which side you want to be the front (they should be identical) and make a 9″ cut in the top center for the collar opening. Remember: This cut is one ONE side only.

7. Hem the top of the collar and the collar opening. I recommend a small rolled hem done by hand. It doesn’t really take that long.
8. Lay the top end of the sleeve against the edge of the body piece, matching the center line of the sleeve with the shoulder seam of the body. Sew the sleeve to the body, as shown below. Repeat for the other sleeve. (Again, I recommend a French seam or flat-felled seam.)

9. Sew a gusset triangle to the point where the end of the sleeve and body meet, as shown below. Repeat for all the gusset triangles. I like to do French seams here.
 10. Now just sew the two sides together from the wrist of the sleeve, along the gusset, and down to the bottom of the smock, as shown below:
 The smock construction is complete — now all that remains is the pleatwork on the collar. I explain how to do that in my next post!

That looks great!
I spent all of Pennsic wearing mainly one chemise made of fabric-store.com IL20 light weight linen. Aside from that one time when I got caught in the rain (wet chemise contest anyone?) it was nice and light and airy.
Sylvie
I make most of my linen gowns from IL019 from fabrics-store.com, but I haven’t tried the IL020 yet — I’ll order some and give it a try. I’ve tried the IL030 (2.8 oz), which was at one time labelled as tissue linen on their site, but it was so gauzy, too coarse, and I got a sunburn right through it! Thanks for the tip. 🙂
Hi, thank you for the smock pattern but can you tell me if you have a photo of the finished product? I’ve been all over your website and can’t seem to find one for My Favorite Pennsic Smock: Pattern For a High-Collared Unterhemd with Honeycomb Pleatwork.
please advise
Debbie
I am wearing it in the photo at the top of this page. I will take a photo of spread out on a flat surface soon. I still love this smock. It is so comfortable.
Wondering if a bias finish on the neckline cut would be workable/appropriate?
A bias binding on the neckline rather than a hem? I have seen casing strips at the tops of pleated garments, though they were cut straight on the grain, not on the bias. Hope that helps! 🙂
This is just lovely! I have one question about your underarm gussets. I understood that gussets would be a single square, not two adjacent triangles. I thought the whole point of a gusset was to get a little extra stretch, supplied by the bias of the square. If you have a seam on that diagonal, you lose the stretch factor. Do you know if there’s a historical precedent for the two-triangle gussets? I am curious about that – I’ve only ever seen the squares, but I may well have overlooked something obvious.
Interesting question! I always thought the gussets were to provide increased range of arm movement, not stretch — I have not heard the stretch idea before! I use two-part gussets (the triangles) on things I want to sew up quickly. They do the job without any issues, offering plenty of range of motion. I think I got the idea for this either from Norse-era tunics or from Drea Leed’s “Well Dress’d Peasant: 16th Century Flemish Workingwomen’s Clothing,” which also uses the triangular gussets (see http://www.elizabethancostume.net/welldressdpeasant.pdf ). However, I cannot find any evidence they used this method, because this is what I use when I make smocks with a machine, and they wouldn’t have done that. When I make smocks by hand, I use a full square, like this: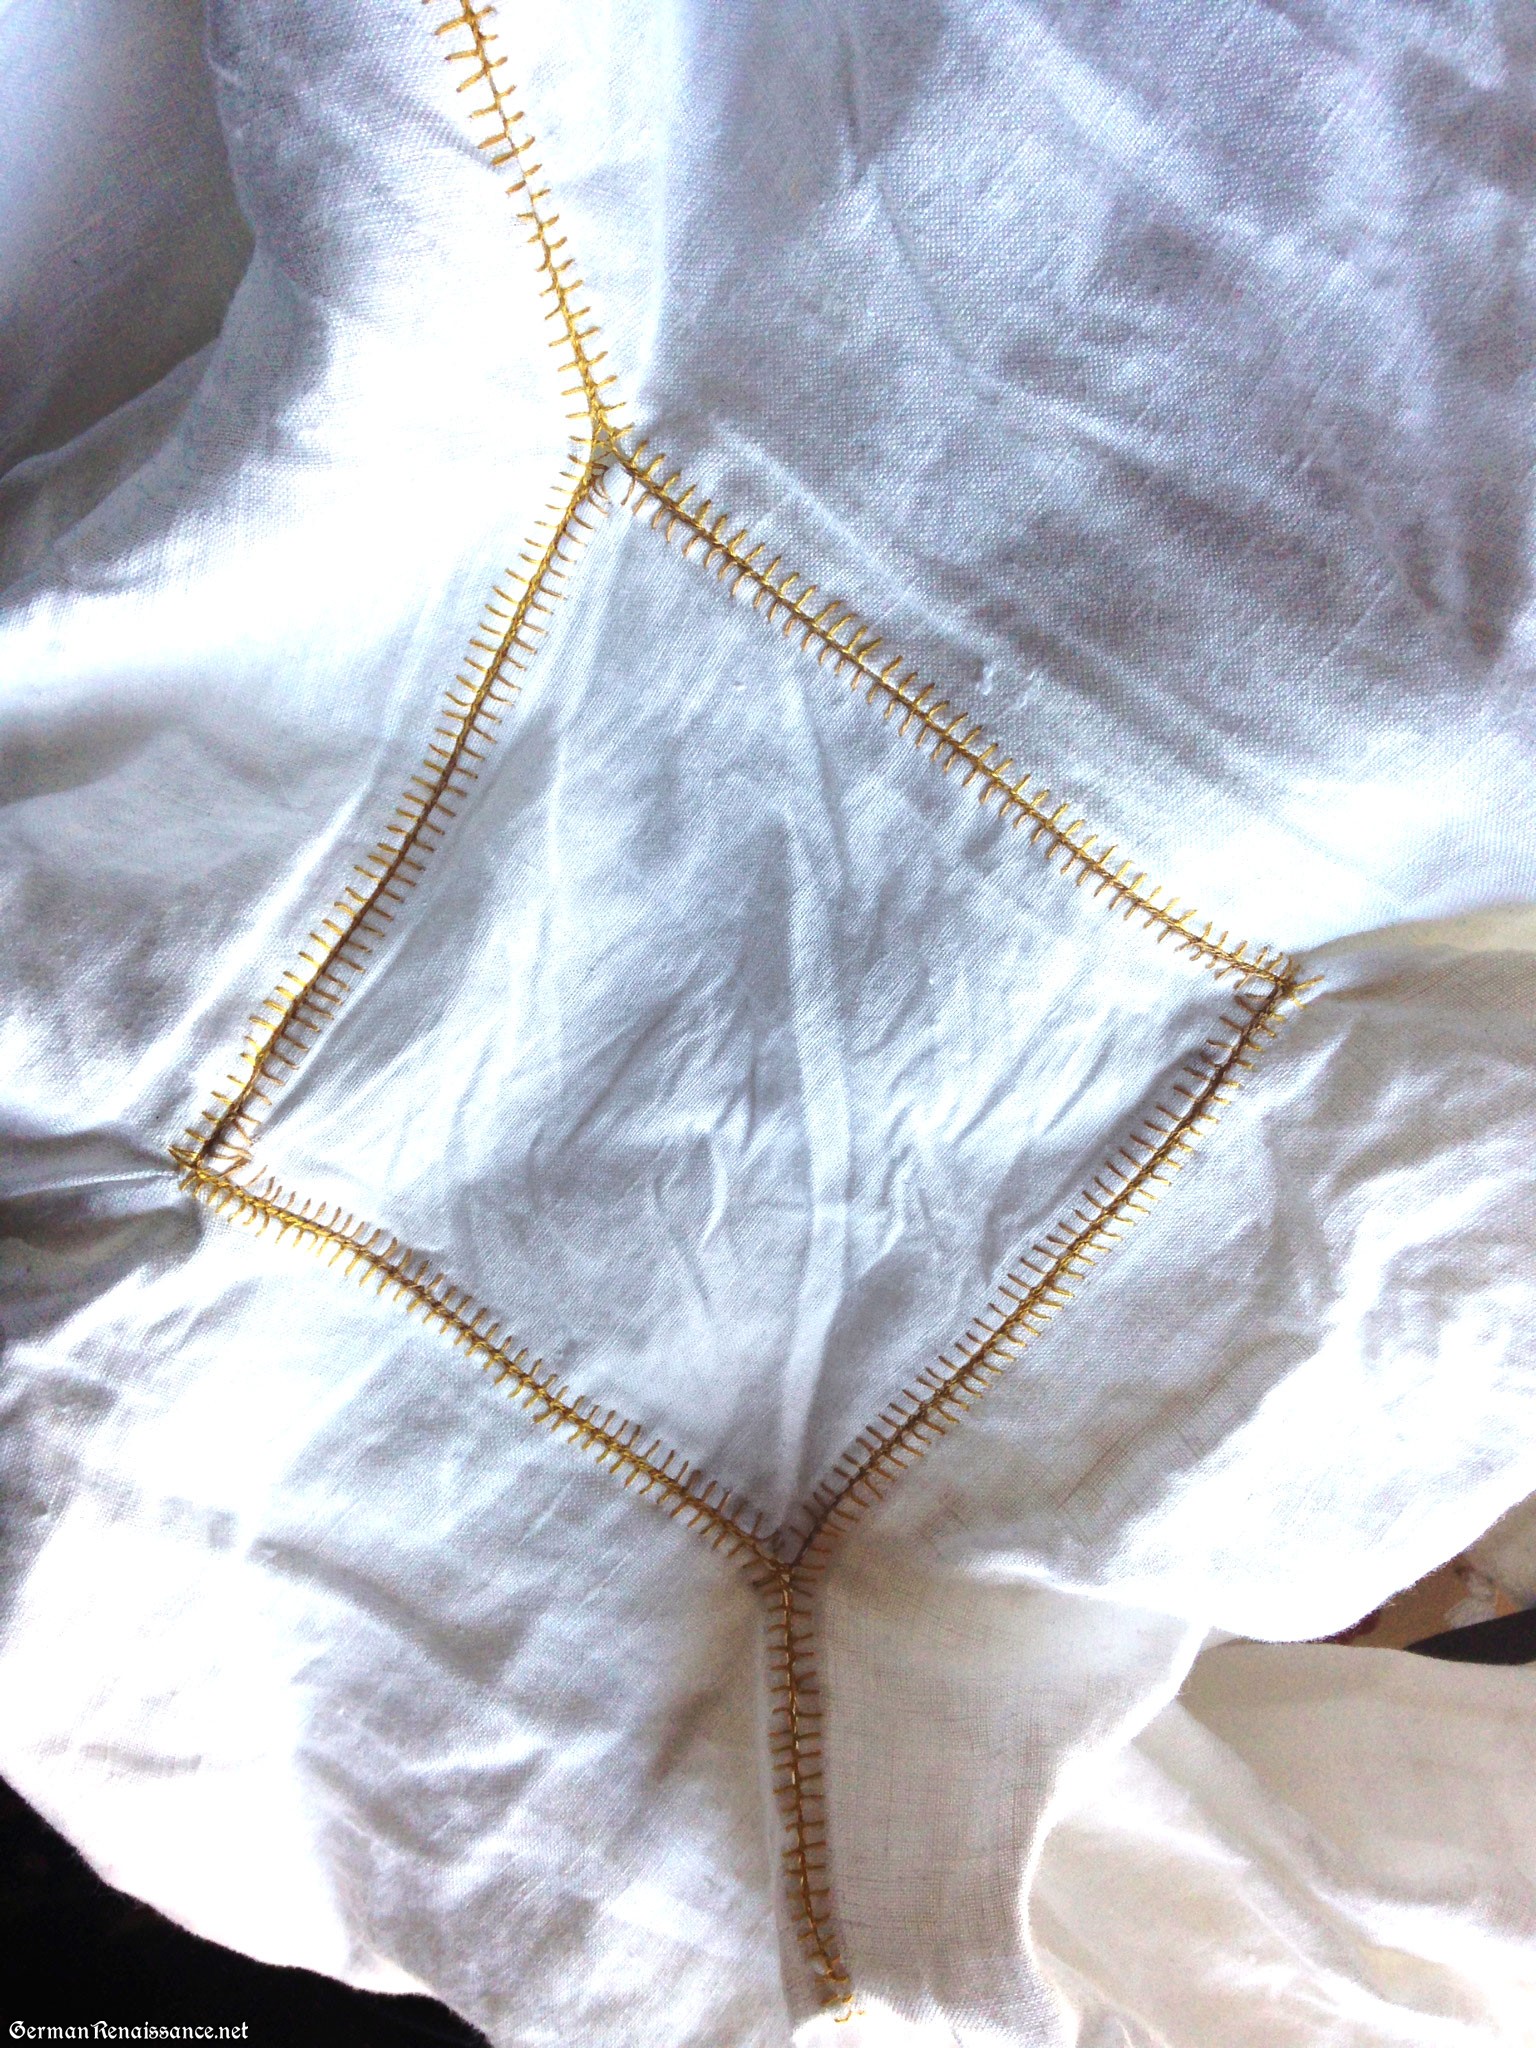
I’m so happy I found your site. All kinds of new passions are cropping up. I’m working on the shirt but it’s not draping right. Did you offset the neck or change the pleating gauge to get it lay right?
Hi, Gen! How is it draping wrong? It’s possible that on a different body it could lay wrong, but if that were the case, a different construction style might be warranted. While I know we offset other 16th c. shirts so that the neck opening is 1/3 in the back and 2/3 in the front, I haven’t come across any evidence that these pleated neck shirts had an offset neck. But that doesn’t mean they did not. Let me know what’s up and maybe I can propose a solution!