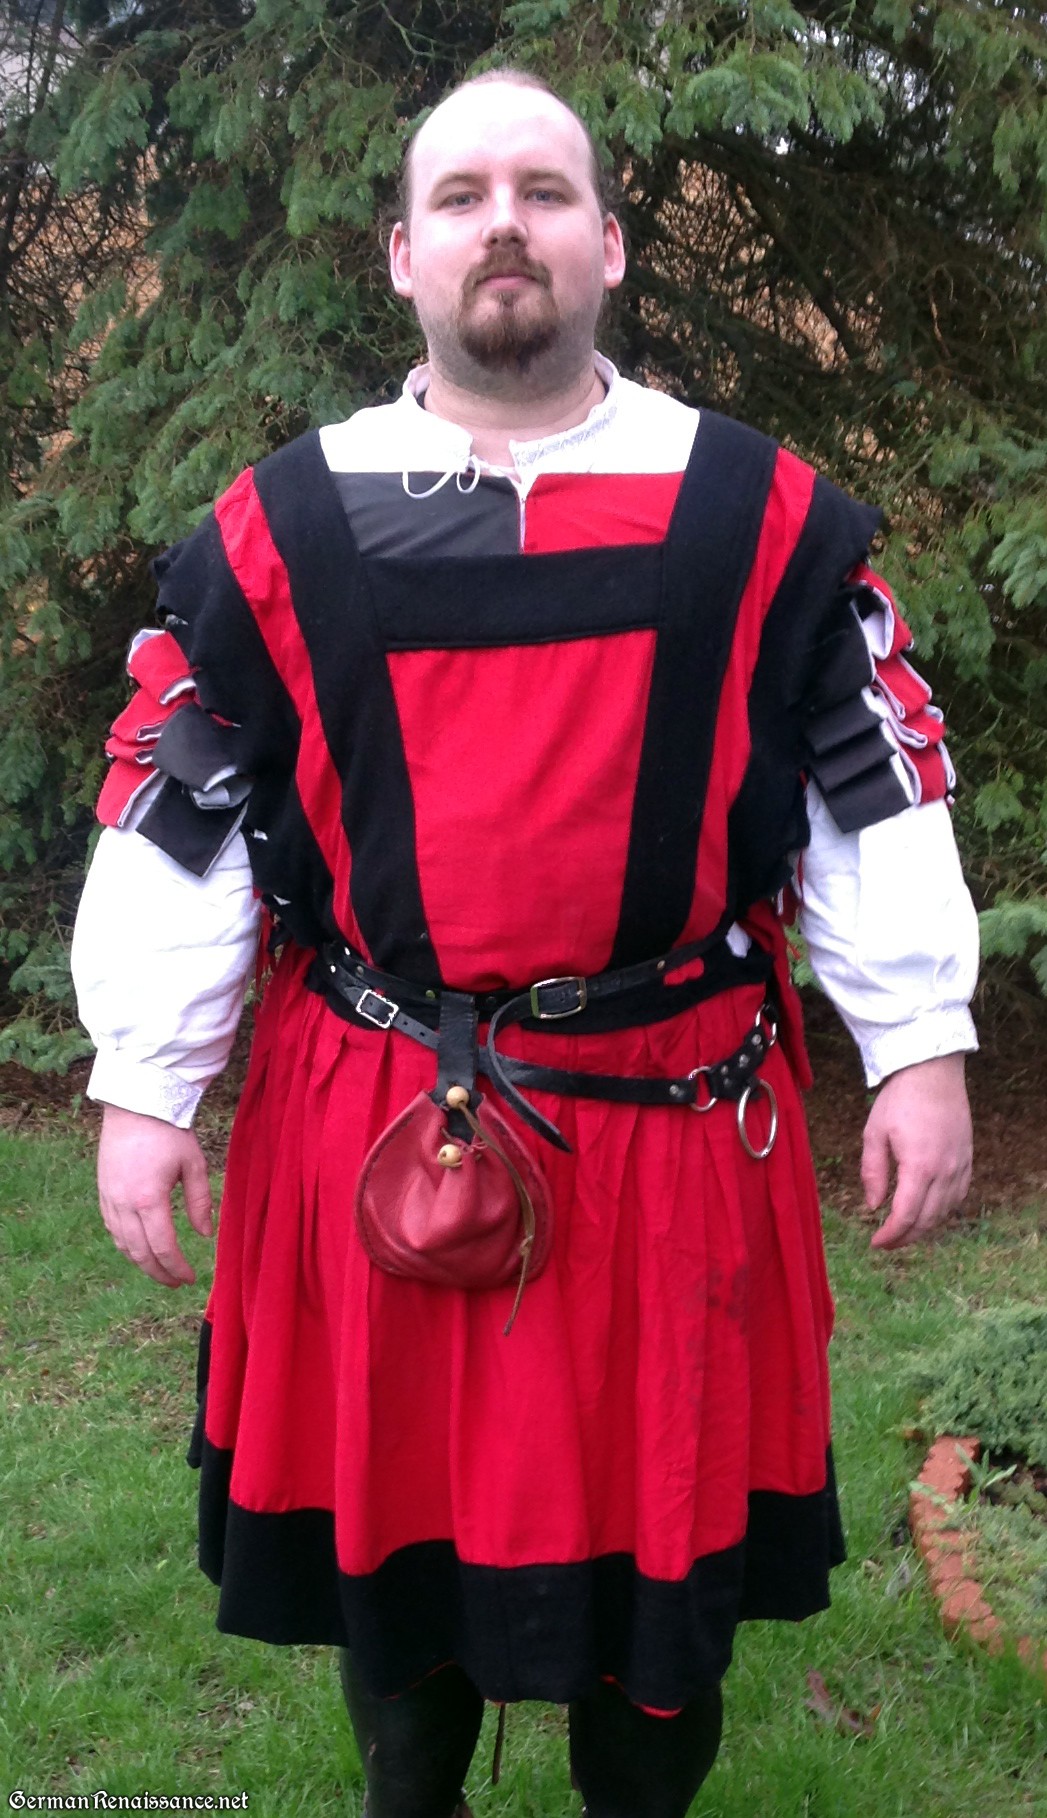
The Waffenrocket!
Tabards (wappenrock) are popular for SCA fighters because they’ll cover up less-than-period armor and just generally make one look good without a lot of effort. And while my fighter (Gregor) has plenty of good things to wear, he tends to go back again and again to the tabard for comfort and ease.
There’s just one problem — tabards aren’t something German Renaissance soldiers wore to battle. They wore wams (doublet), lederwams (leather vest), hosen, and waffenrock (arming dress). Wams and lederwams are too short for what we need here — we want to cover the upper legs, too. Gregor has a waffenrock, but his is very fitted and takes much too long to get in and out of on his own, which he has to do frequently. It’s also very heavy and hot. And it doesn’t adjust well to different shapes and layers of armor underneath it.
So together we came up with an idea of a simpler, sleeveless waffenrock that functions like a tabard. We’re calling it the Waffenrocket (no, not a real word!) — because it’s like a Waffenrock but faster to make and faster to get on and off. This design is not period, as far as we can tell, but it looks good and behaves like a tabard in that you can just toss it over whatever you’re wearing.
Note: It’s important to note that historic tabards were also a way of displaying one’s heraldic device or association with another individual or group. But I think that putting a heraldic device on the Waffenrocket would be going too far as the 16th c. German men never did that based on my research. Instead, I simply chose meaningful colors for the Waffenrocket. You can display your heraldry in other ways (shield, banners, flags, etc.)
So I thought I’d pass on how to make one to other fighters out there in need of a good, German tabard-like garment. Here’s how we made it:
 Materials:

- 2 yards of muslin or other non-stretchy material you don’t mind marking up
- 5 yards of linen or wool (we’re using linen because this is for the summer), at least 56″ wide
- 2 yards of linen or wool (wool will look better)
- matching thread
- 3 yards of cording
Instructions:
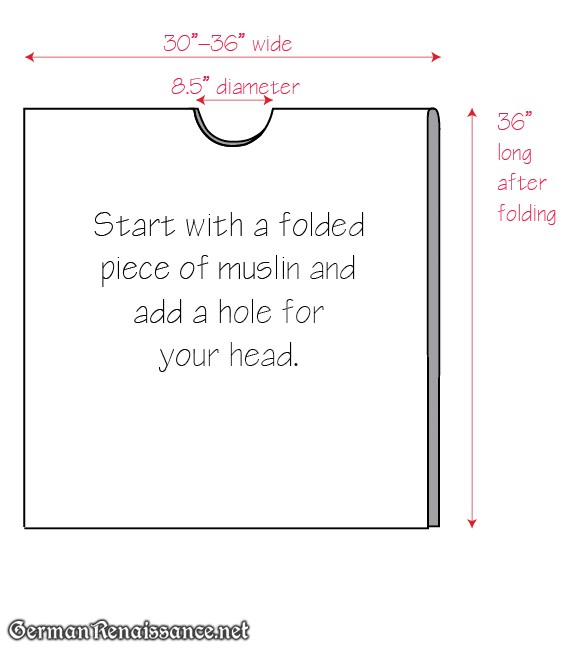
1. Take a 2 yard-long piece of muslin or other light-colored, non-stretch fabric, fold it in half crosswise. Cut a hole in the center for your head and put it on while wearing whatever you’d want to wear underneath (i.e., hemd, padding, armor, etc.). You should look like you’re wearing a poncho!
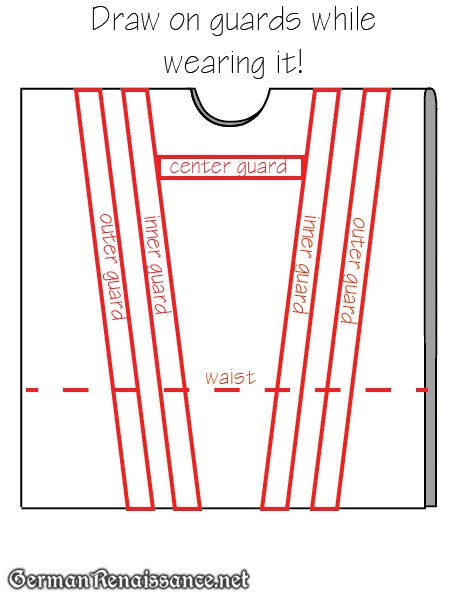
2. Using images of period waffenrock as a reference, draw right on the muslin where you want your neckline, cross guard, inside guard, outside guard, and waist to go. Important: To get the right look of the waffenrock, your waist should be around your natural waist and your guards should angle in as they go down. German men liked the small waist look (athleticism was highly prized at this time in history) and this V shape makes the waist look trimmer and gives the “right look.”
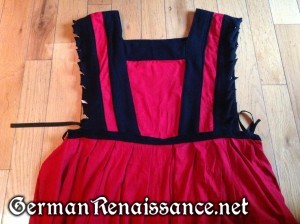
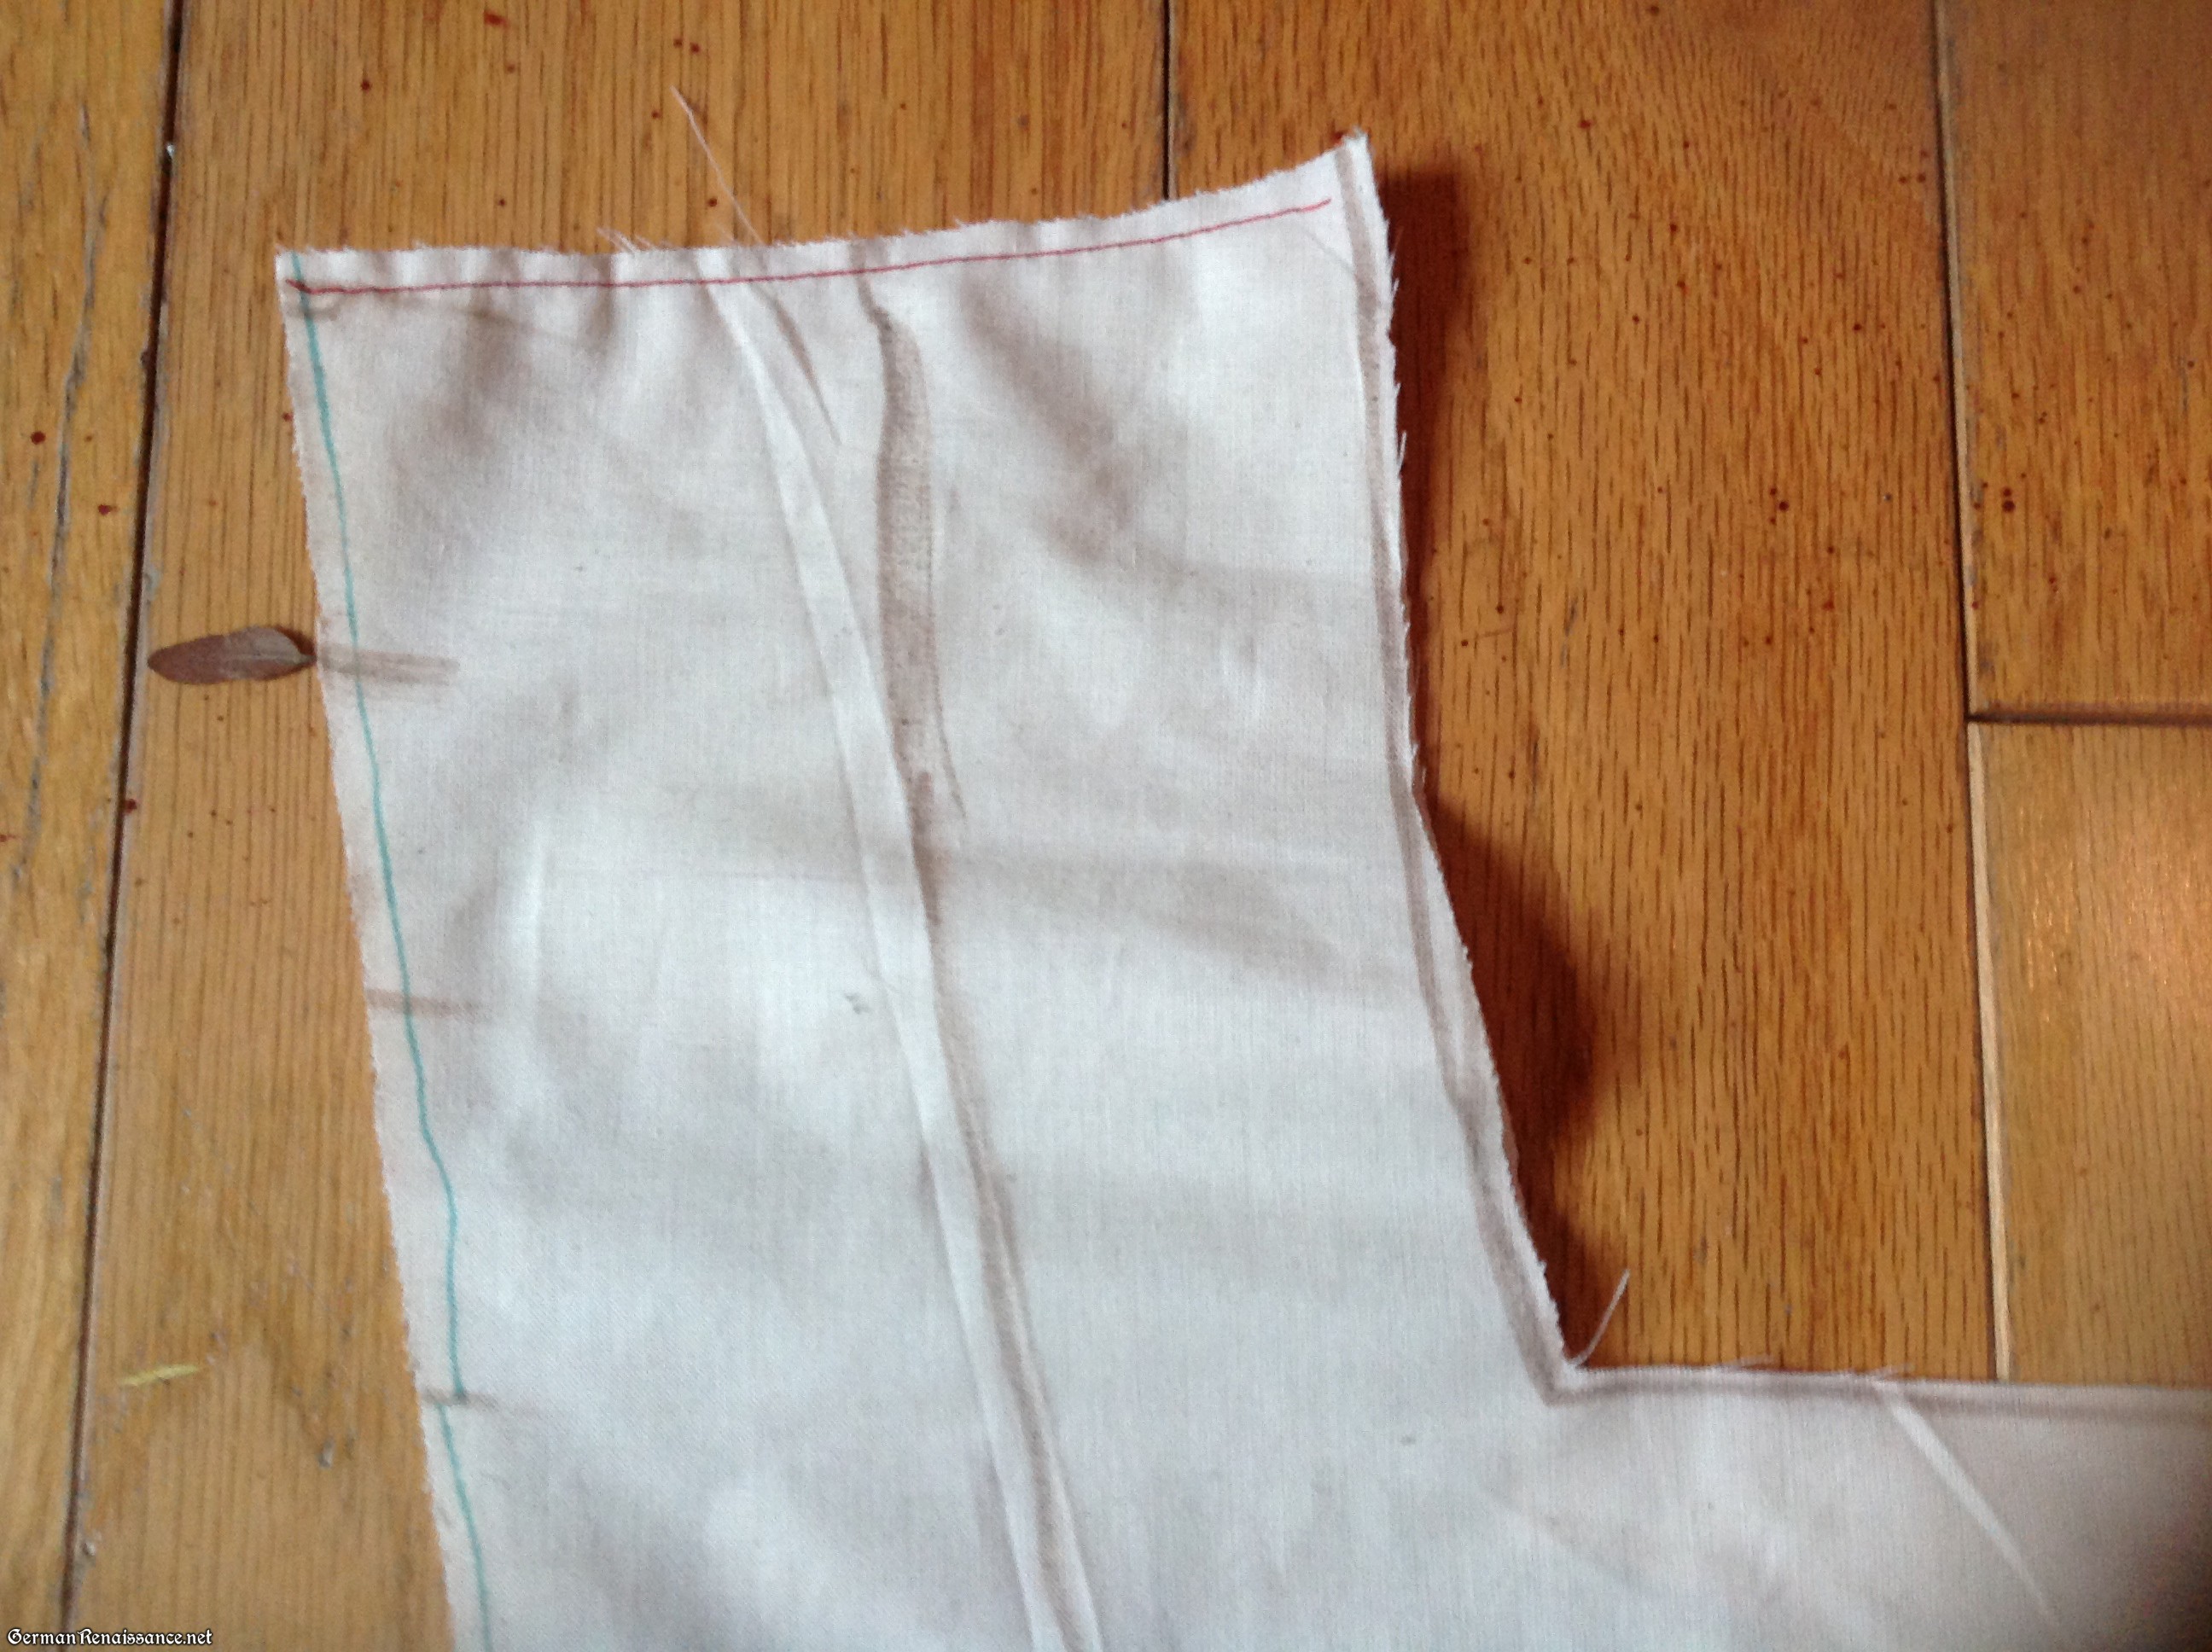
3. Take the muslin off your head, fold in half crosswise at the neckline and trim the sides where you drew the outer edge of the outer guard. Also trim the neckline where you indicated the inner edge of the center guards and the upper edge of the cross guard would go. I made Gregor’s Waffenrocket identical front to back, so it could be put on without worrying which way was right.

Our muslin trimmed at the neckline and sides. Note the shape!
4. Now, still using your muslin, sew straight lines at slight angles, sloping down from the neck to the shoulder. In other words, place a mark at the top of neckline and another mark about 1″ down at the shoulder, then sew a straight line between them. Repeat for the other side. These simple shoulder seams will minimize puckering when you wear it.
You can see the angle of the shoulder seam here.
5. The last step for your muslin is to cut it about 1″ below where you indicated the waist should be. This muslin is now your pattern for the upper section of your Waffenrocket!
6. Take your pre-washed and ironed material (we used linen for the main material) and fold it in half crosswise. Using your muslin pattern, cut out your linen and sew the shoulder seams. Set aside.

Slashing on the outer guard
7. Cut out guards for the top of your Waffenrocket. I found that 8″ strips for the outer guards and center guards, and 4″ strips for the inner guards worked well. If you want to do anything fancy with your guards, like slashing, do it now. Note that for best results, slashes should be cut on the bias of the fabric — this minimizes fraying.
8. Attach the center guard by covering the raw edge of the main fabric and folding over the raw edges of the guard, pin in place, and sew down. Do the same with the outer guard — cover the raw edge of the fabric with the guard, folding over the guard edges, pin, and sew. Repeat for the inner guard, which should overlap the raw edges of the center guard. When you’re done with this, the only raw edges left will be the ones at the bottom!
9. Put on all the armor and clothing you might want to wear at one time then put your the top you completed in step 8 on over it. Admire how great you look! Now measure your natural waist with everything on. Make a note of this measurement.
10. With the remaining three yards of your main fabric, cut it in half lengthwise so you have two long strips that are three yards each. These will form the skirt of your Waffenrocket.
11. Make rolled pleats in these two lengths of fabric for the front and back of your skirt (with side seams). For help making rolled pleats, see my article and calculator at http://germanrenaissance.net/rolled-pleats-photo-tutorial-and-pleat-spacing-calculator/ — you’ll want each side of your skirt to be roughly half the measurement you took in step 9.
12. Once pleated, sew the rolled pleats down for stability near the edge of the fabric before removing pins.
13. Join the seams of the skirts together (use a french seam or flat-felled seam) to create one big skirt where the waist is at least as big as your measurement in step 9. (Note: If you are making this without adding bulk underneath, you’ll need to add some inches to your measurement or you may find it hard to get on over your head.
14. Cut out guards for the bottom of your skirt with the remaining fabric. You can be creative here — have one or two guards, slash them, whatever. You’ll probably want at least one guard. Save a strip at least 4″ high by the length of the measurement from step 9 (+2 inches) for your waistband.
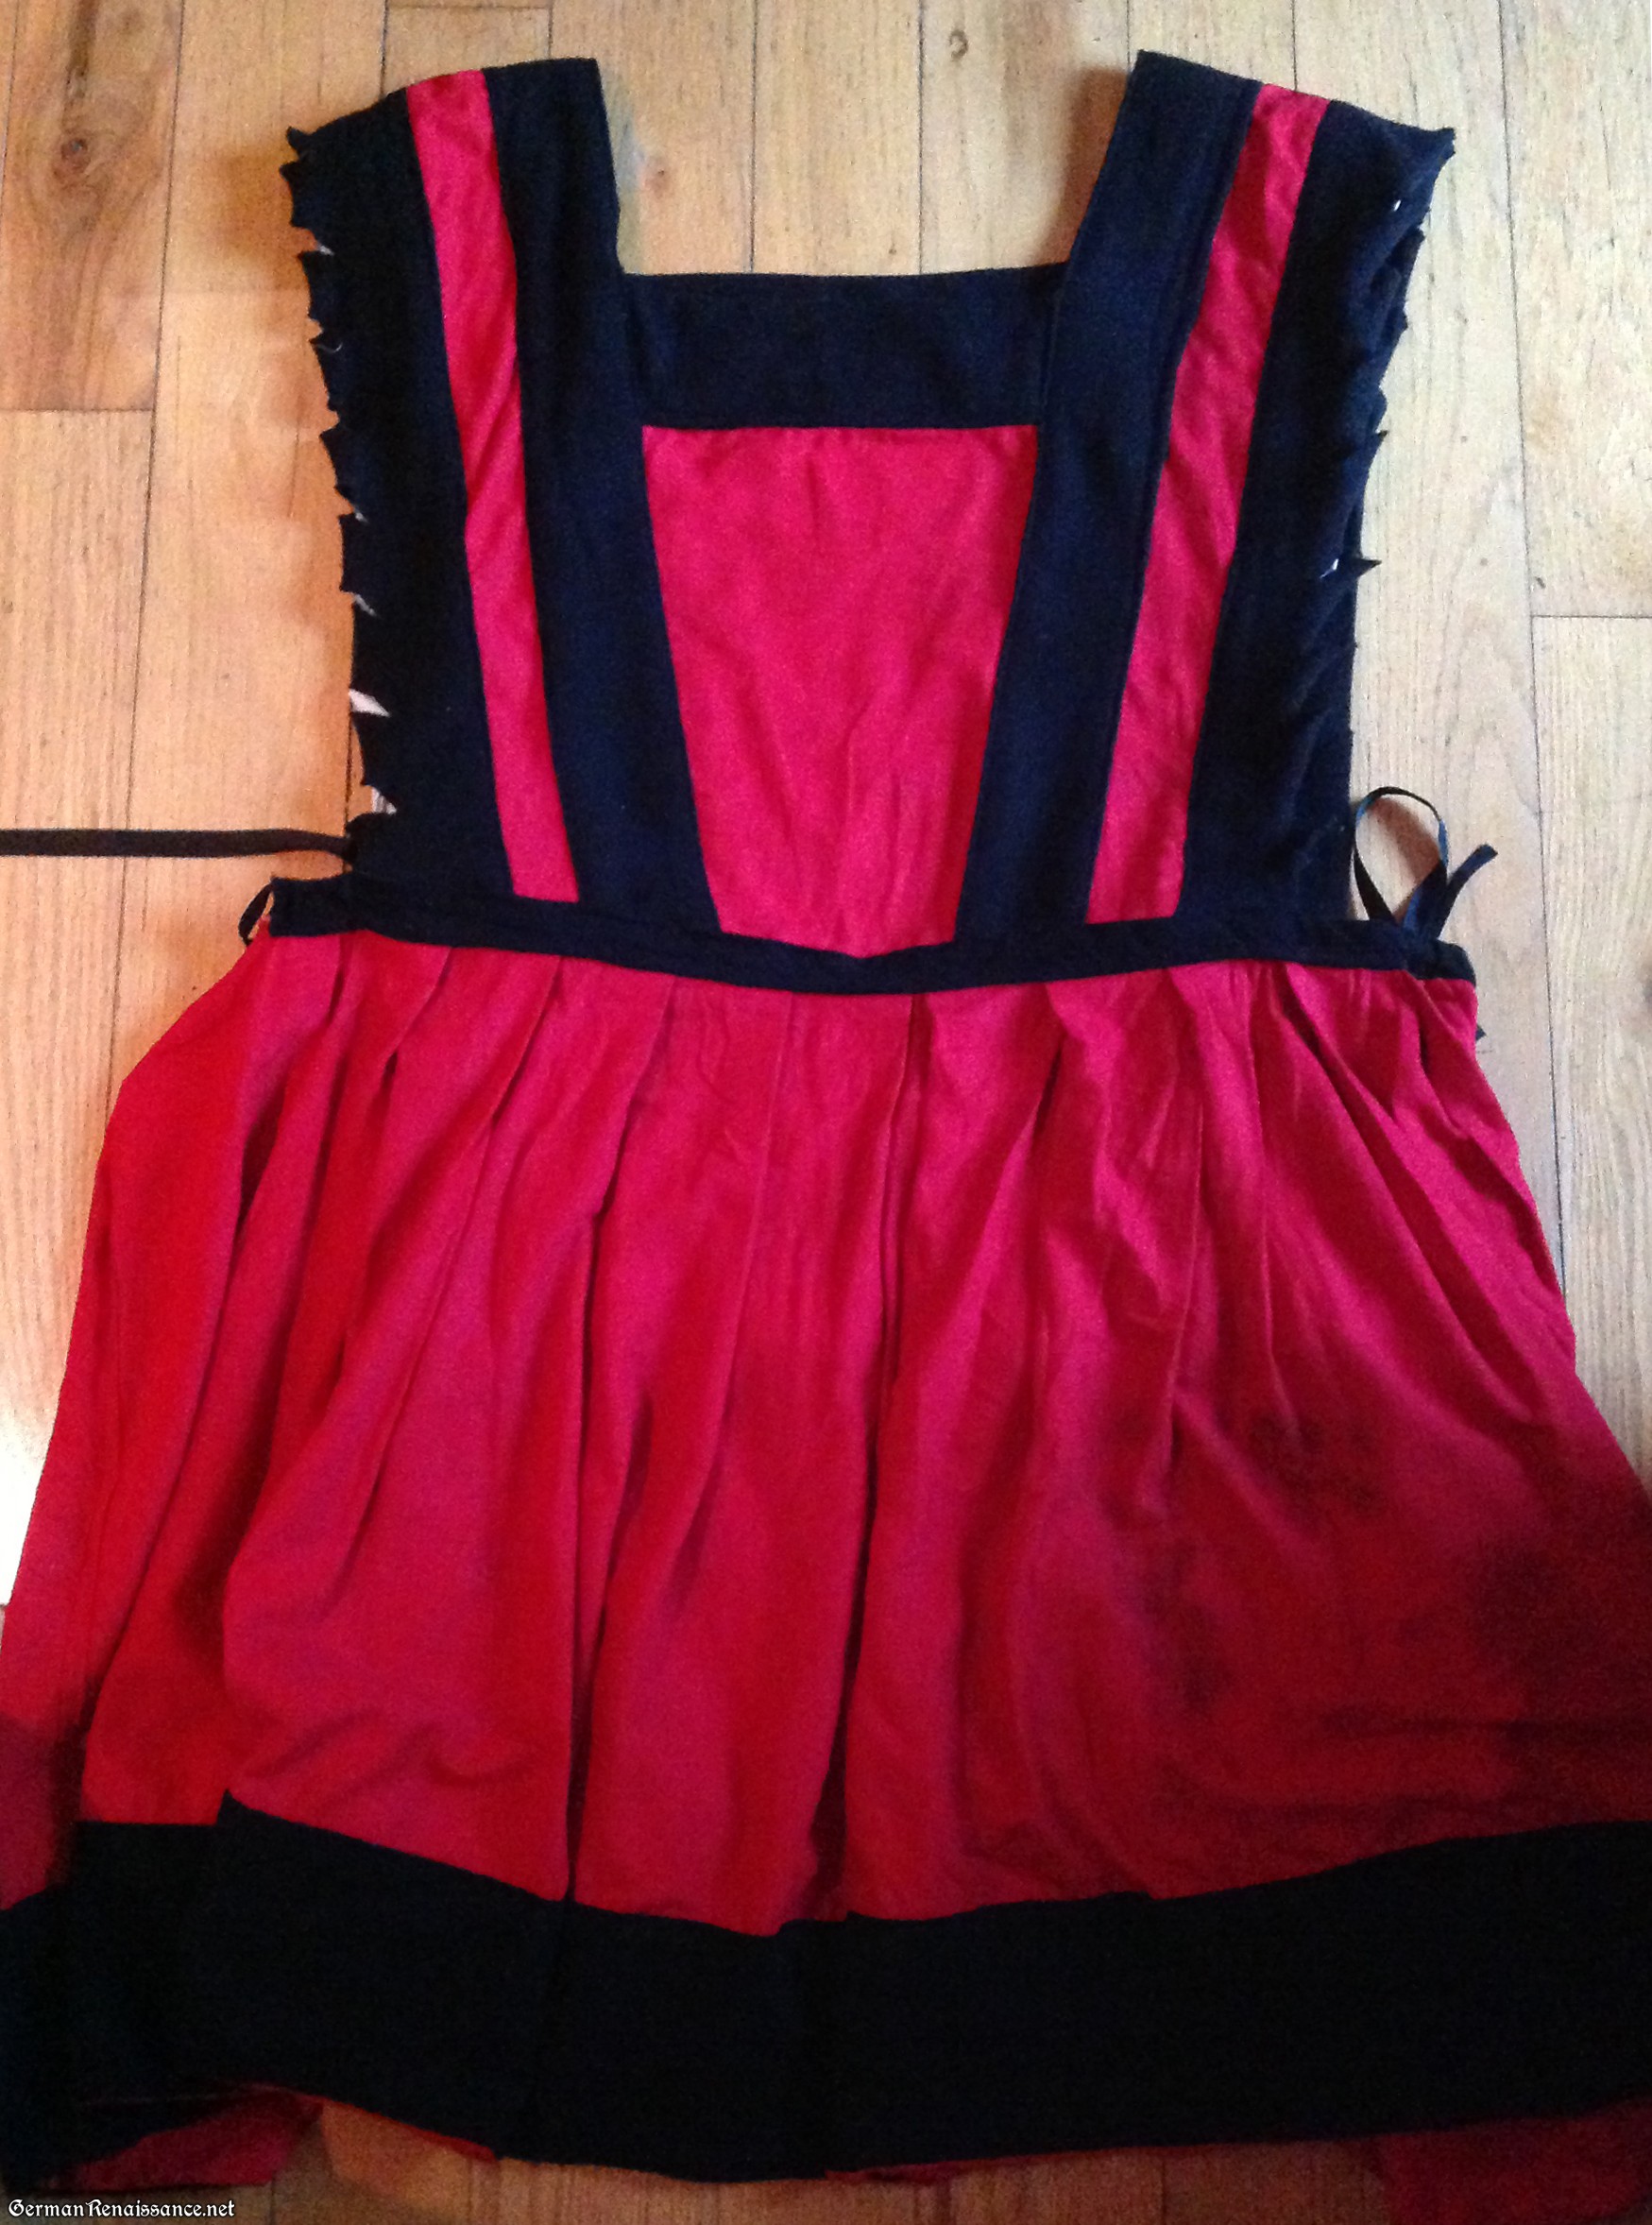
Completed Waffenrocket with ties at the sides.
15. Cut the waistband strip you saved in half and cut your cording in half. Sew down the raw 4″ ends of the two strips. Now fold the strips over, lay the cords inside them, and pin them over the raw edges of the skirt, folding the edge of the strip over as you do so. Now sew the strips to the skirts, taking care not to sew into the cording. When done, you will have a black waistband at the top of your skirt with two openings and four cords on either side.
16. Now simply attach the black waistband of the skirt to the raw edges on the upper section you completed in step 8, again taking care not to sew into the cording (you want that to remain free moving). Note that the sides are open.
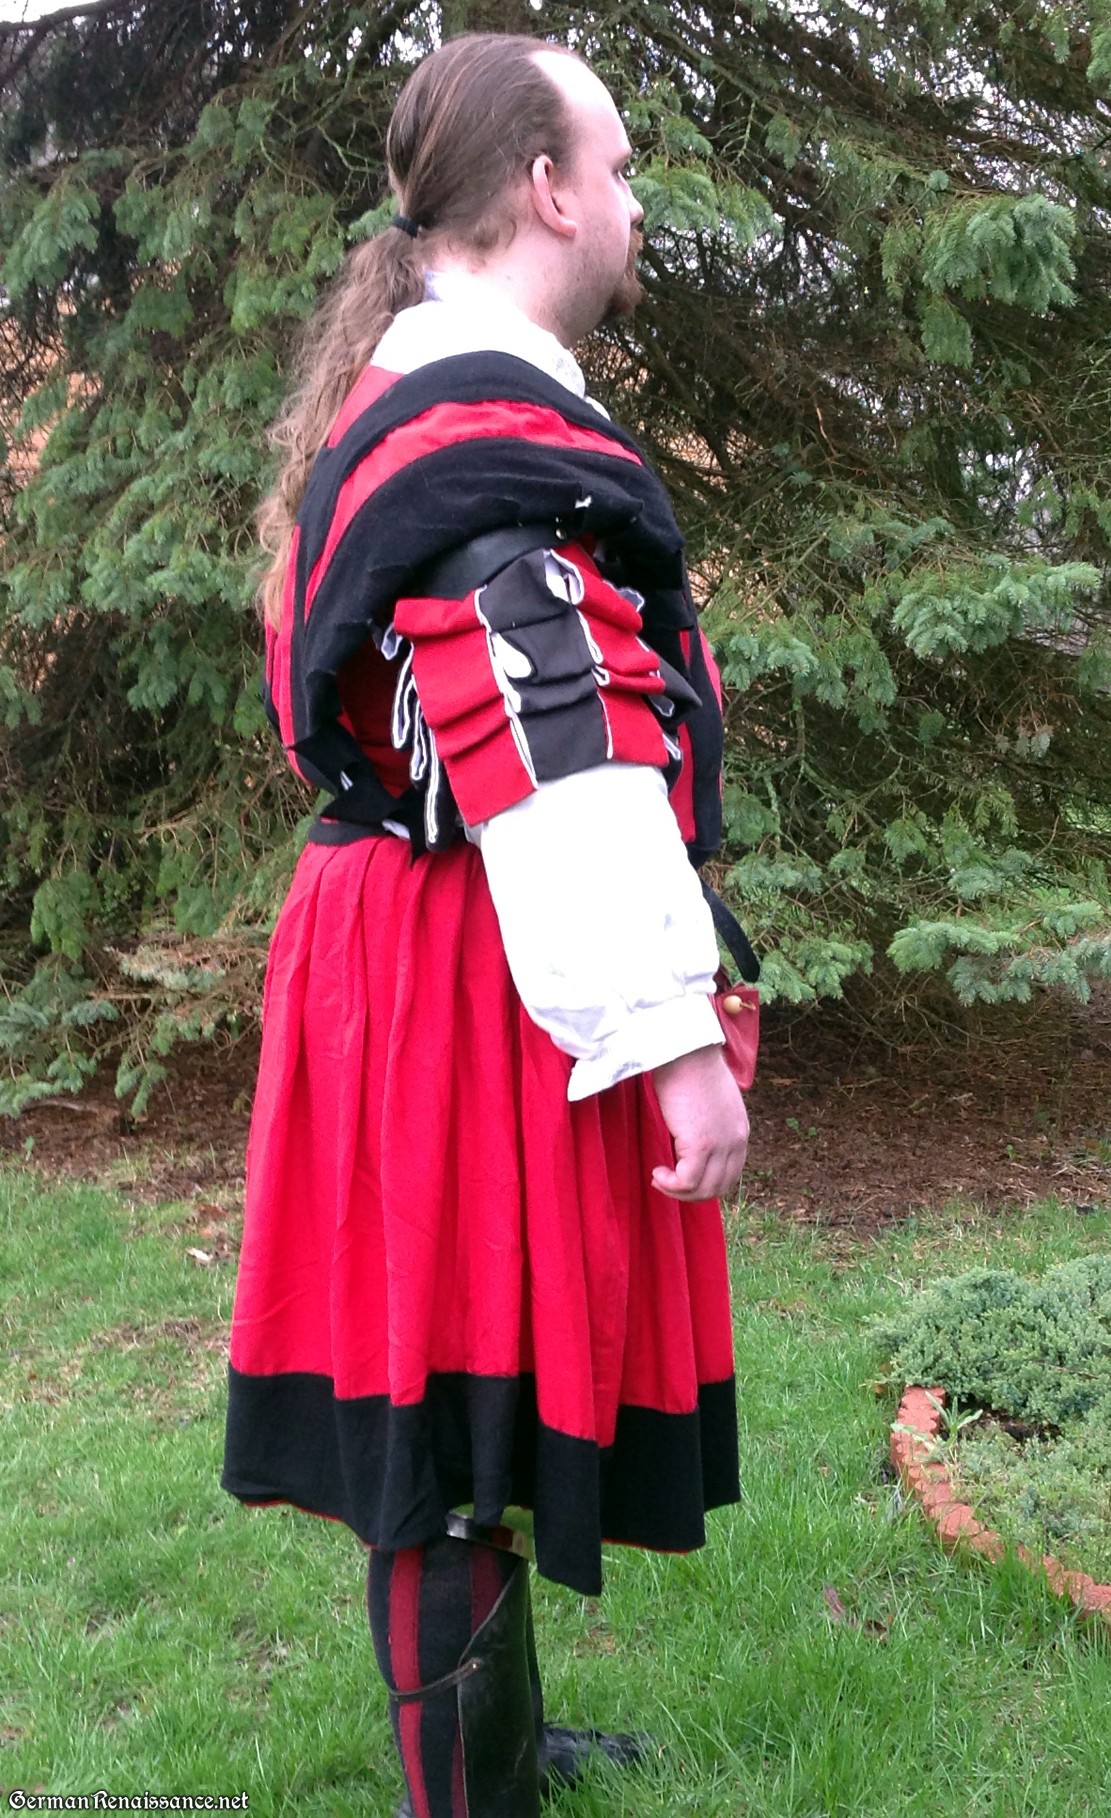 17. Put the garment on over your head and tie the cords at either side. Voila! You have a Waffenrocket. If you want to wear it with less on underneath, cinch the cords a bit tighter at the sides. You’ll want to wear a belt with this like all good Germans did, so you can arrange and smooth the front as necessary to achieve the right look.
Tips: Gregor’s skirt turned out to be attached too low after his first wearing, I think because the linen loosened up a bit after wearing in the rain. So you may want to pin and baste, then hang for a while, before attaching permanently.

I have been recently thinking that my husband needed a new cover up for his armor.His last cover-up was simular in design,but I made it from some cloth of gold. Not the real stuff of course. And it was made on a lark at the last minute. It has held up for about 15 years. It was in a long line of armor covers. After all he has been fighting since January 1999. And this just fits the bill.
You are so helpfull!
Thanks for being my muse. Lady Cate
How is the linnen holding up to the fighting? Cate
No issues yet, but he hasn’t been wearing it a lot. He is preferring his regular tabards, probably because we’ve been in melee season (so he wants to represent the barony). We’ll see what the future holds.
This is a lovely piece of work. I wonder if you’ve seen Durer’s Paumgartner Altar painting? The soldier on the left does seem to be wearing something vaguely Waffenrocket-esque. 🙂
http://upload.wikimedia.org/wikipedia/commons/2/22/Albrecht_D%C3%BCrer_-_Paumgartner-Altar_-_Alte_Pinakothek_M%C3%BCnchen.jpg
Thank you for the link! I think the man on the left simply has armor OVER his waffenrock, as you can see a red bit poking out from under an arm that looks like a sleeve to me.