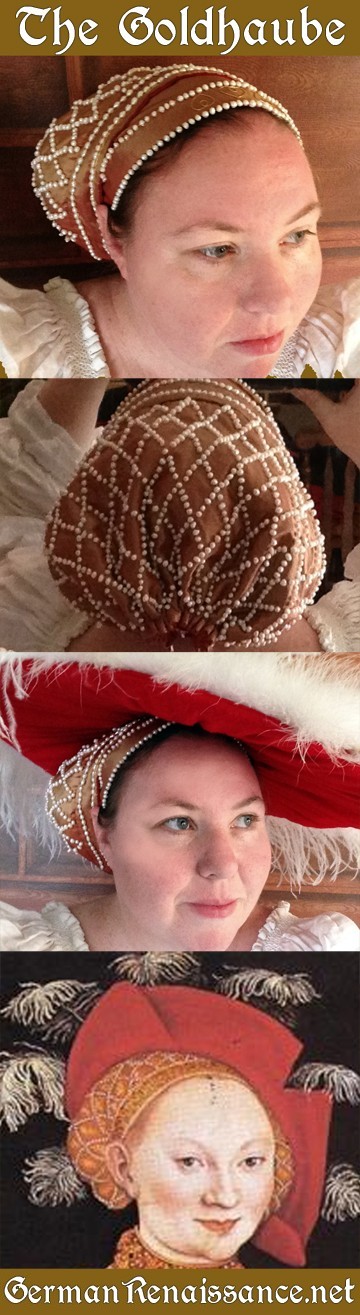
 After months of research, I’ve successfully managed to create a lovely “goldhaube” (golden cap) that looks like the caps seen in the many Lucas Cranach paintings of 16th century Germany. During my research and trials I had many people contact me to ask about it, and I’m happy to share what I have learned. In addition to the pattern, instructions, and notes below, I have documentation on the goldhaube — I entered it into my regional Arts & Sciences Competition where it received a first place award. [Update: It also won a first place award at the Kingdom level.]
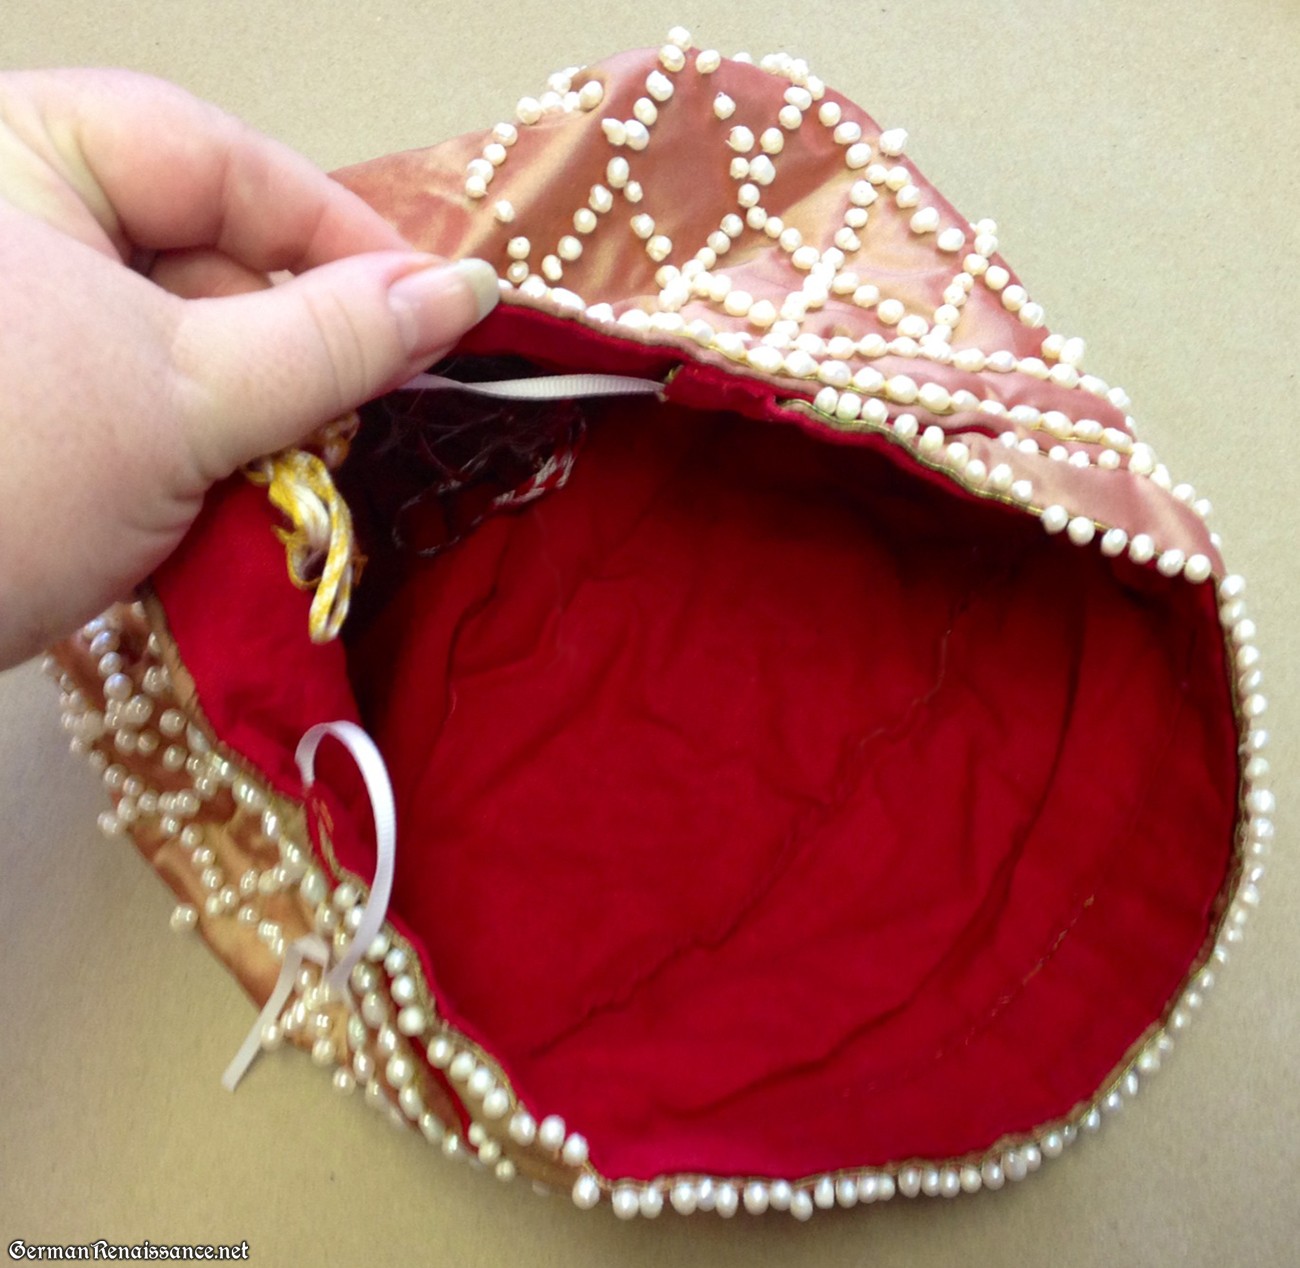
My goldhaube is made of gold-shot-reddish silk taffeta, 1000+ freshwater pearls, gilt passing thread, linen, silk thread, and linen thread. It weighs 11 ounces. And, amazingly, it stays on my head without pins.
Goldhaube Pattern
Below is the pattern I used to create my goldhaube. Many thanks to Katrine De Saint Brieuc, Crespine de la Vallée, and Anthoinette de Martel for helping me figure this out. It took several tries to get the shape right and this is the end pattern result. Keep in mind that this cap is intended to be worn with zopfe (false braids) or at least padding to fill the cap and have it puff out at the sides.
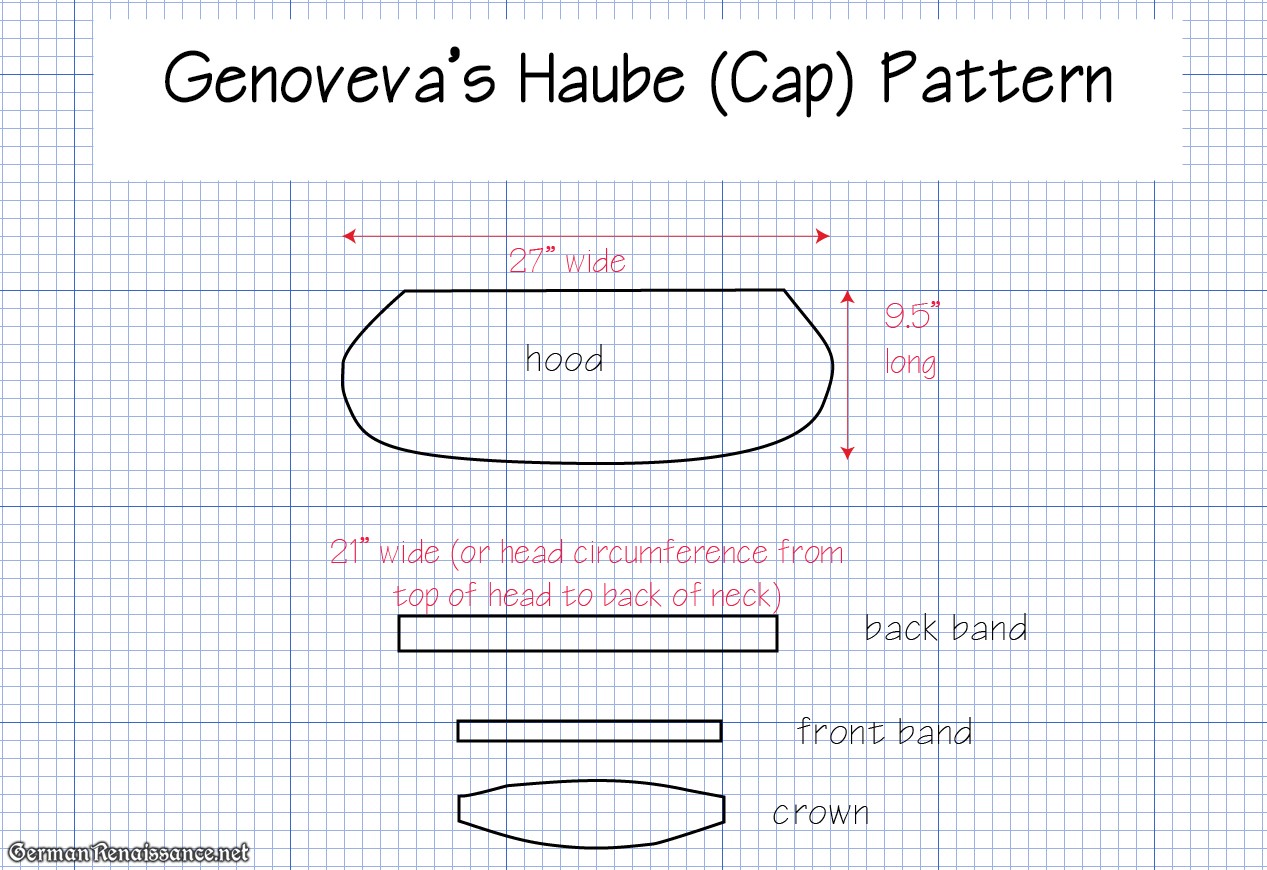
Sizing Notes: Measure the circumference of your head and adjust the back band and straight edge of the hood as necessary (these two are currently 21″ — my own head circumference). If you want less bulk and poof, reduce the length of the hood from 9.5″ to 9″ or even 8″.
Seam Allowance: Add 1/2″ for a seam allowance to the above pattern pieces.
Goldhaube Materials
It is my belief that cloth goldhaubes would have been made out of cloth of gold (cloth with real gold-wrapped weft threads) and that is nearly impossible to find these days. So here’s what I recommend using instead:
- 1 yard of red-gold silk taffeta (such as Sunset Taffeta). – $17
- 1 yard of linen (red, gold, orange, or brown), washed, dried, and ironed – $9
- 1000 real freshwater pearls (3mm or smaller) – $70
- 3 yards of gold/gilt passing thread – $6
- Linen and silk filament threads in white, gold and red – $10
- Beeswax (to wax all threads)
- Needles: sharps (size 9) and non-flexible beading needles (you want very thin, sharp needles when working with silk taffeta)
- Slate frame with a usable area of at least 30″ by 14″
Goldhaube Embellishment
First thing you’ll want to do is get the pearls and goldwork stitched onto your taffeta. Here’s how you do it in 20 steps:
1. Follow my directions for dressing a slate frame with your linen and taffeta. Important: Put your taffeta on the frame so that the gold threads are along the parallel to the longest side of your frame.
2. Transfer the pattern (modified as necessary for your head) onto good, strong paper (no need to add extra seam allowances). Onto your hood pattern piece of paper, draw lines at 60 degree angles (NOT 45 degrees) starting from 1/2″ from the straight edge and ending 1″ in from the sides and curved bottom.
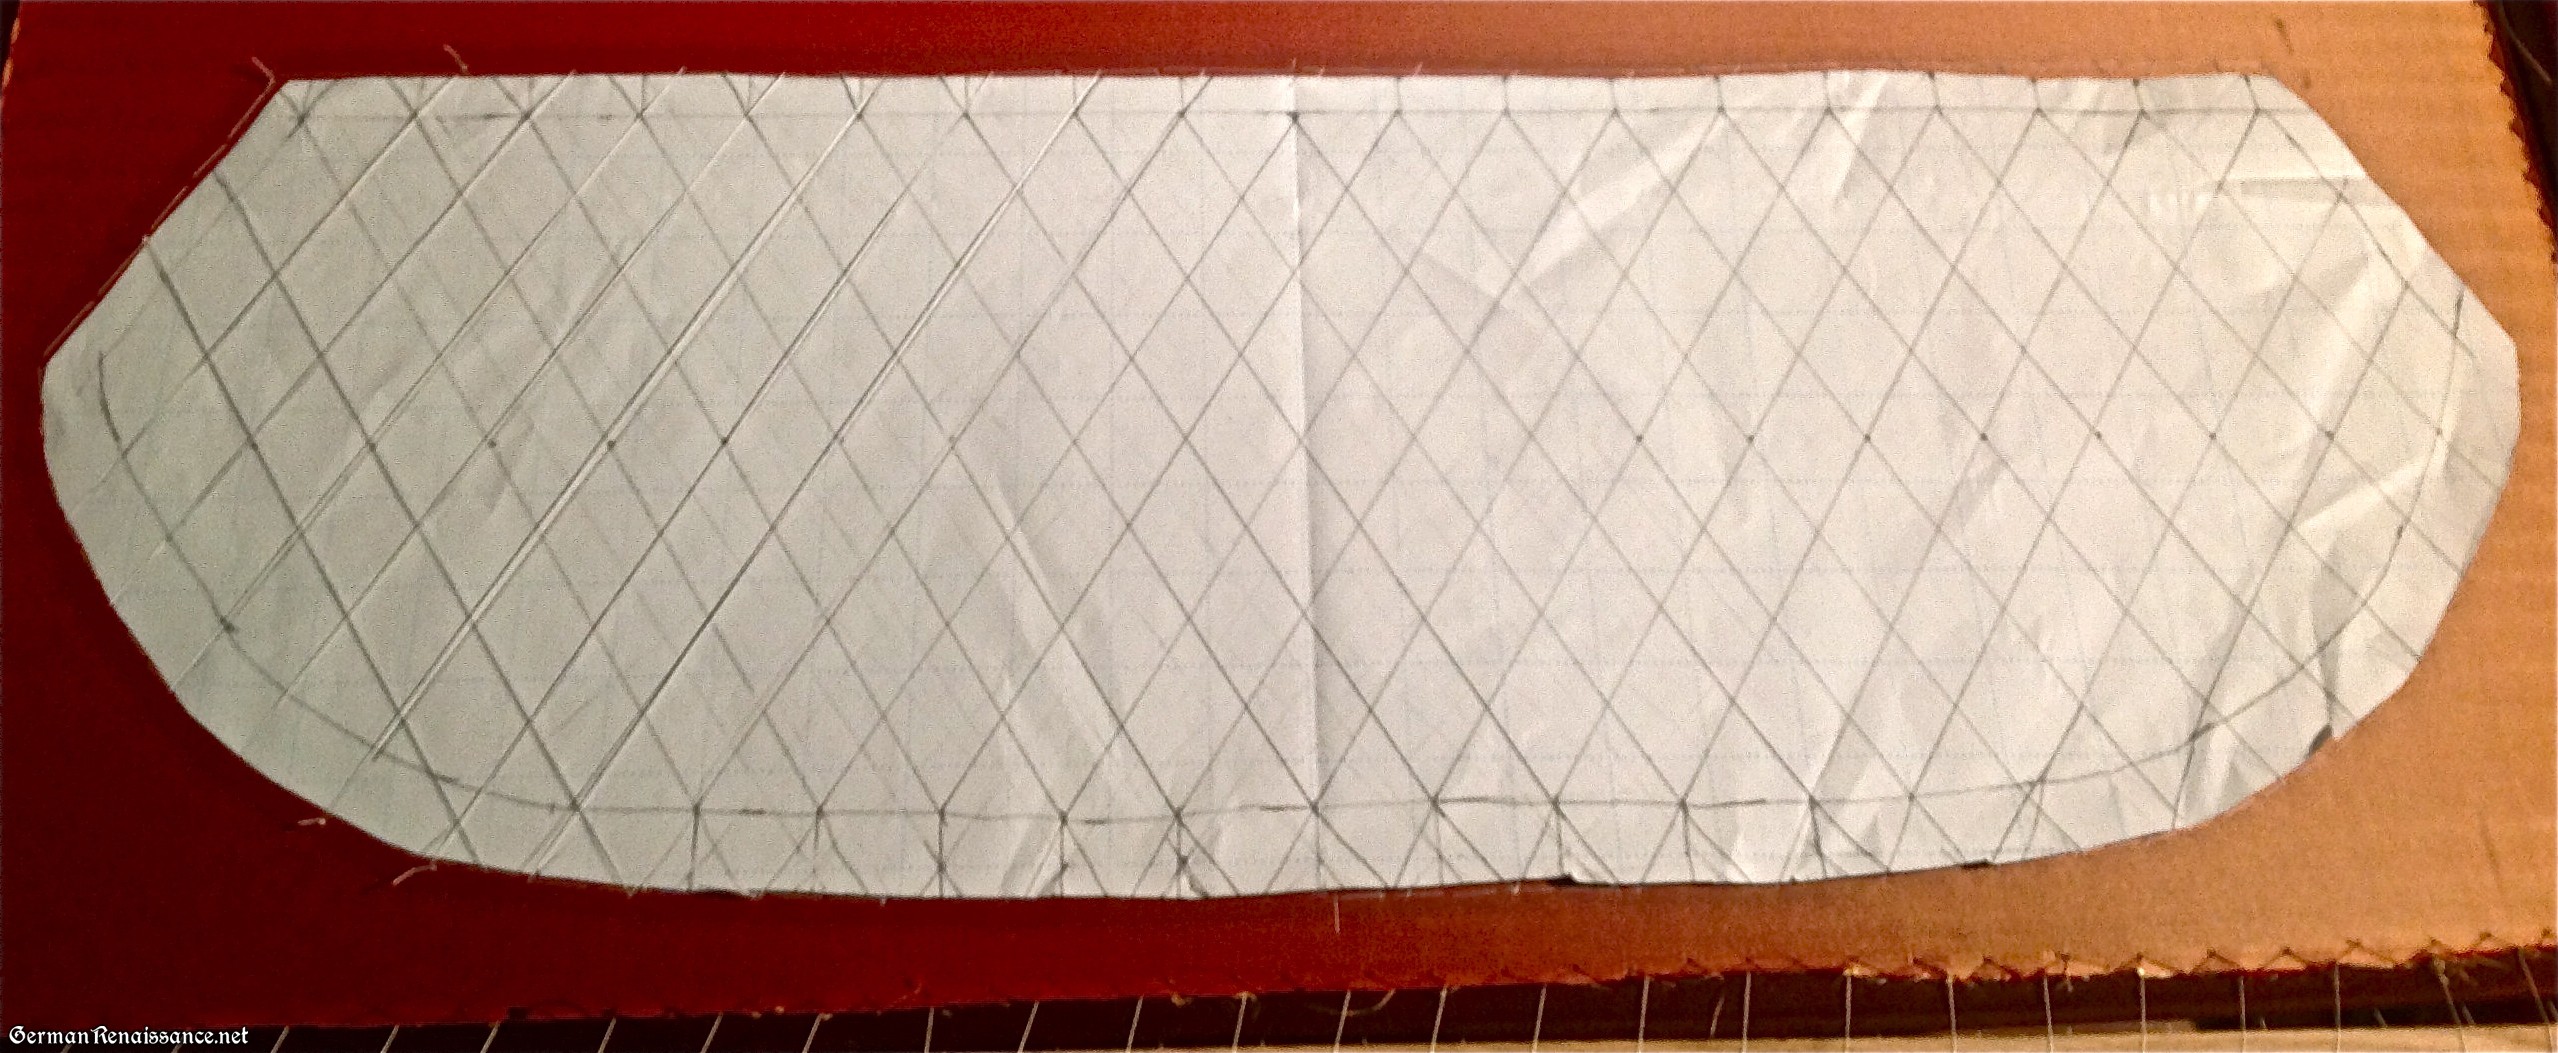
Hood pattern with diagonal guidelines drawn upon it.
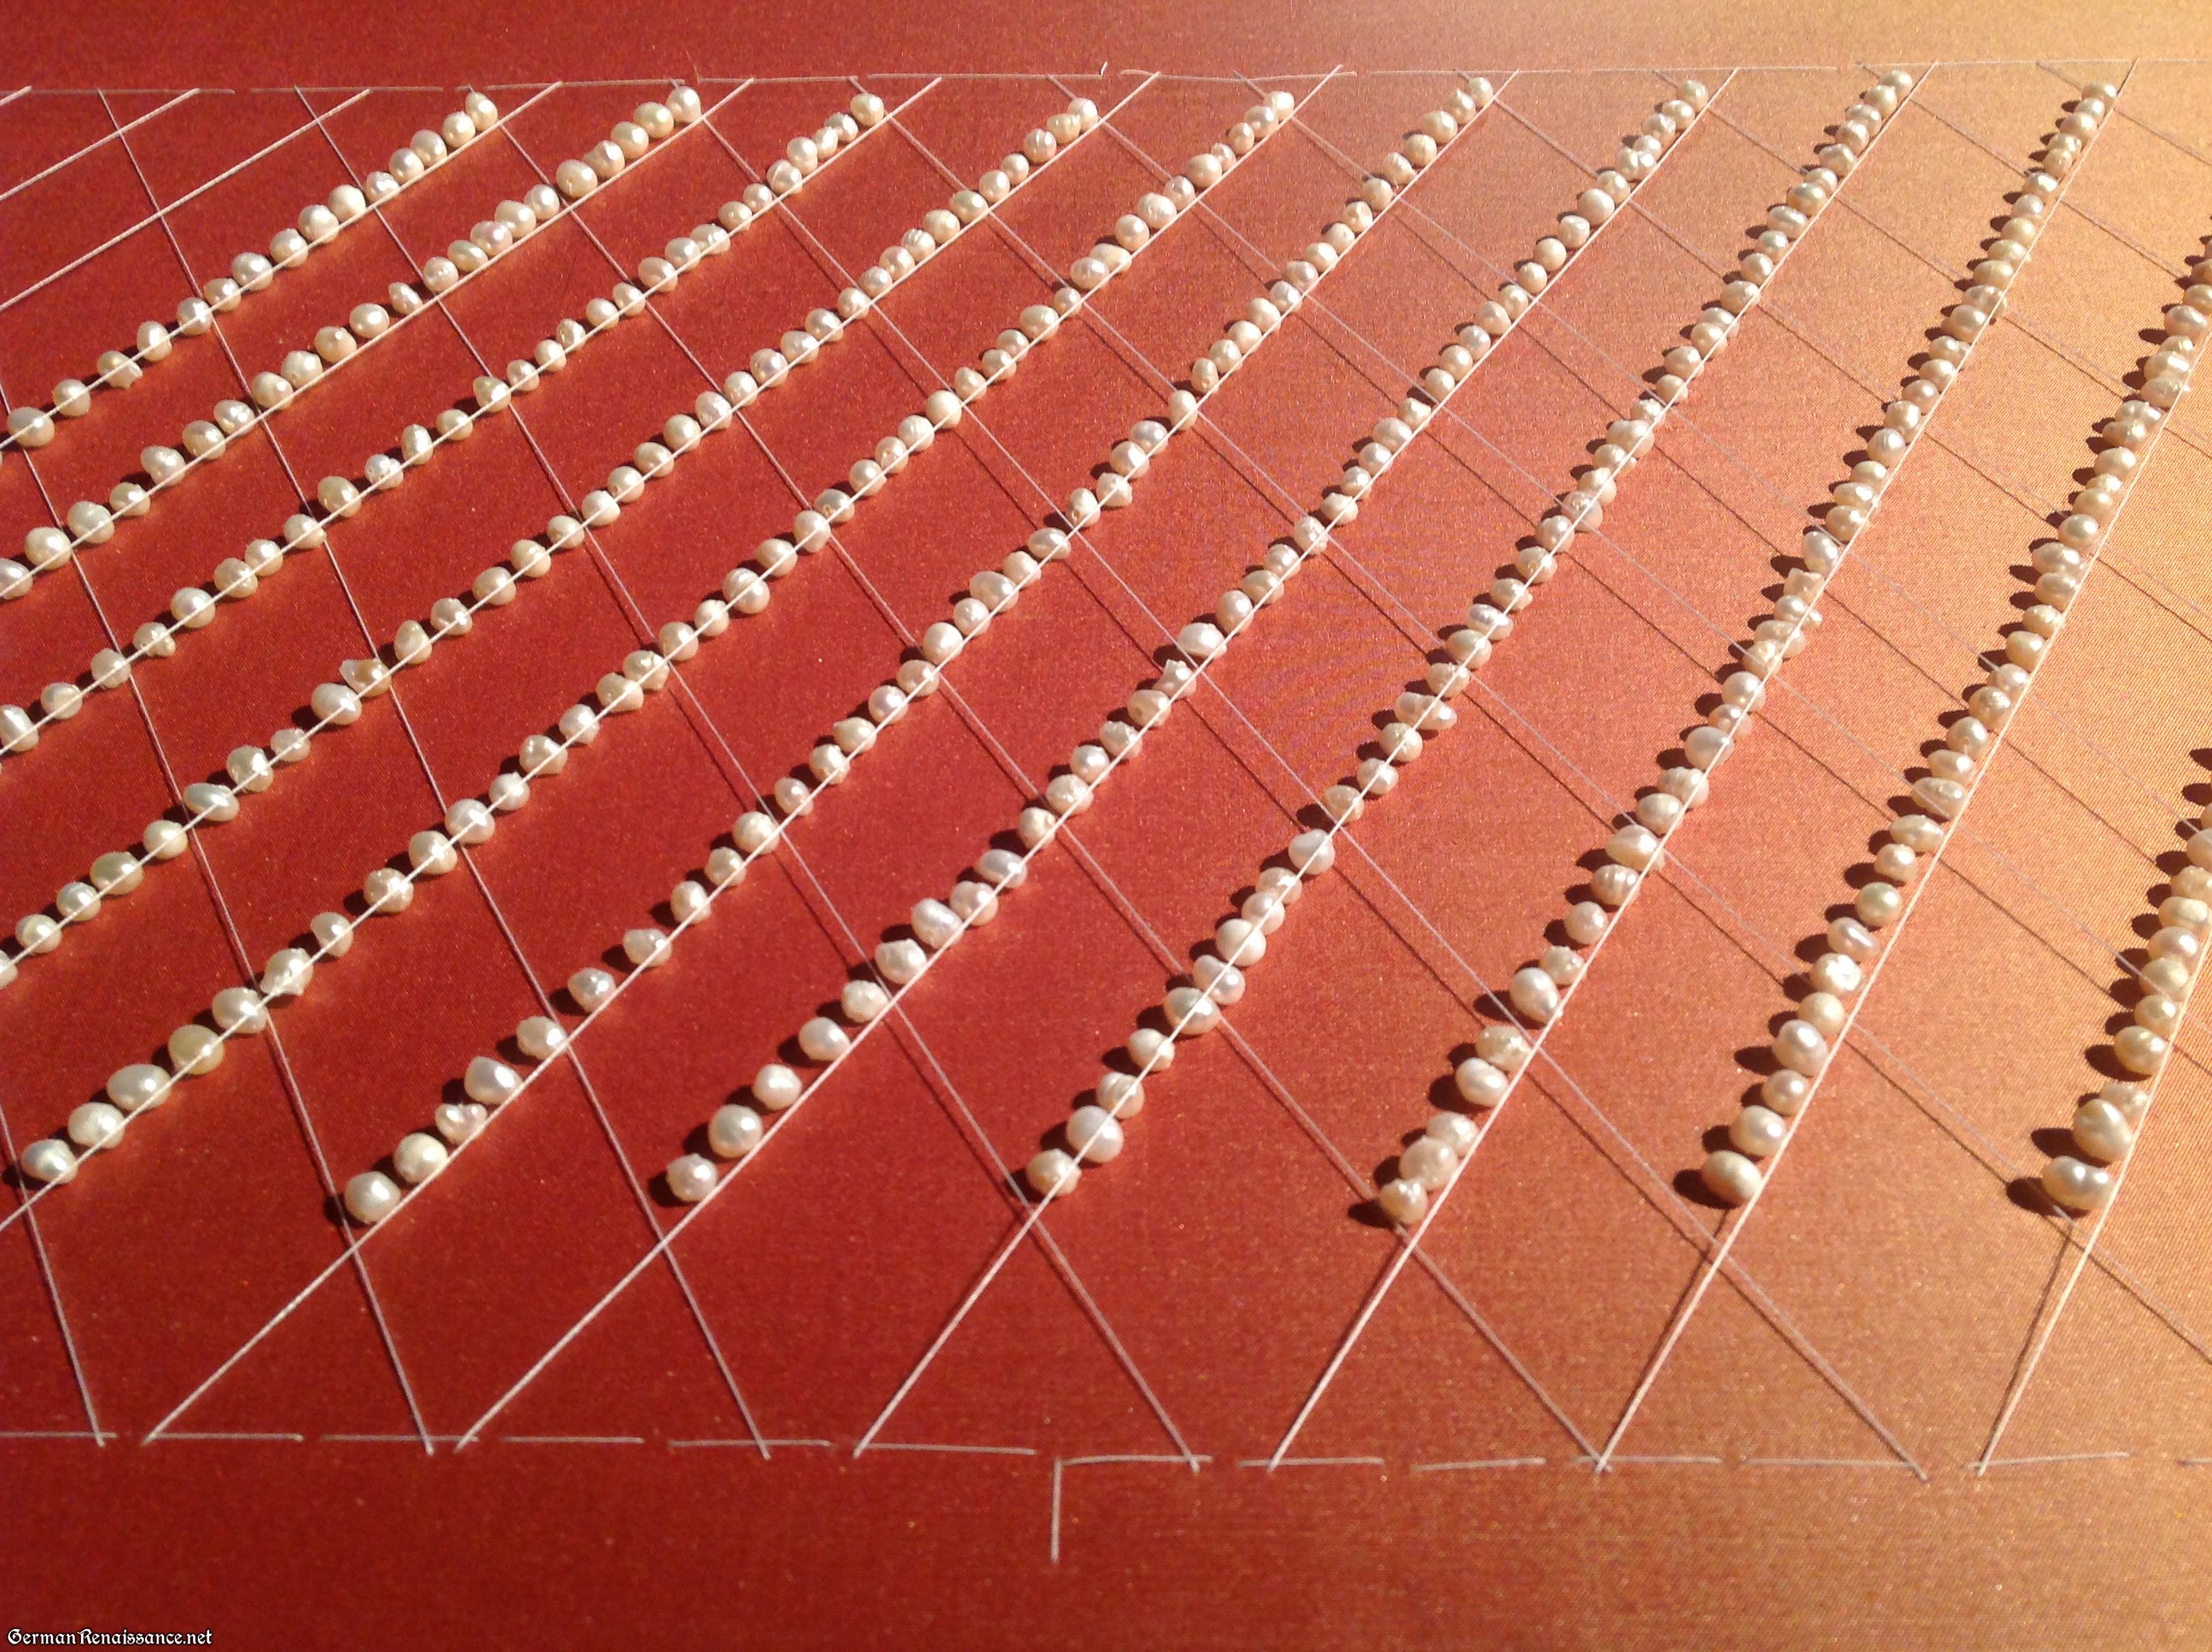
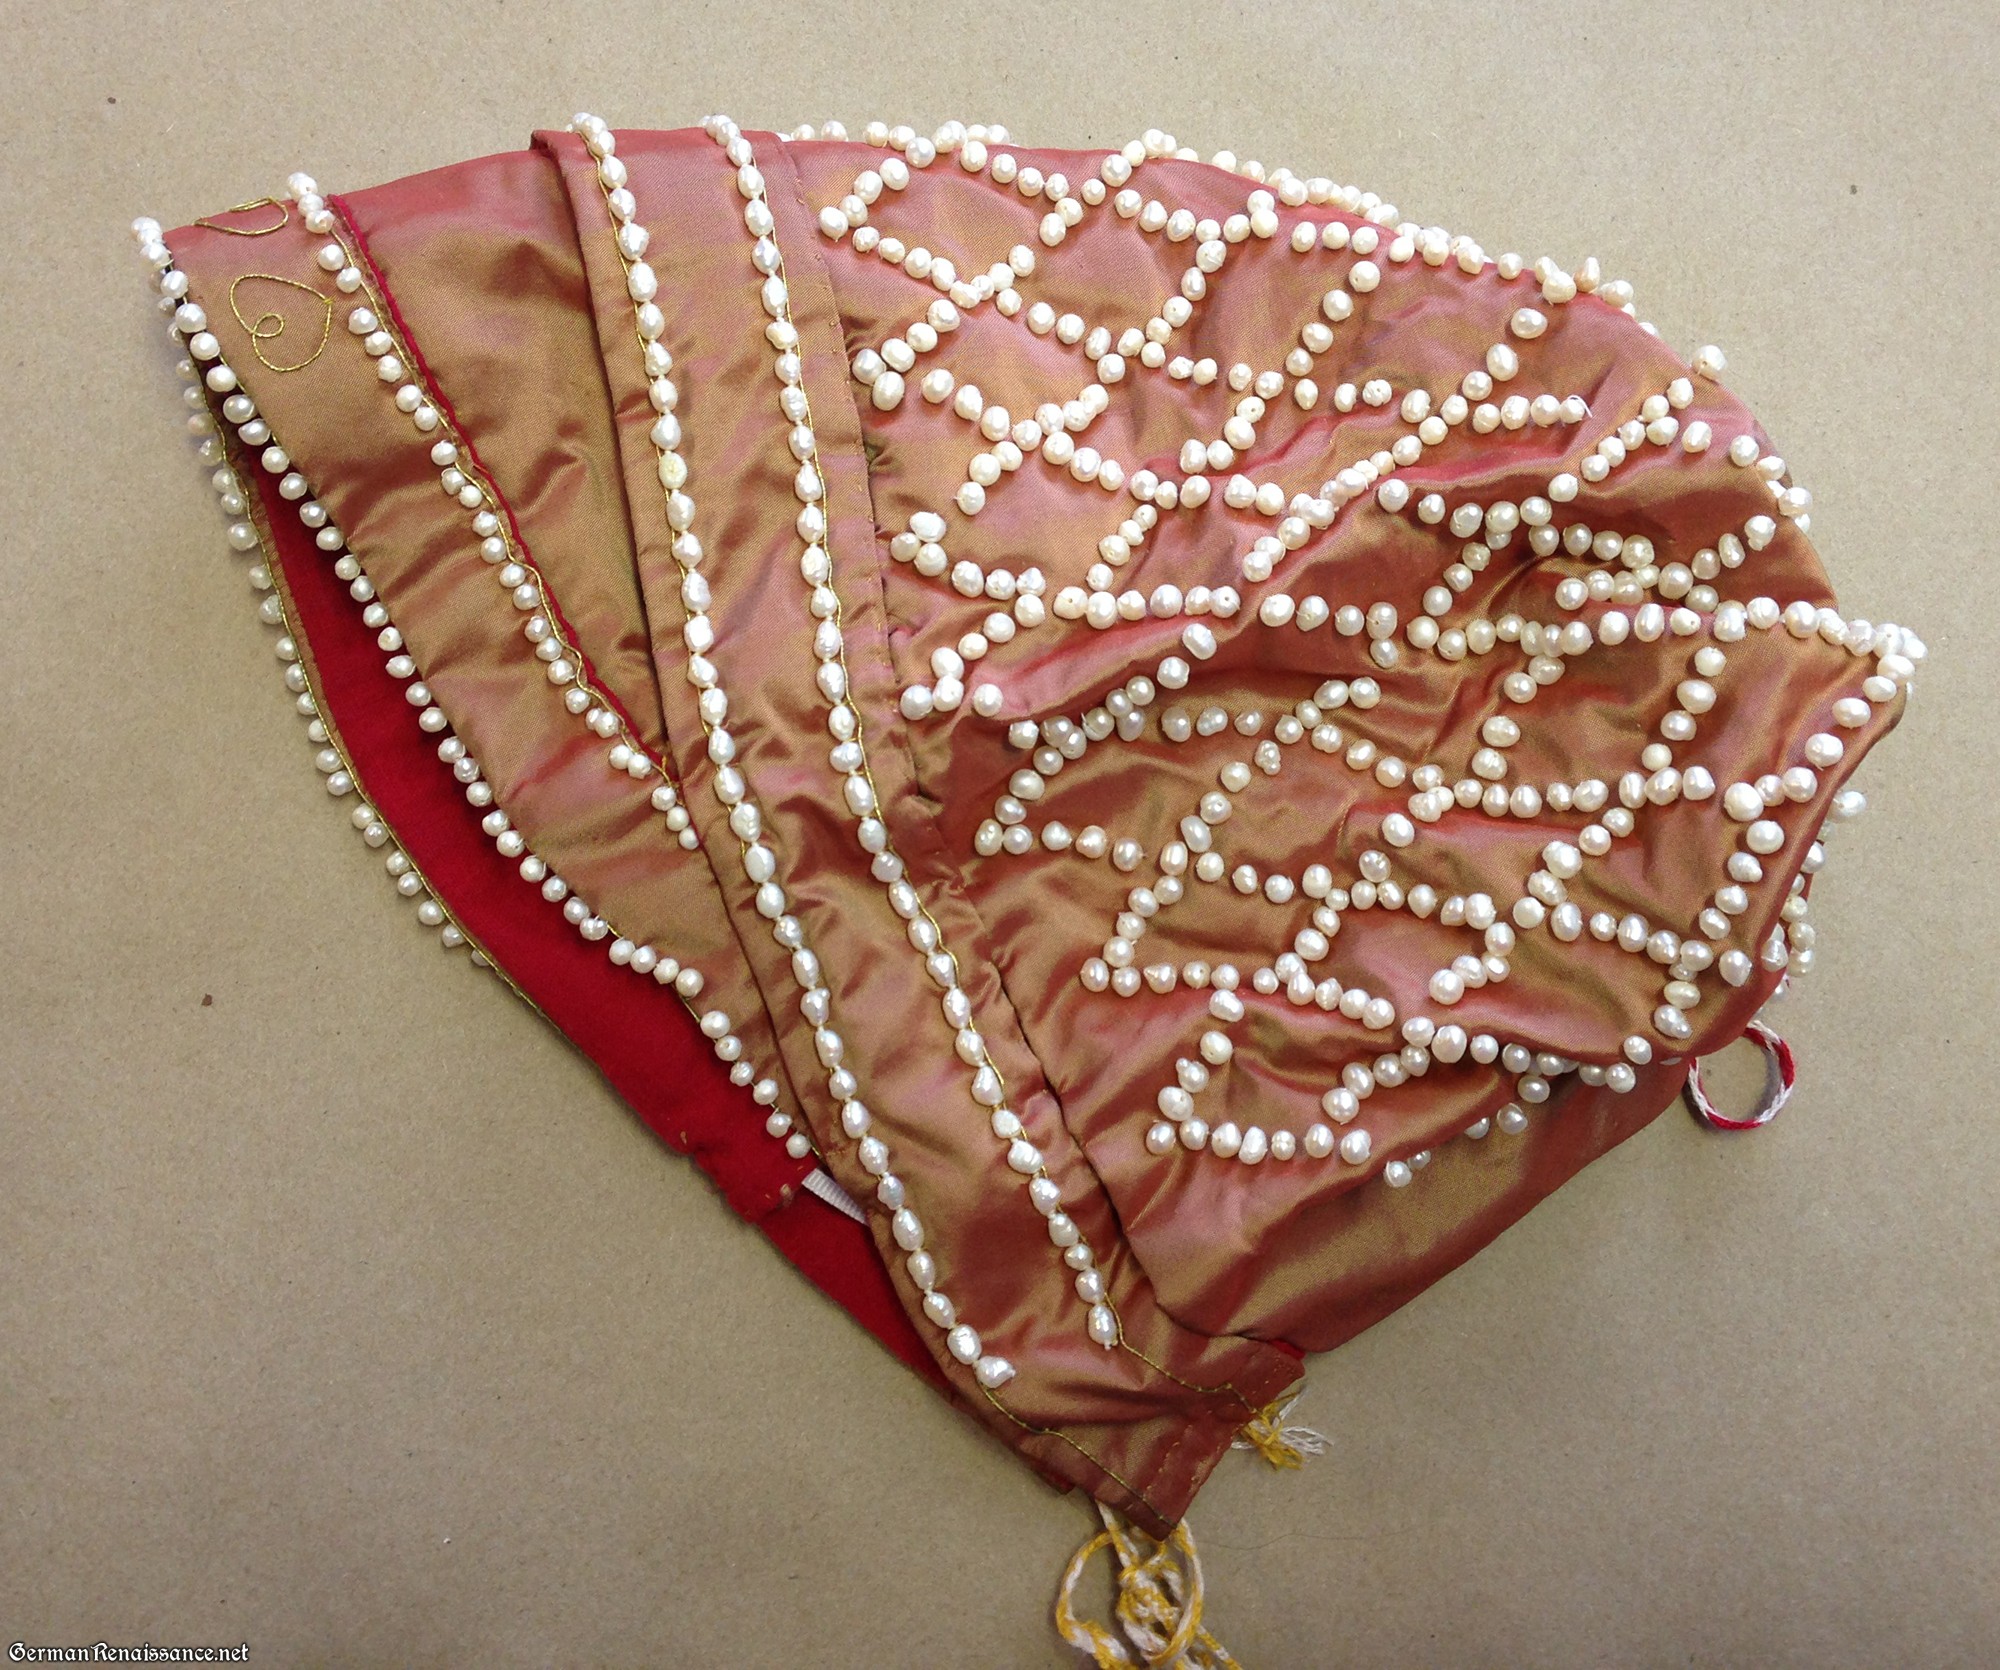
3. Lay the pattern piece on the bottom edge of your taffeta and copy the pattern onto your taffeta by handstitching the patterns’ outlines right onto the fabrics with white thread in a large stitch so it’s easy to remove later when you are done. Also using thread, create the diamond grid over your taffeta, sewing each thread down at the edge of the hood to use as a guide for later.
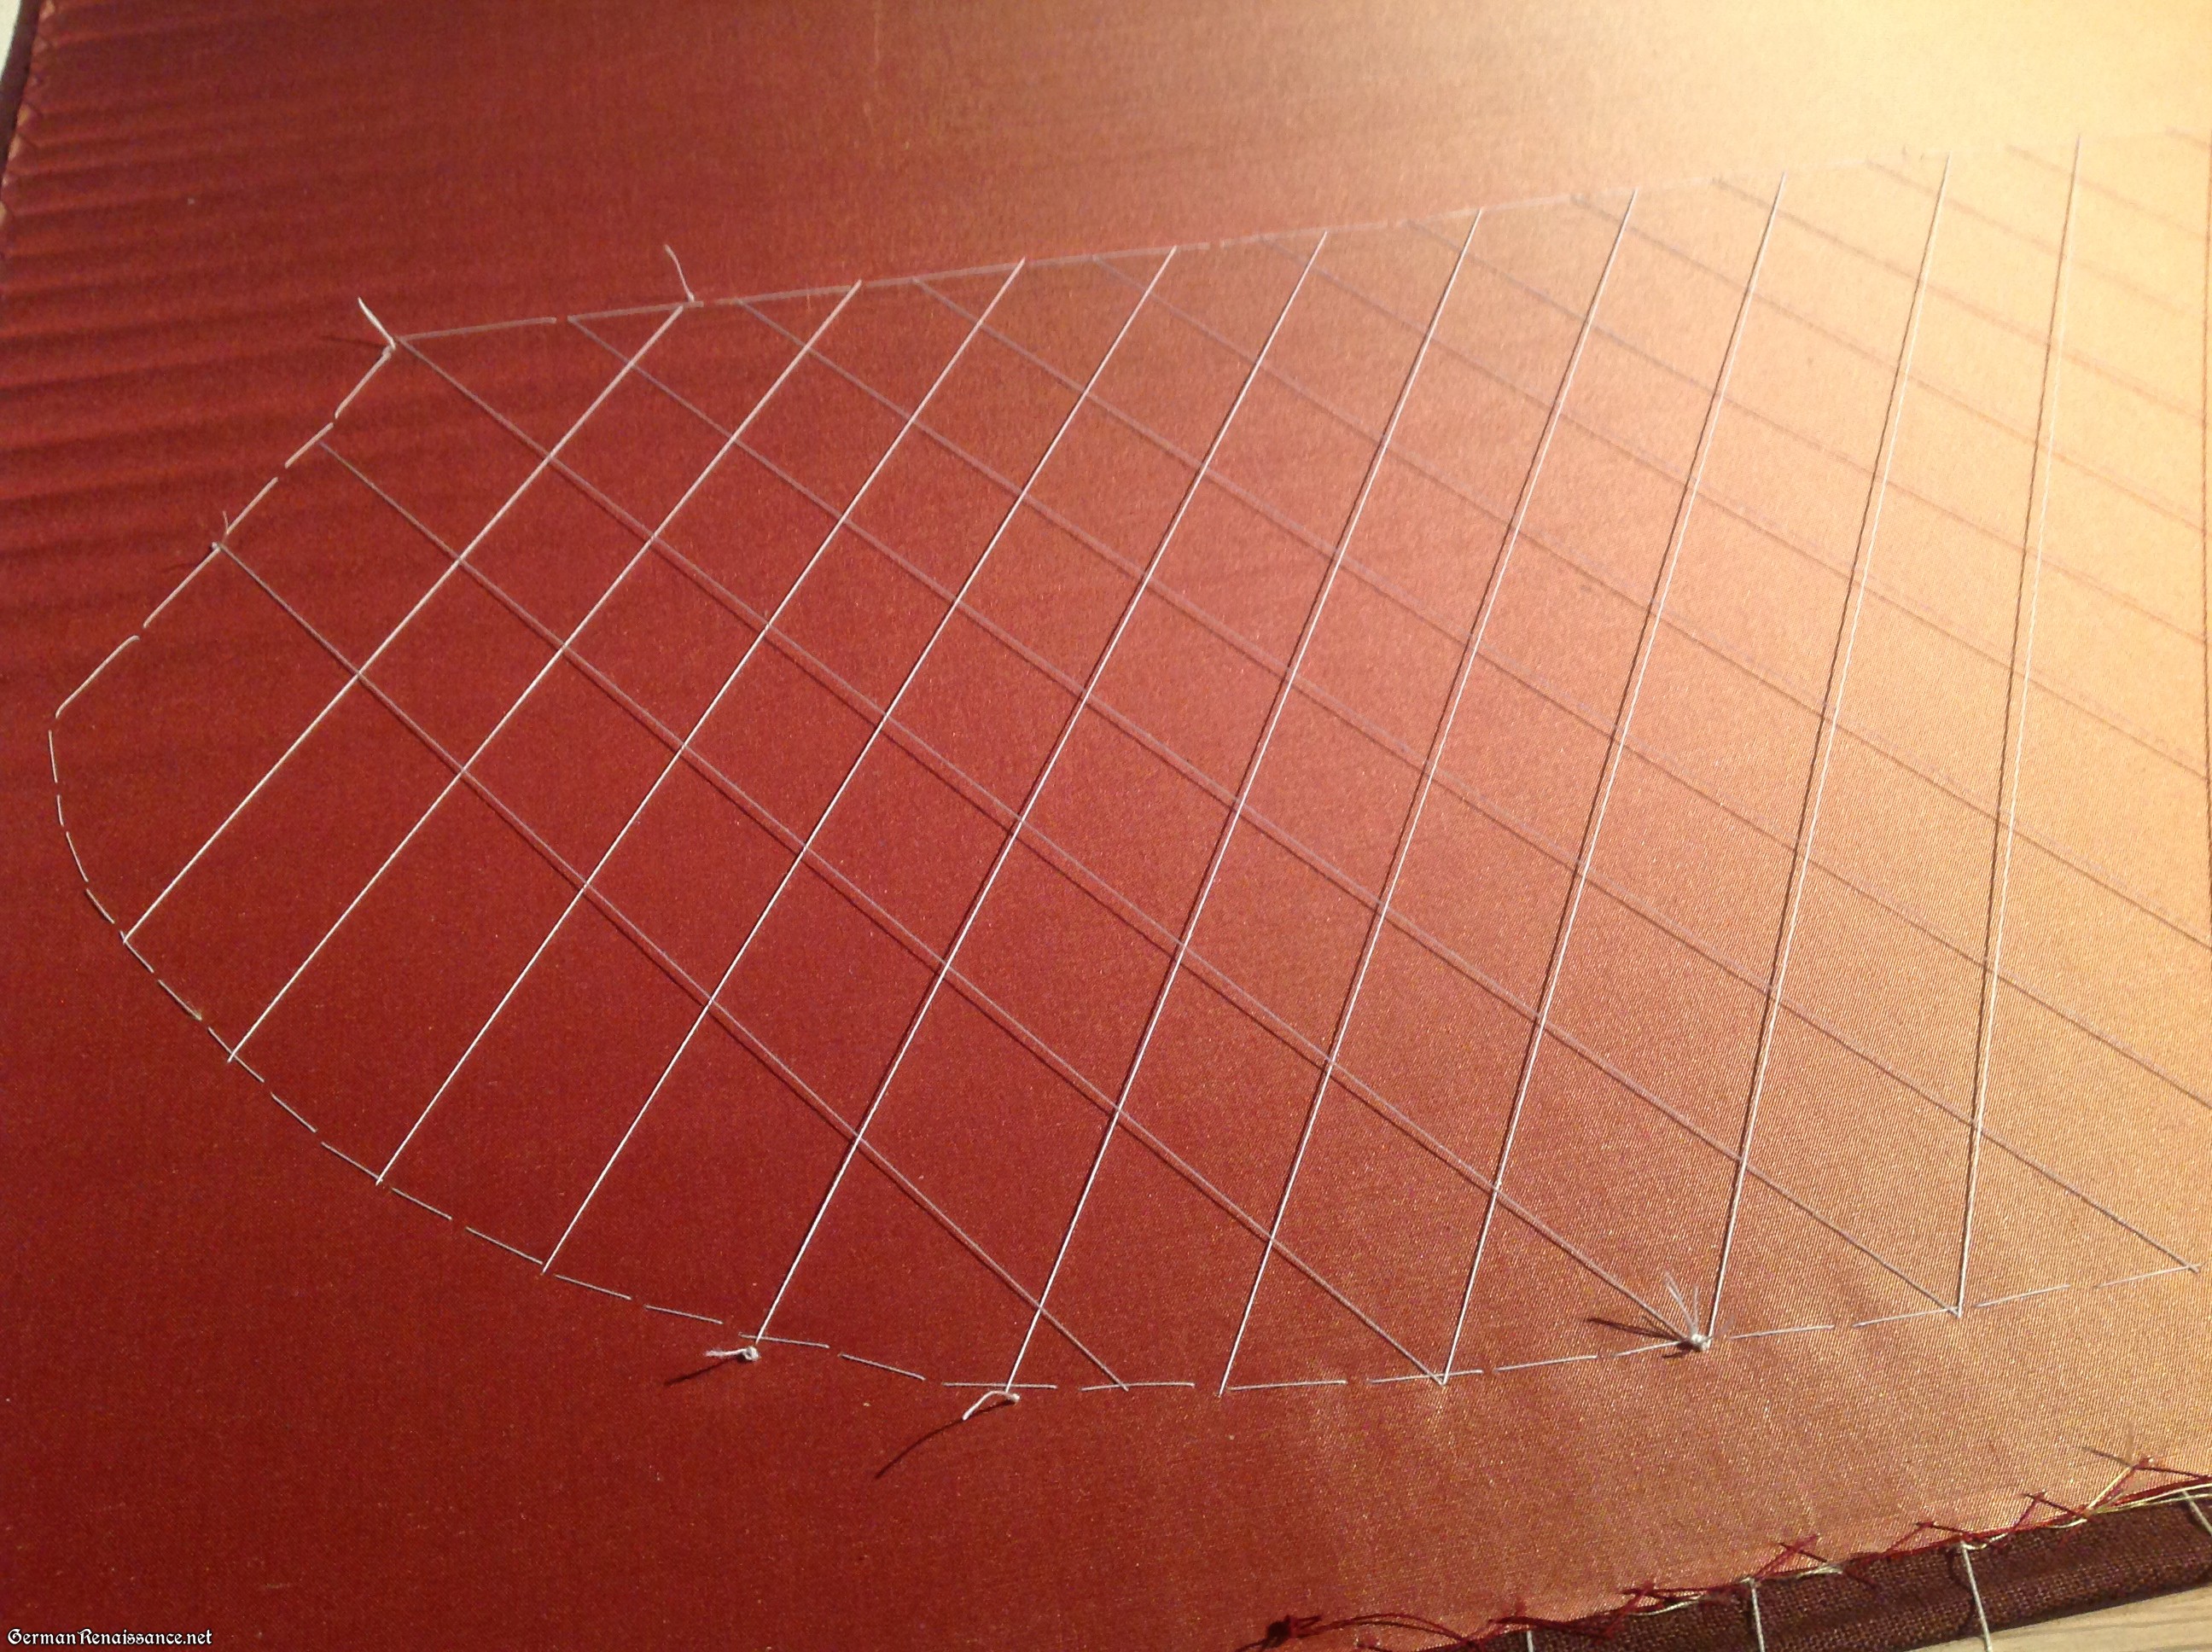
Guide threads sewn to the fabric — these will be removed later.
4.Now using a non-flexible beading needle (strong and sharp enough to pierce your fabric but thin enough to go through the hole in your pearls), begin sewing pearls in straight lines to one side of your thread guides. Work in parallel lines across your fabric and strive for consistency in placement. My pearls were sewn on five to a segment, with the fifth pearl forming the important center pearl where two thread guides met. If you are unfamiliar with how to sew pearls, check here and follow either the backstitch or couching directions (NOT machine couching). Be sure to wax and anchor your thread, and knot your thread regularly between stitches (at least every five stitches) to avoid catastrophic breakage and pearl loss.
Pearls attached in parallel lines on fabric
Tip: If you decide to couch your pearls, be sure to use thread that matches your fabric to minimize the appearance of it between stitches (I did not, but wish I had).
5. Once all the parallel lines of pearls are secured down, go back along and fill in the lines going in the other direction. Be careful to line them up with the center pearls so your lines are as straight as possible.

Sewing the pearls down along the other lines.
Note: I estimate that attaching the pearls took me about 20 hours, just so you’re prepared.
Tip: I chose not to attach pearls all the way to the sides, as you can see from this photo. I was concerned about pearls that close to the bottom of the hat would constantly get tangled in my hair. I was also a bit worried about the pearls dragging down the fabric at the bottom of the hat. It’s your choice.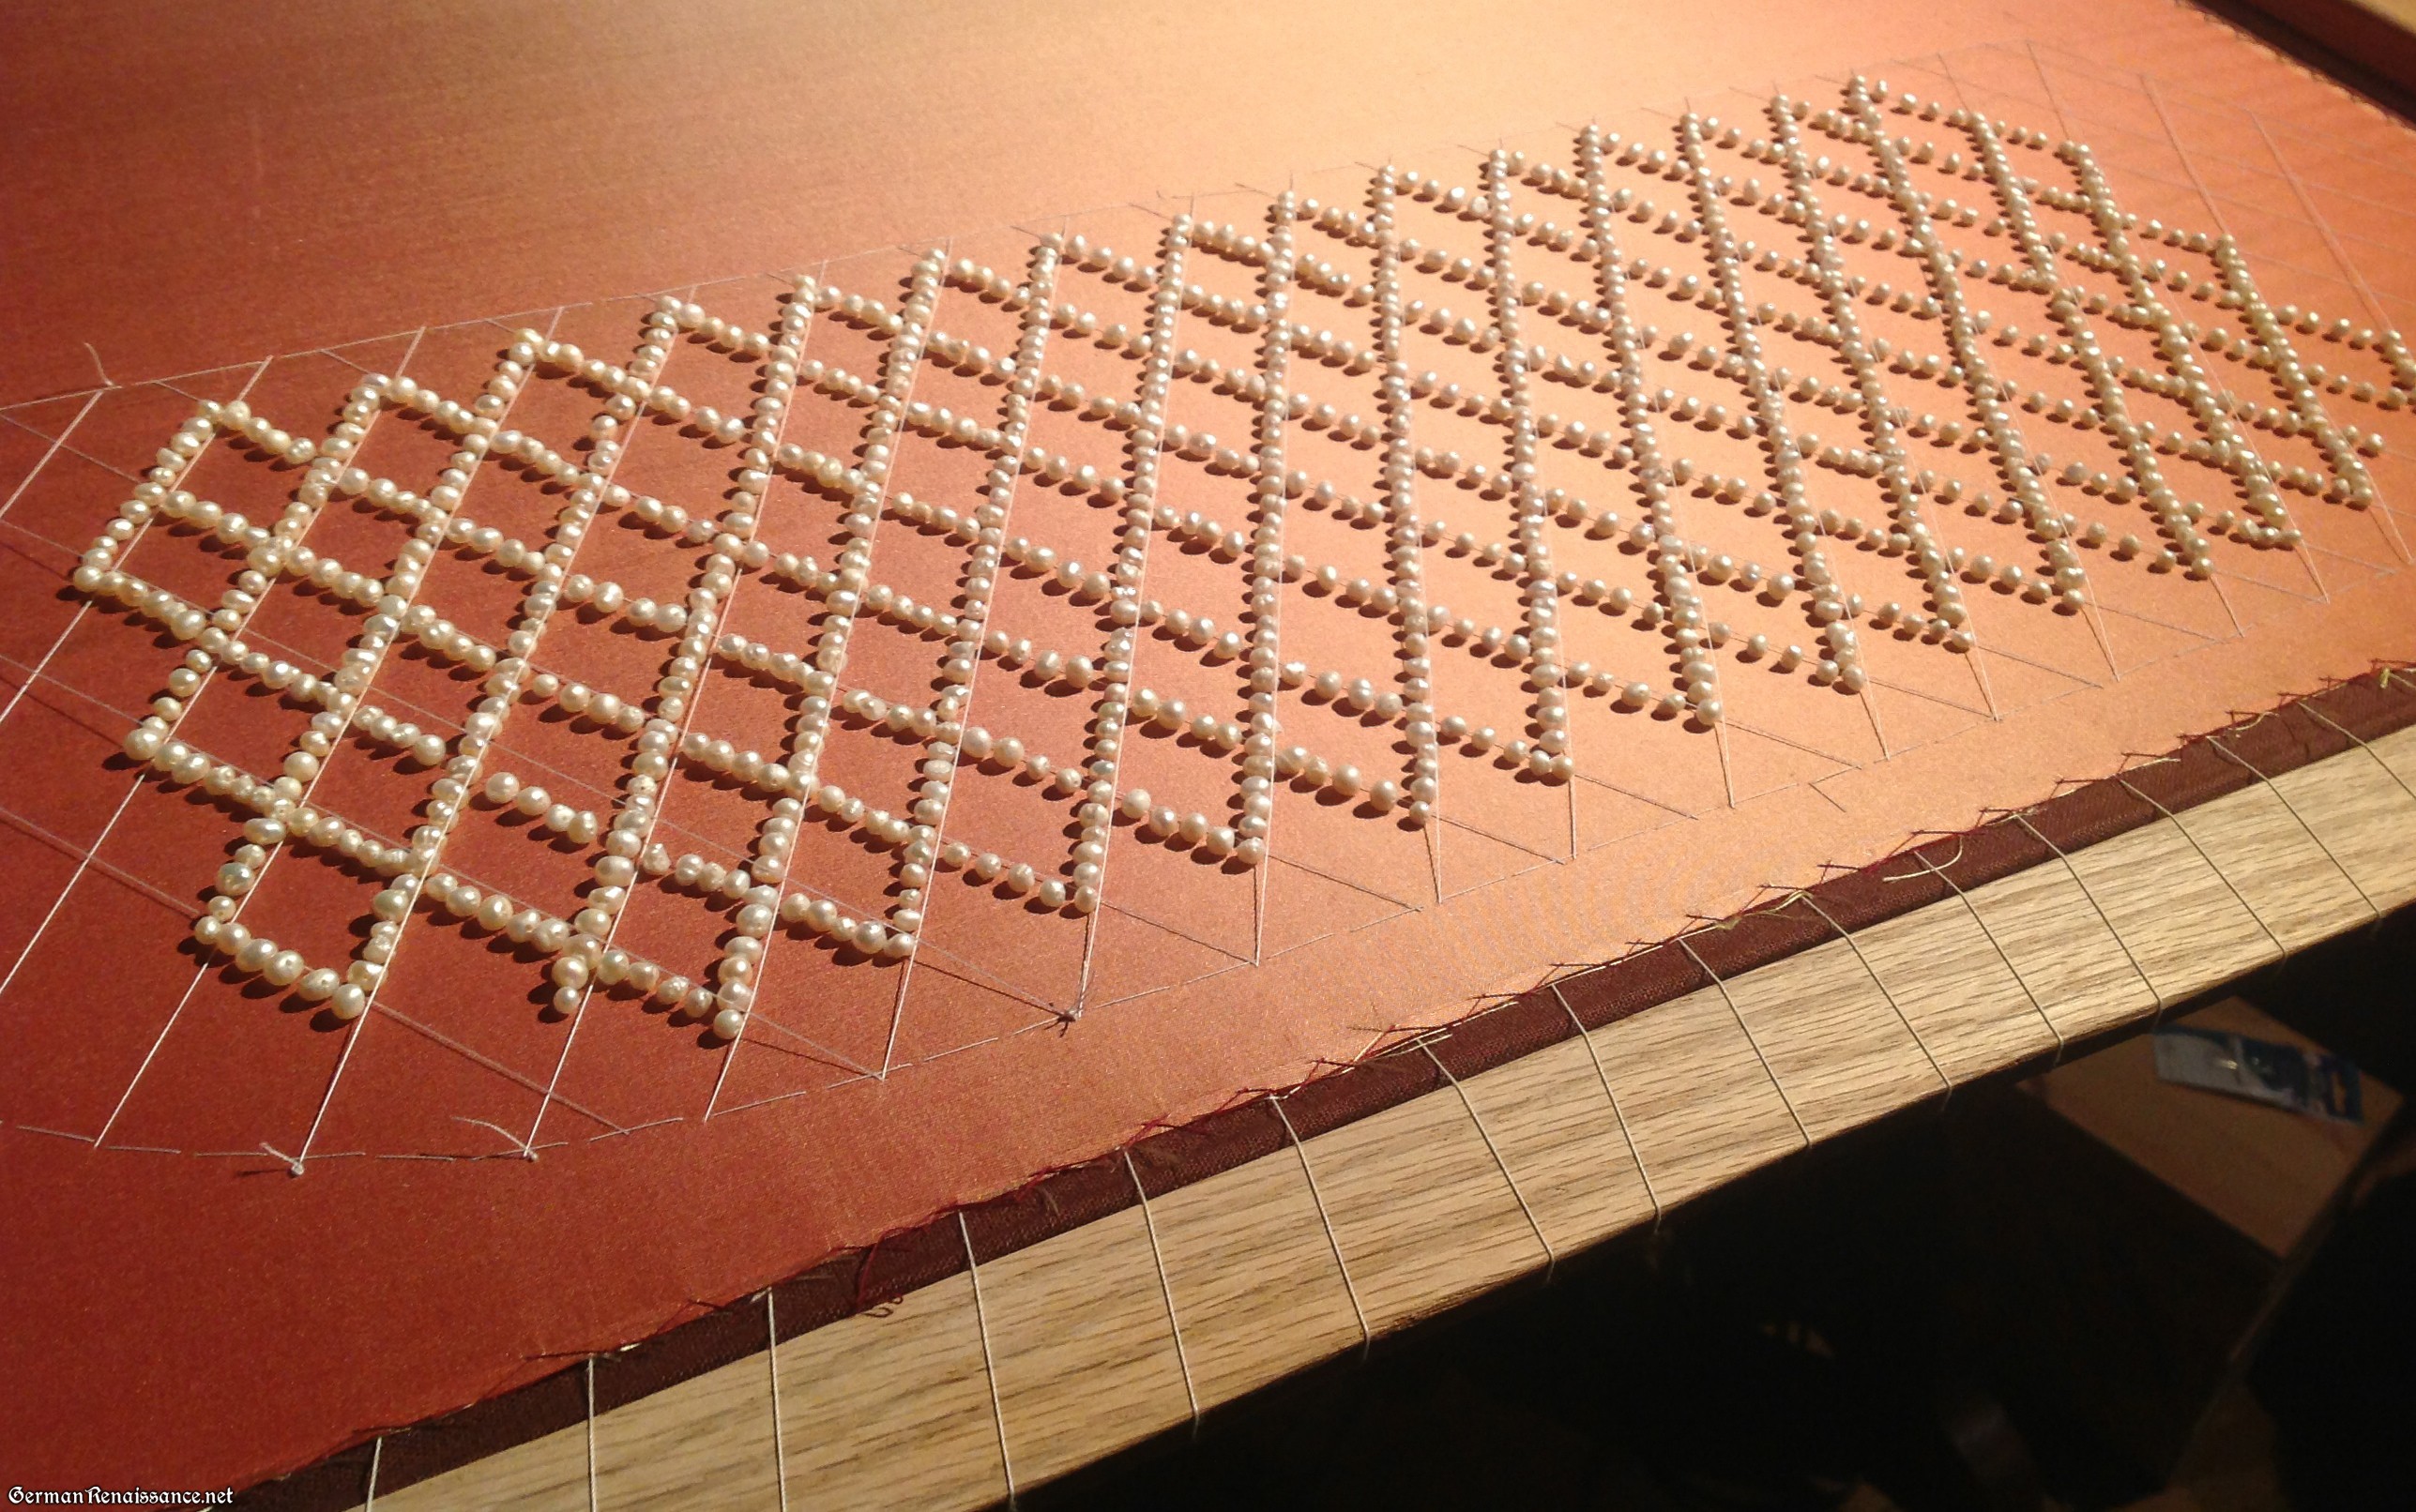
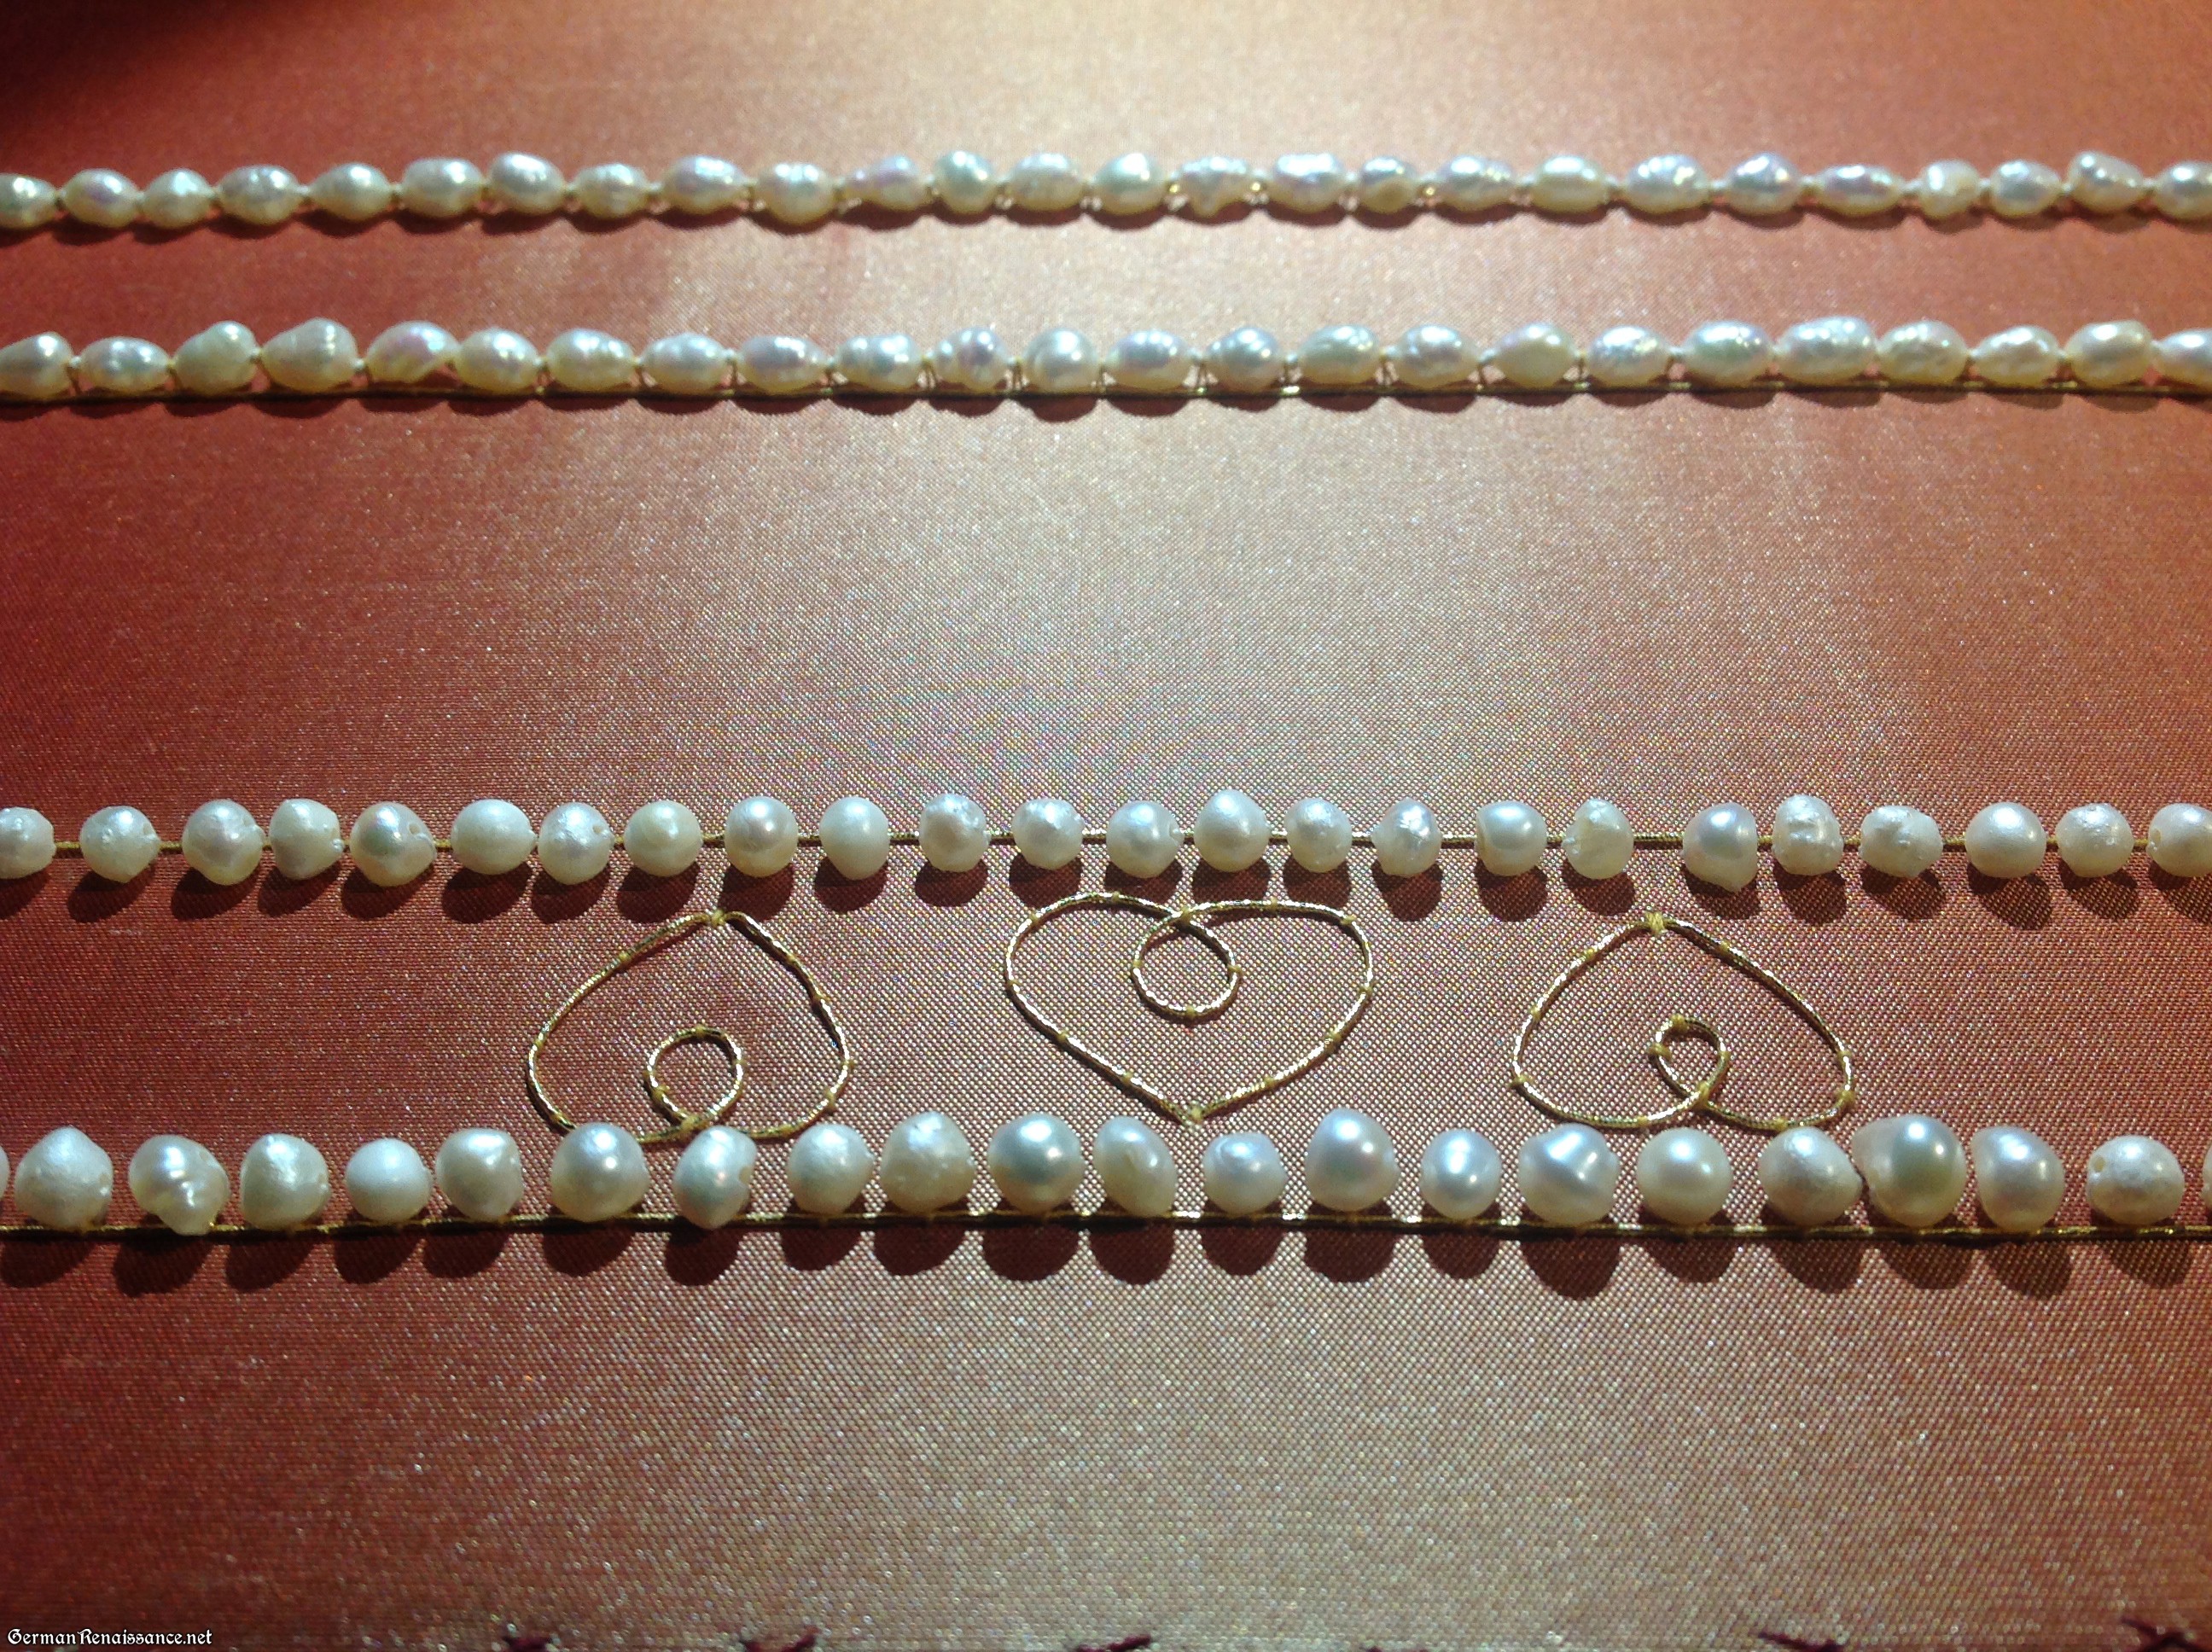
6. Now it’s time to turn your attention to the two head bands. I did not bother to stitch around my pattern pieces for these. Instead, I simply started by couching down a straight line of gold passing thread. I then added another, parallel to it, exactly one inch away. I repeated this for the other head band, making sure to leave plenty of space between the two bands.
Couching the gold passing thread in parallel lines one inch from one another
7. Once you’ve got your gold passing thread couched down, apply your pearls just inside the gold lines. I recommend the couching method of attaching the pearls for the head bands.
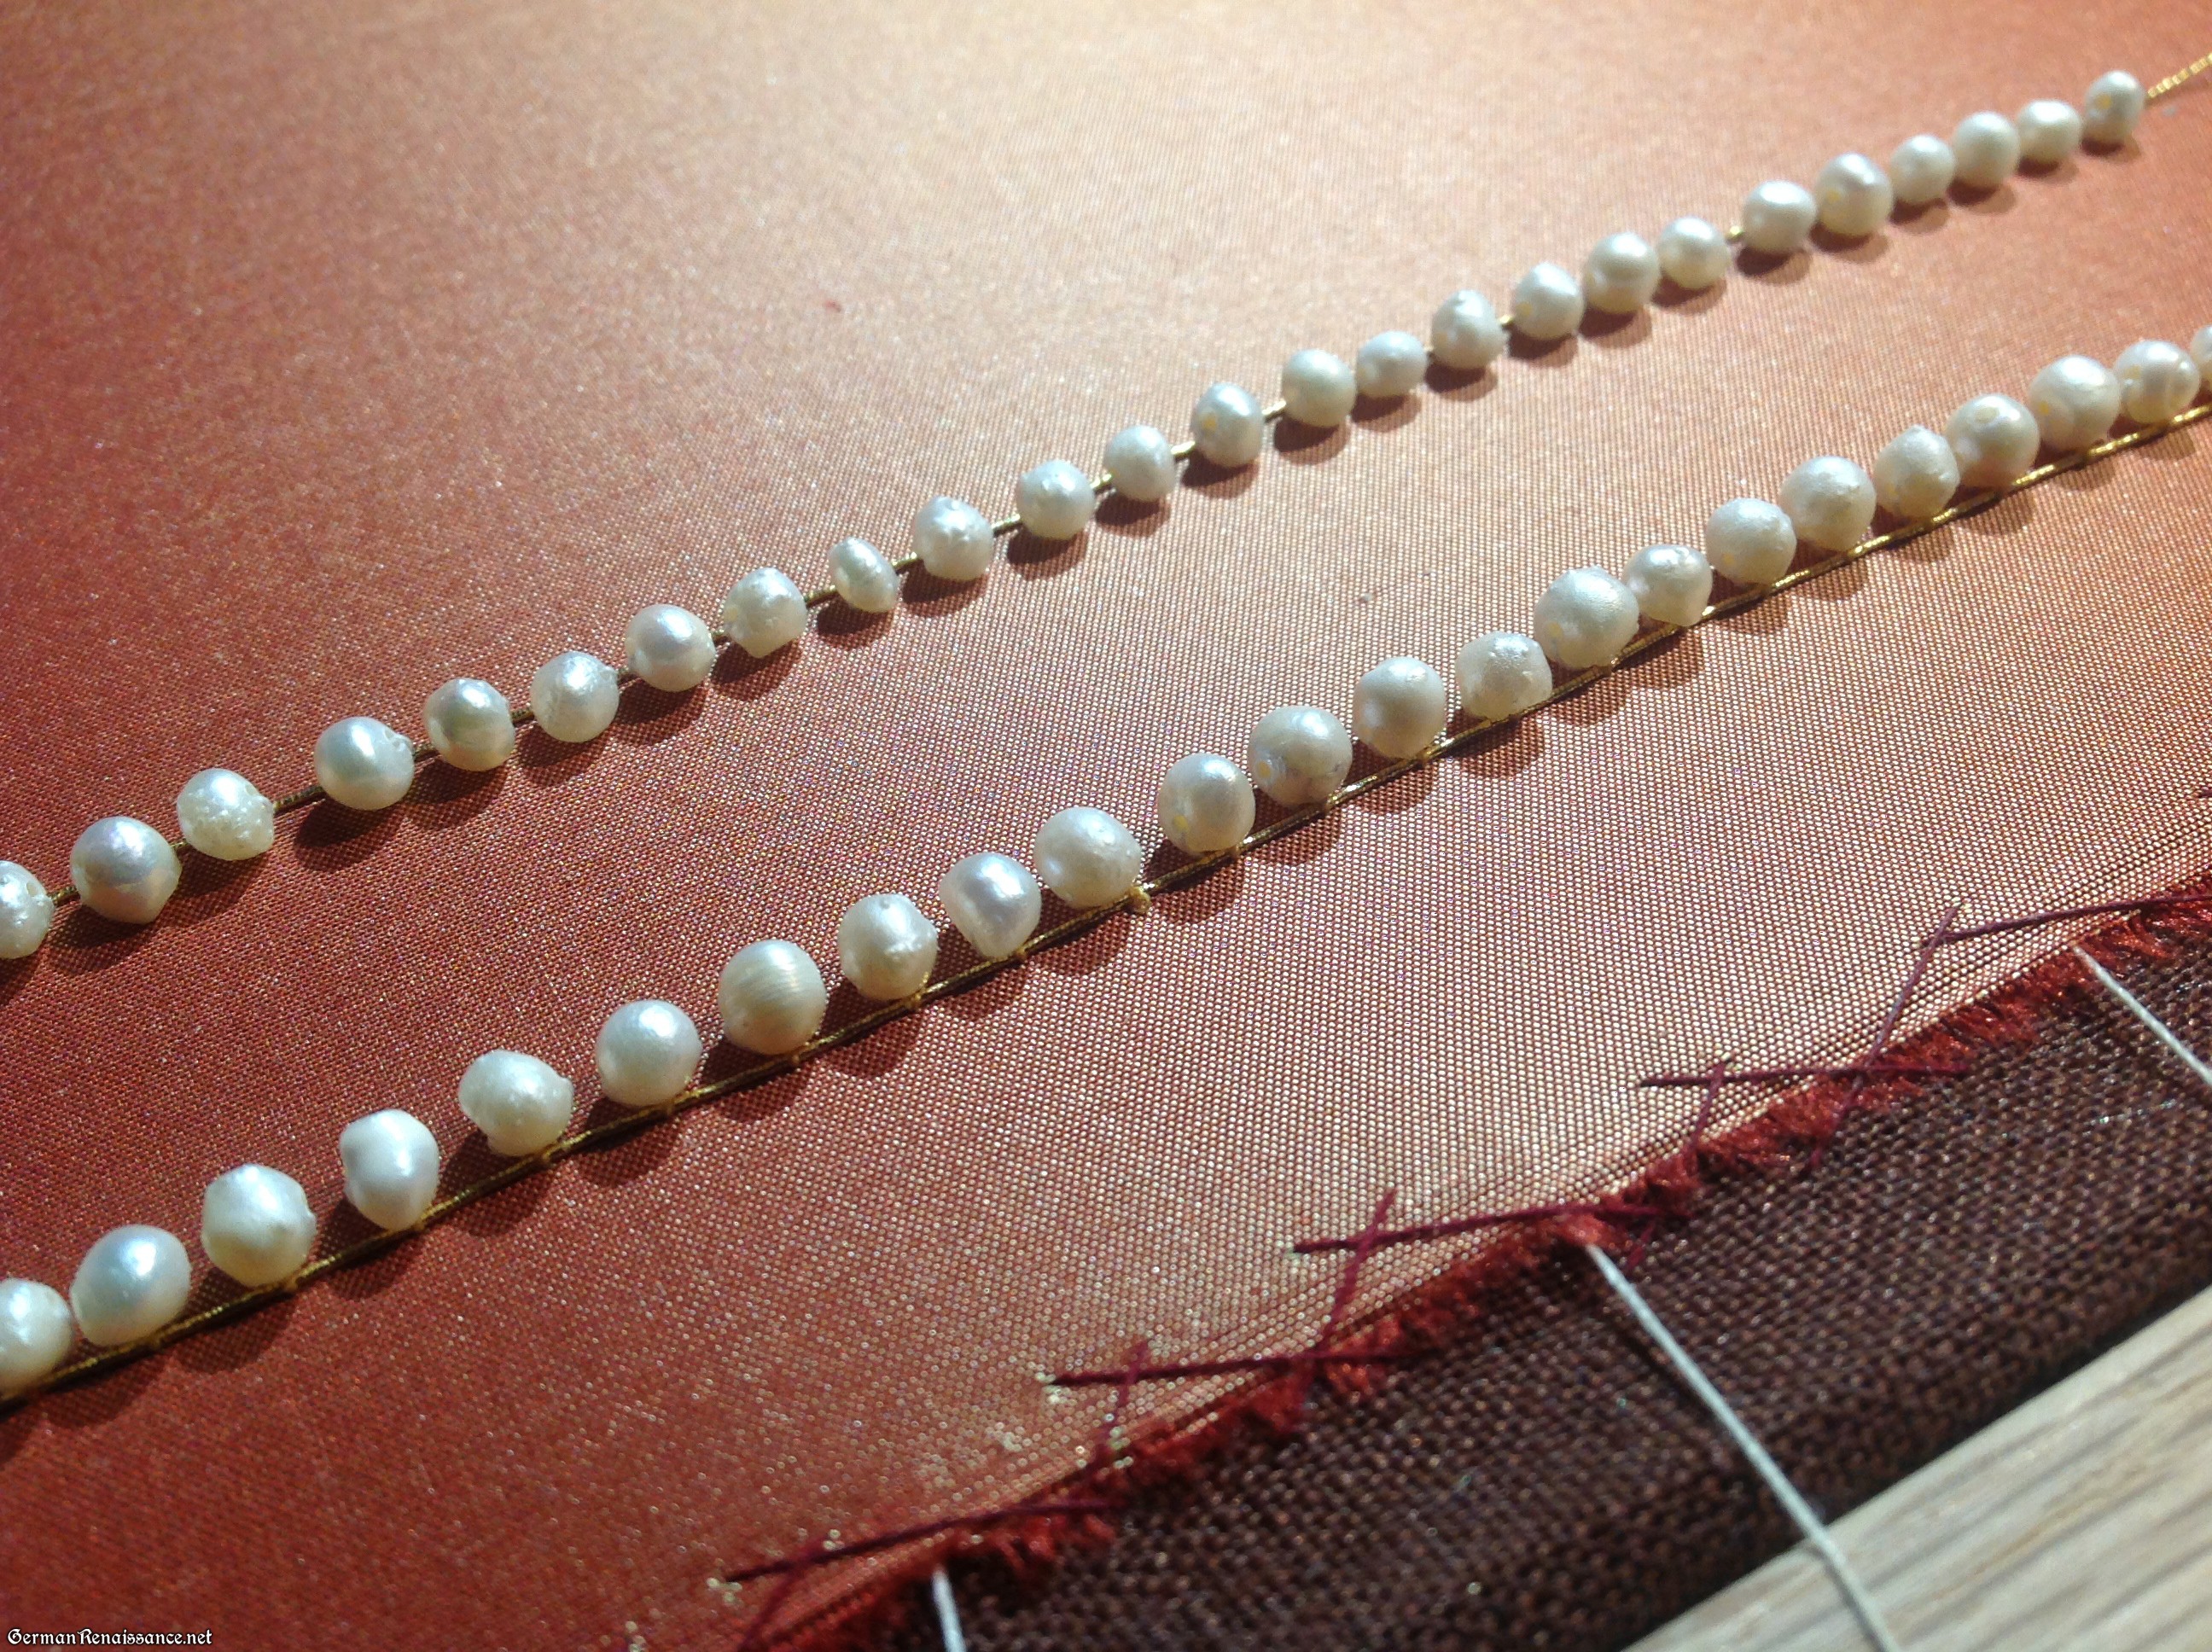
Attach pearls inside the gold lines
8. Now you can add more goldwork by created designs in between the rows of pearls with your gold passing thread. I chose to put in hearts (part of my heraldic device), but you can pick something else or leave it blank. Check the Lucas Cranach Digital Archive for inspiration!
Goldhaube Construction
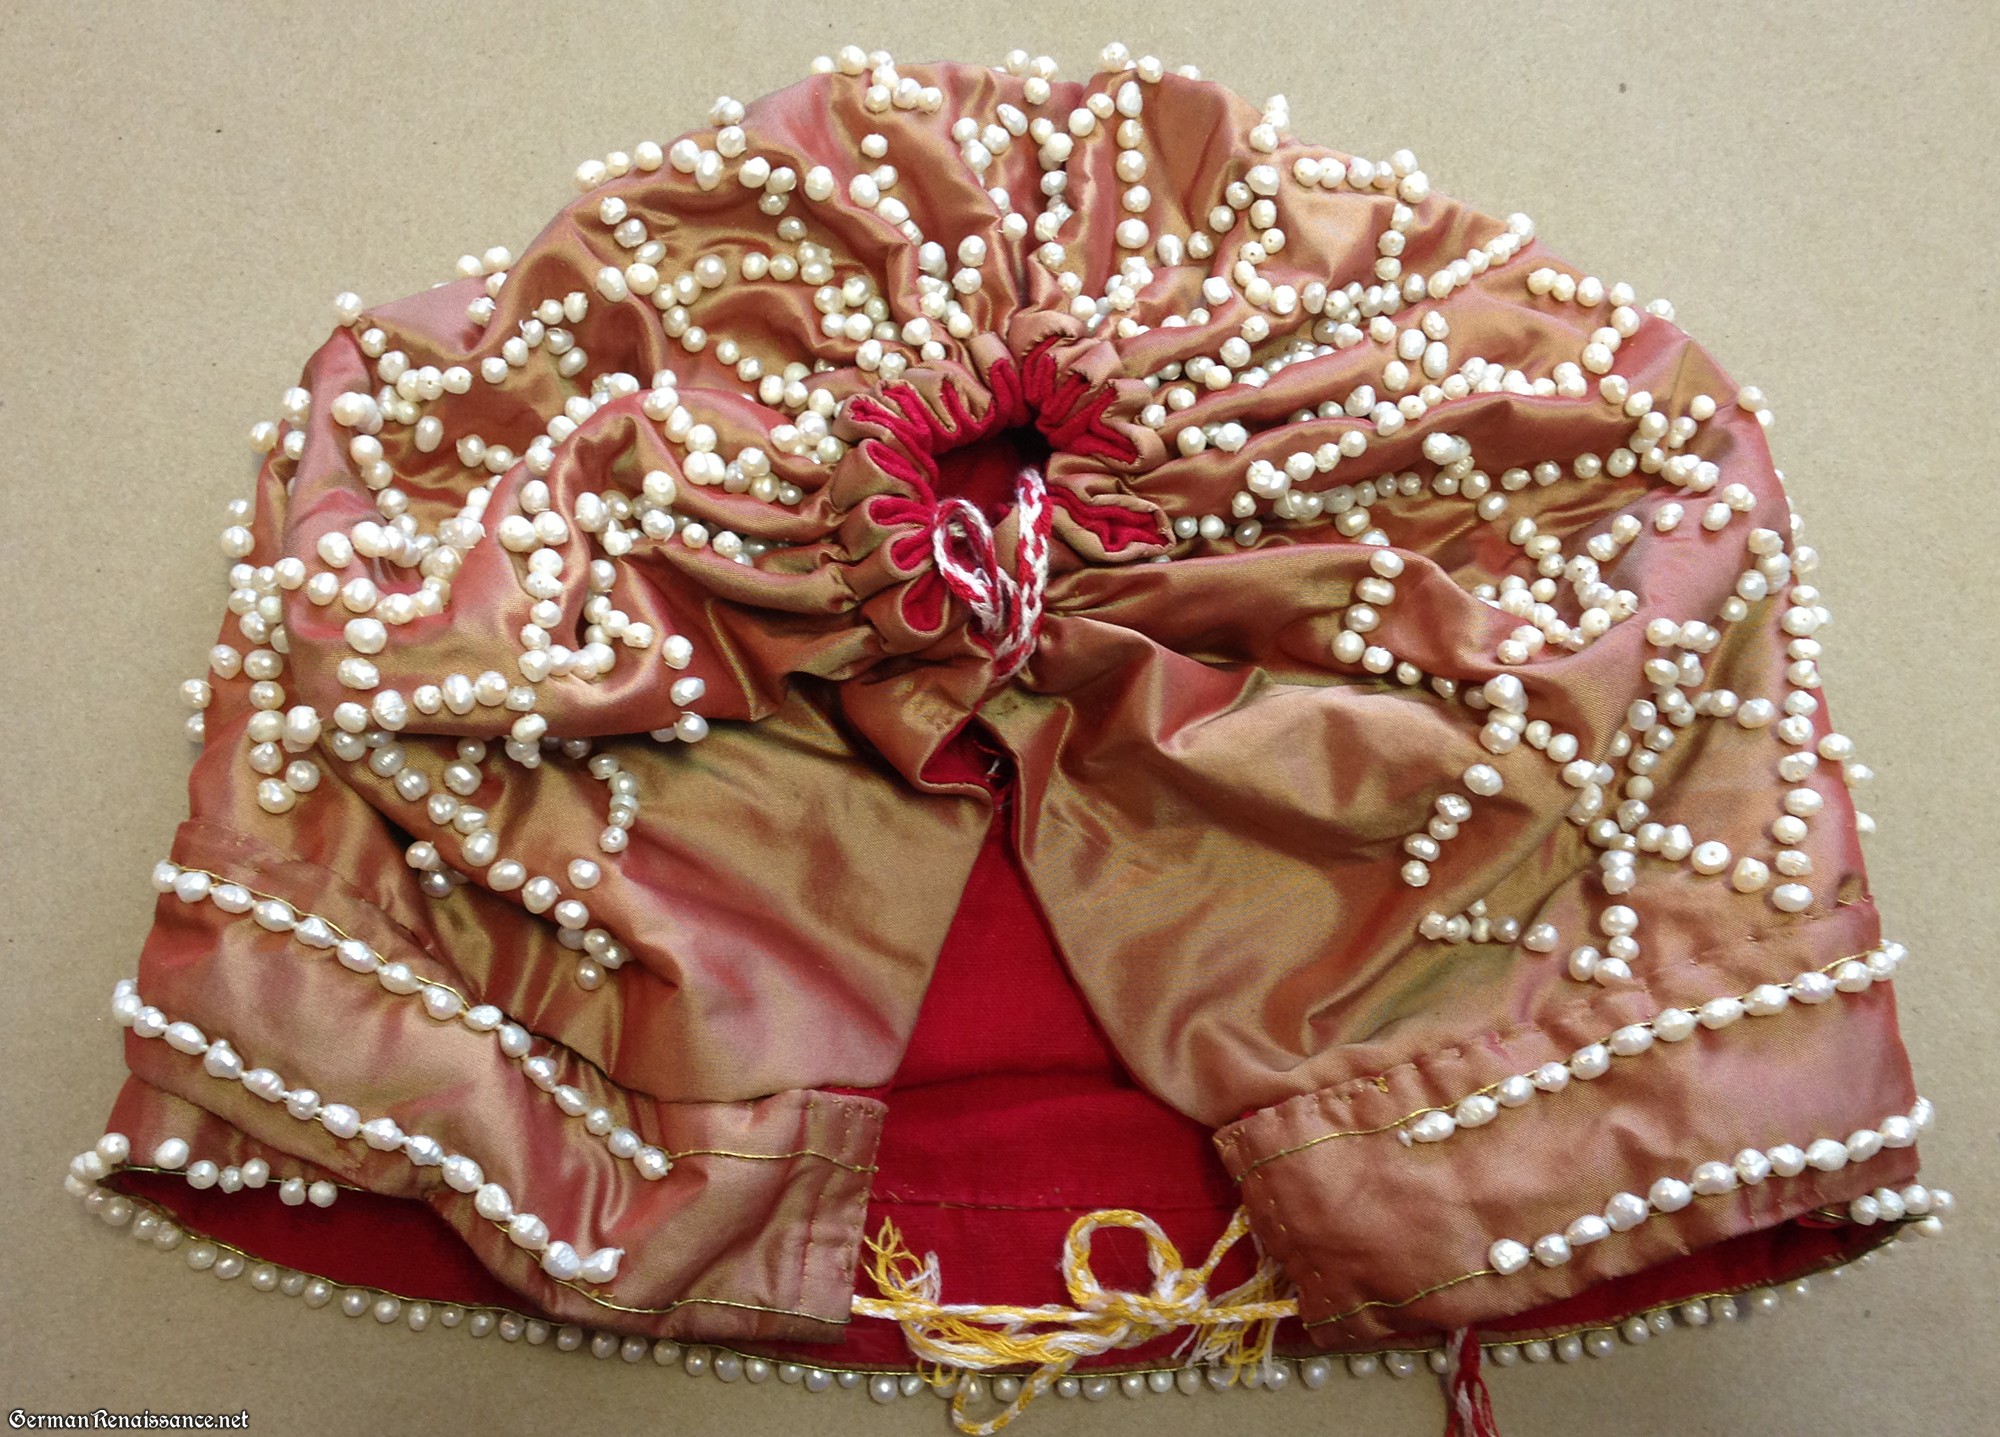
9. Now that your pearls and goldwork are applied, carefully remove the fabric from the slate frame (I simply cut the threads and then cut off the sides) and cut out your pattern pieces. The hood is easy — just cut outside your thread guidelines. The bands are also easy — cut 1″ from the edge of the outer pearl/gold lines for each band. You’ll also need to put a piece of taffeta and linen for the crown section (see pattern), which has no pearls or goldwork on it.
Note: From this point forward, I will refer to the linen that backs the taffeta as the “interlining” to avoid confusion.
10. Sew the crown taffeta and linen together (see photo), leaving a small portion unsewn so you can turn it inside out. Turn inside out, press flat, and stitch the open section closed. Treat this now as a single piece of fabric.
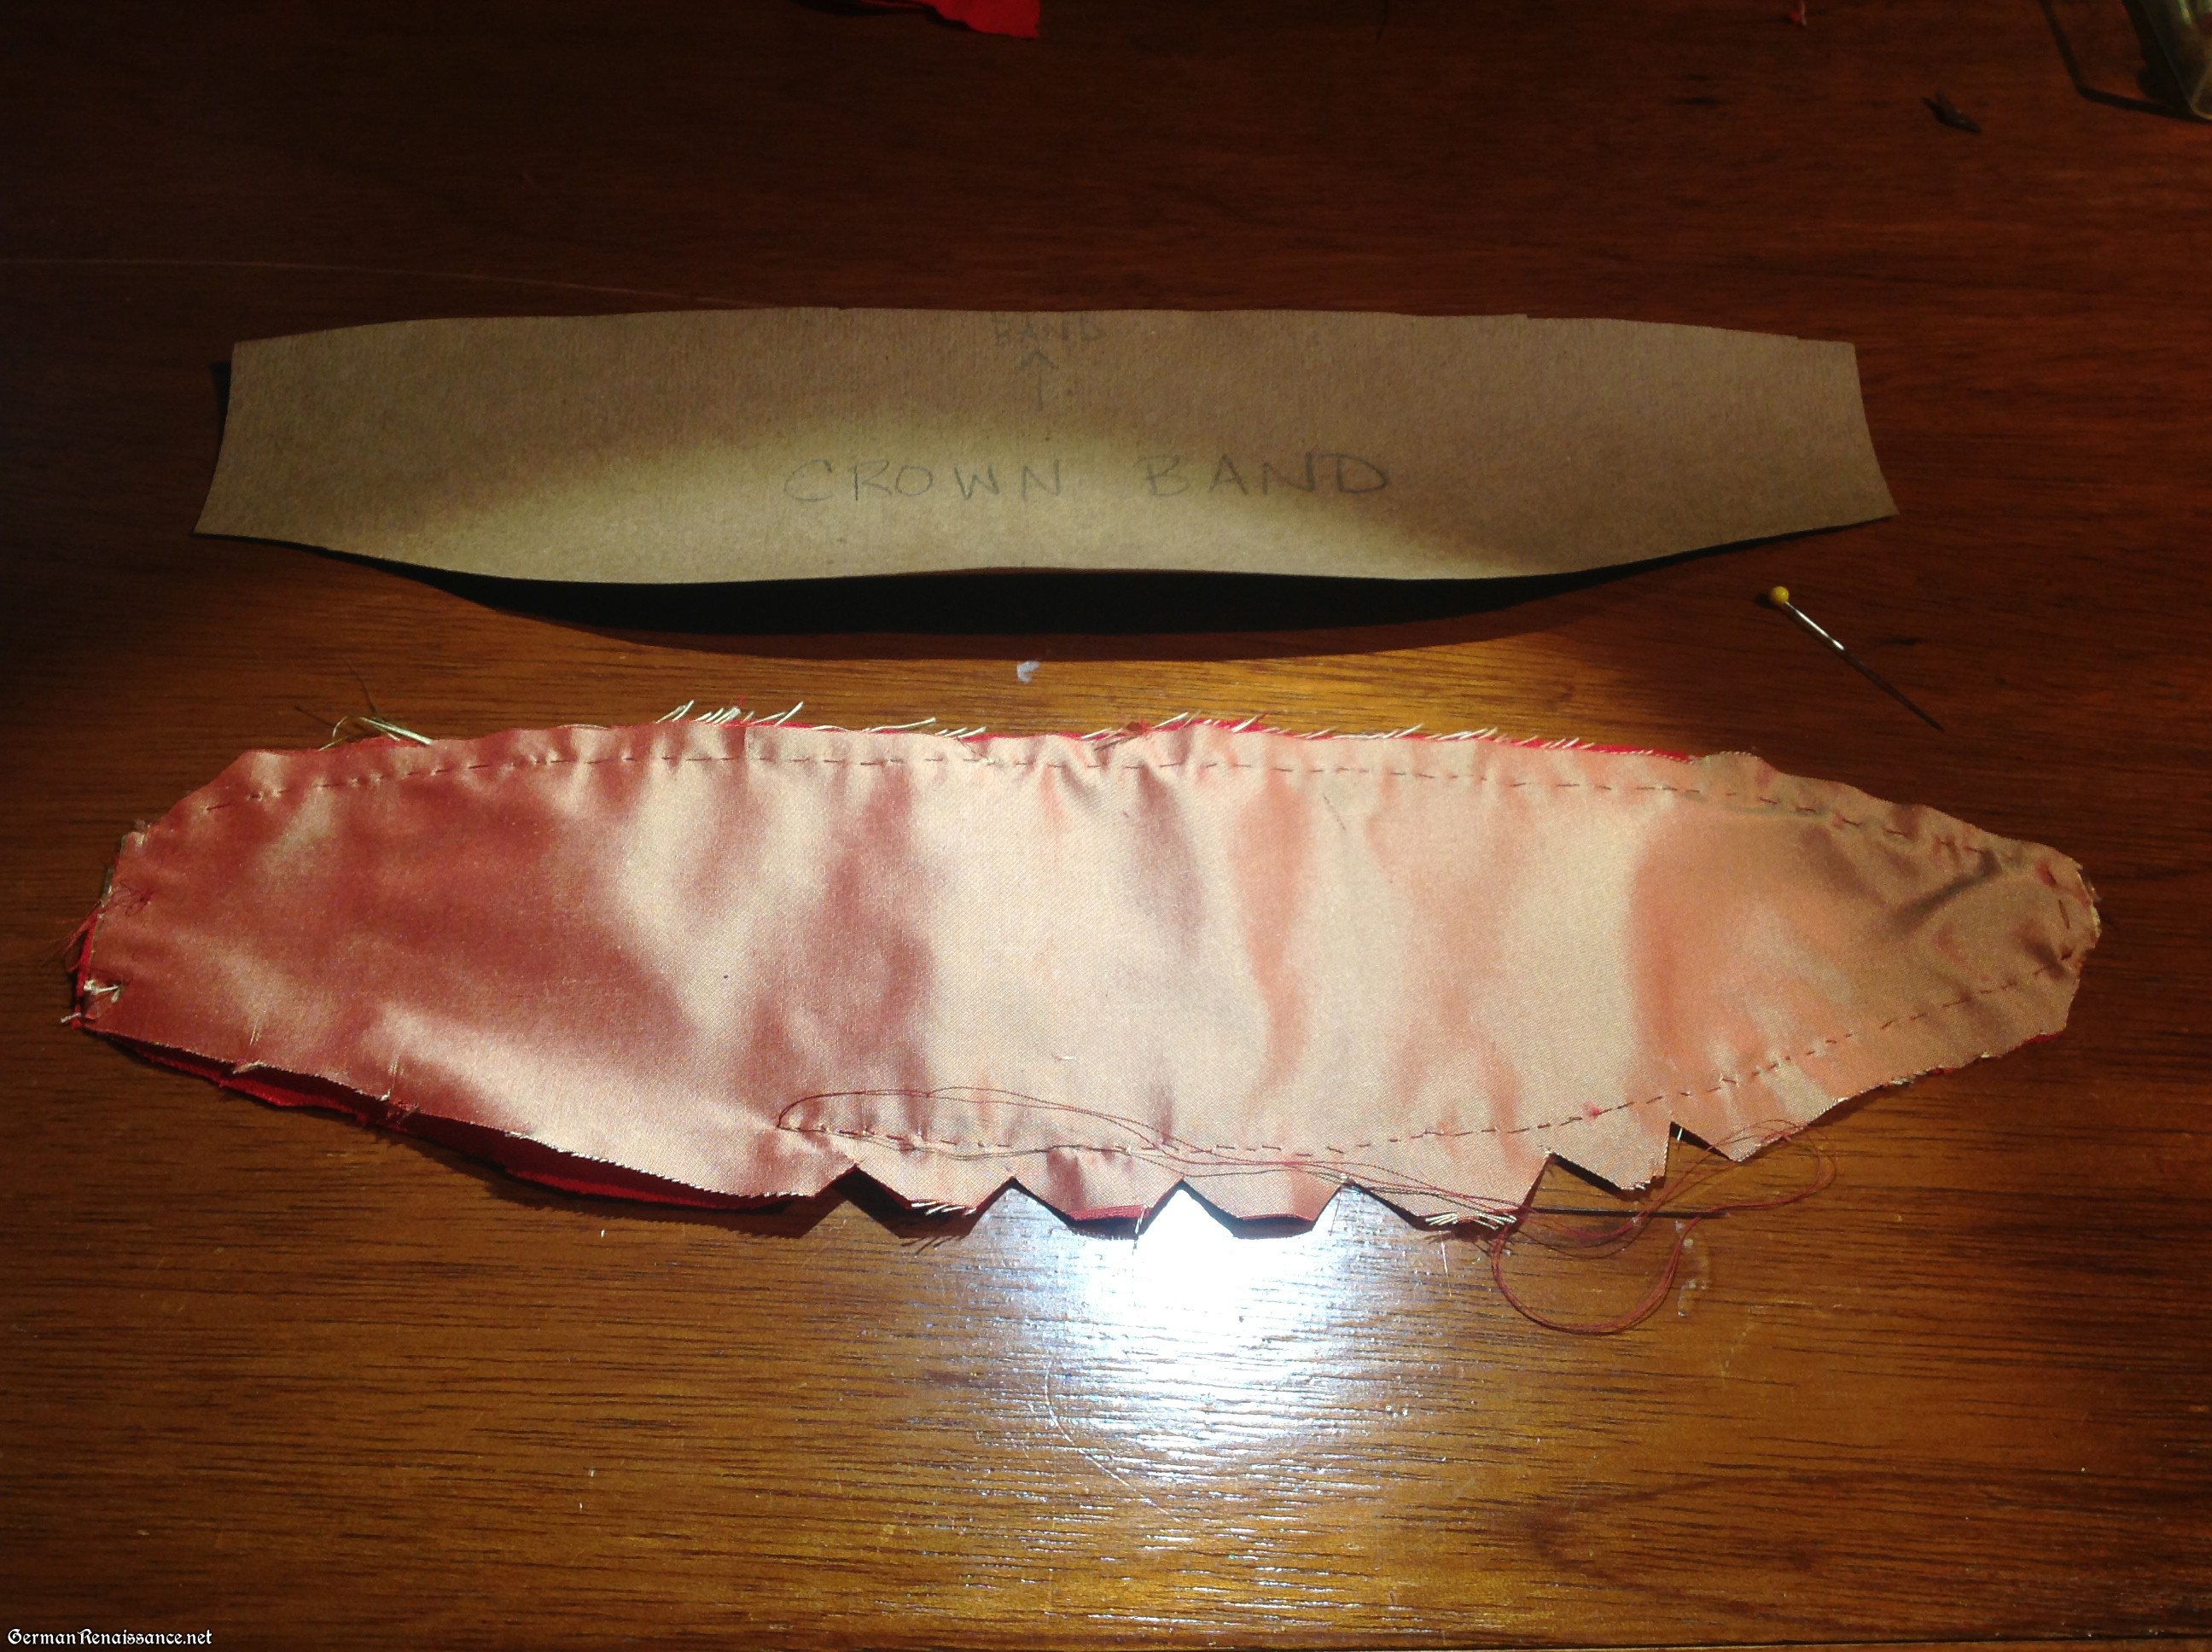
Sew the crown
11. Cut out a new piece of linen using your hood pattern. Now sew the hood taffeta/interlining combination together with the new linen just inside the thread guides in the same fashion as the step above, this time leaving the straight edge unsewn except for about 6-7″ on either side. Turn inside out and carefully press edges. Leave the open side open for now.
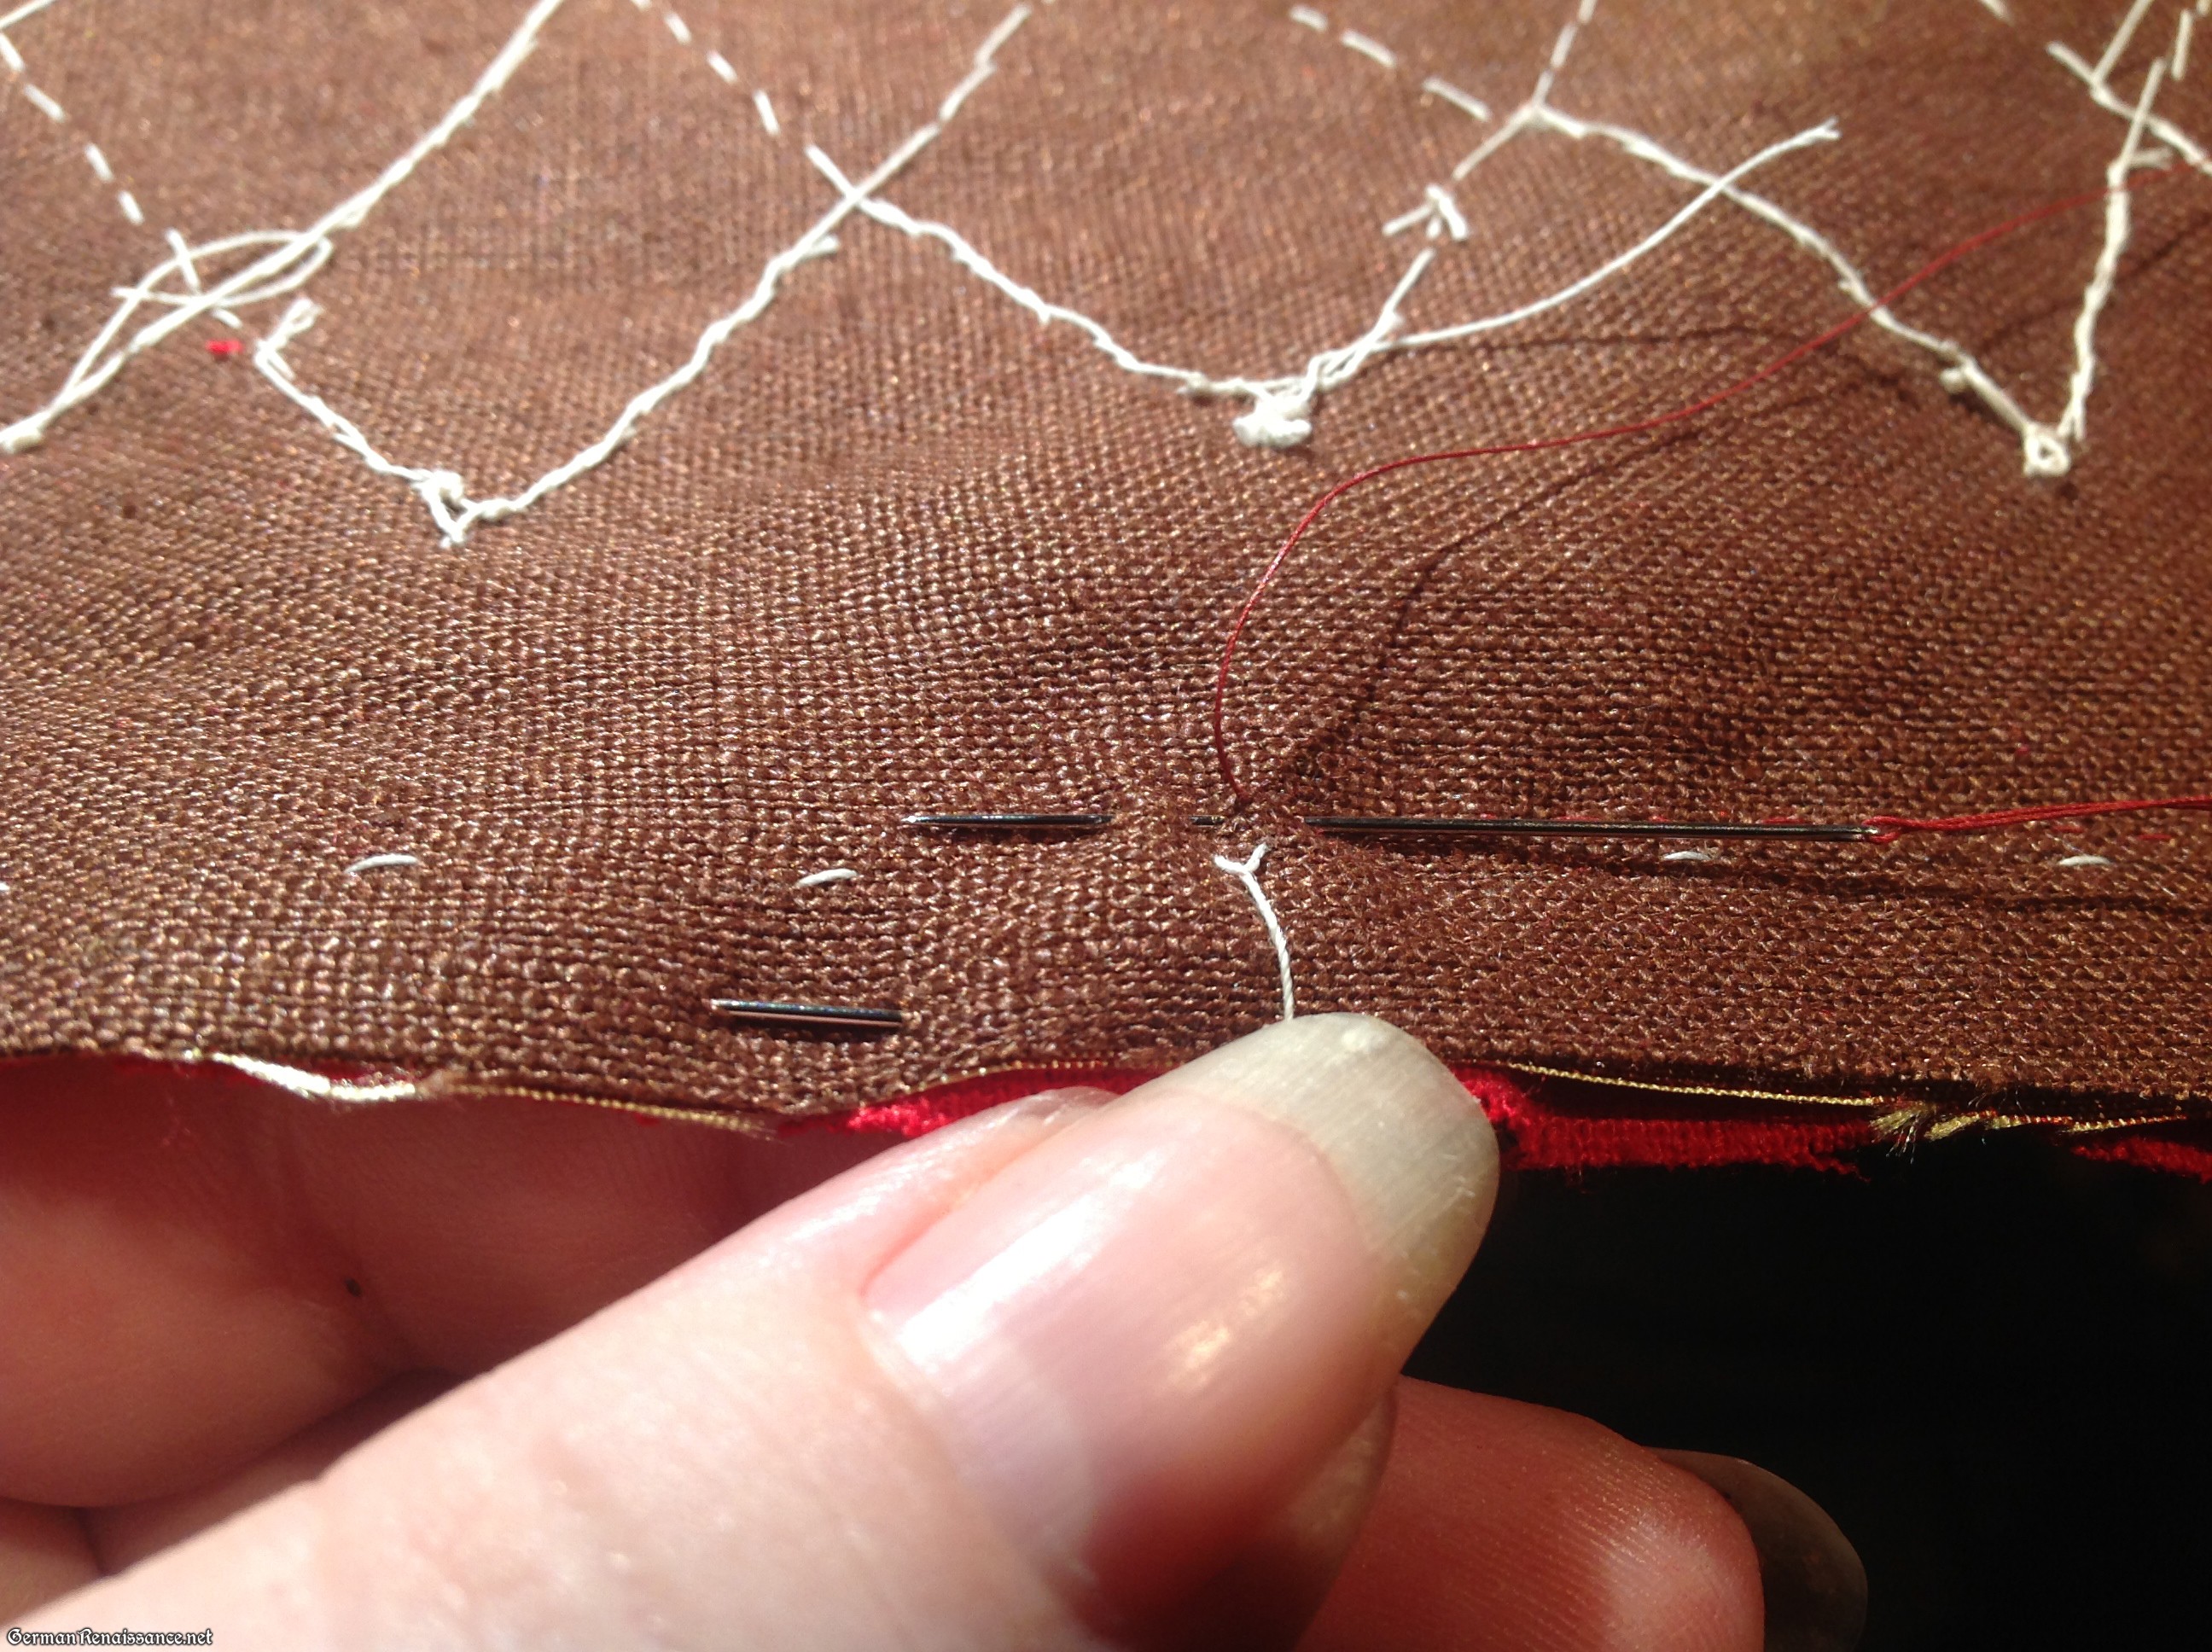
Sew the hood’s taffeta to the linen following the thread guides.
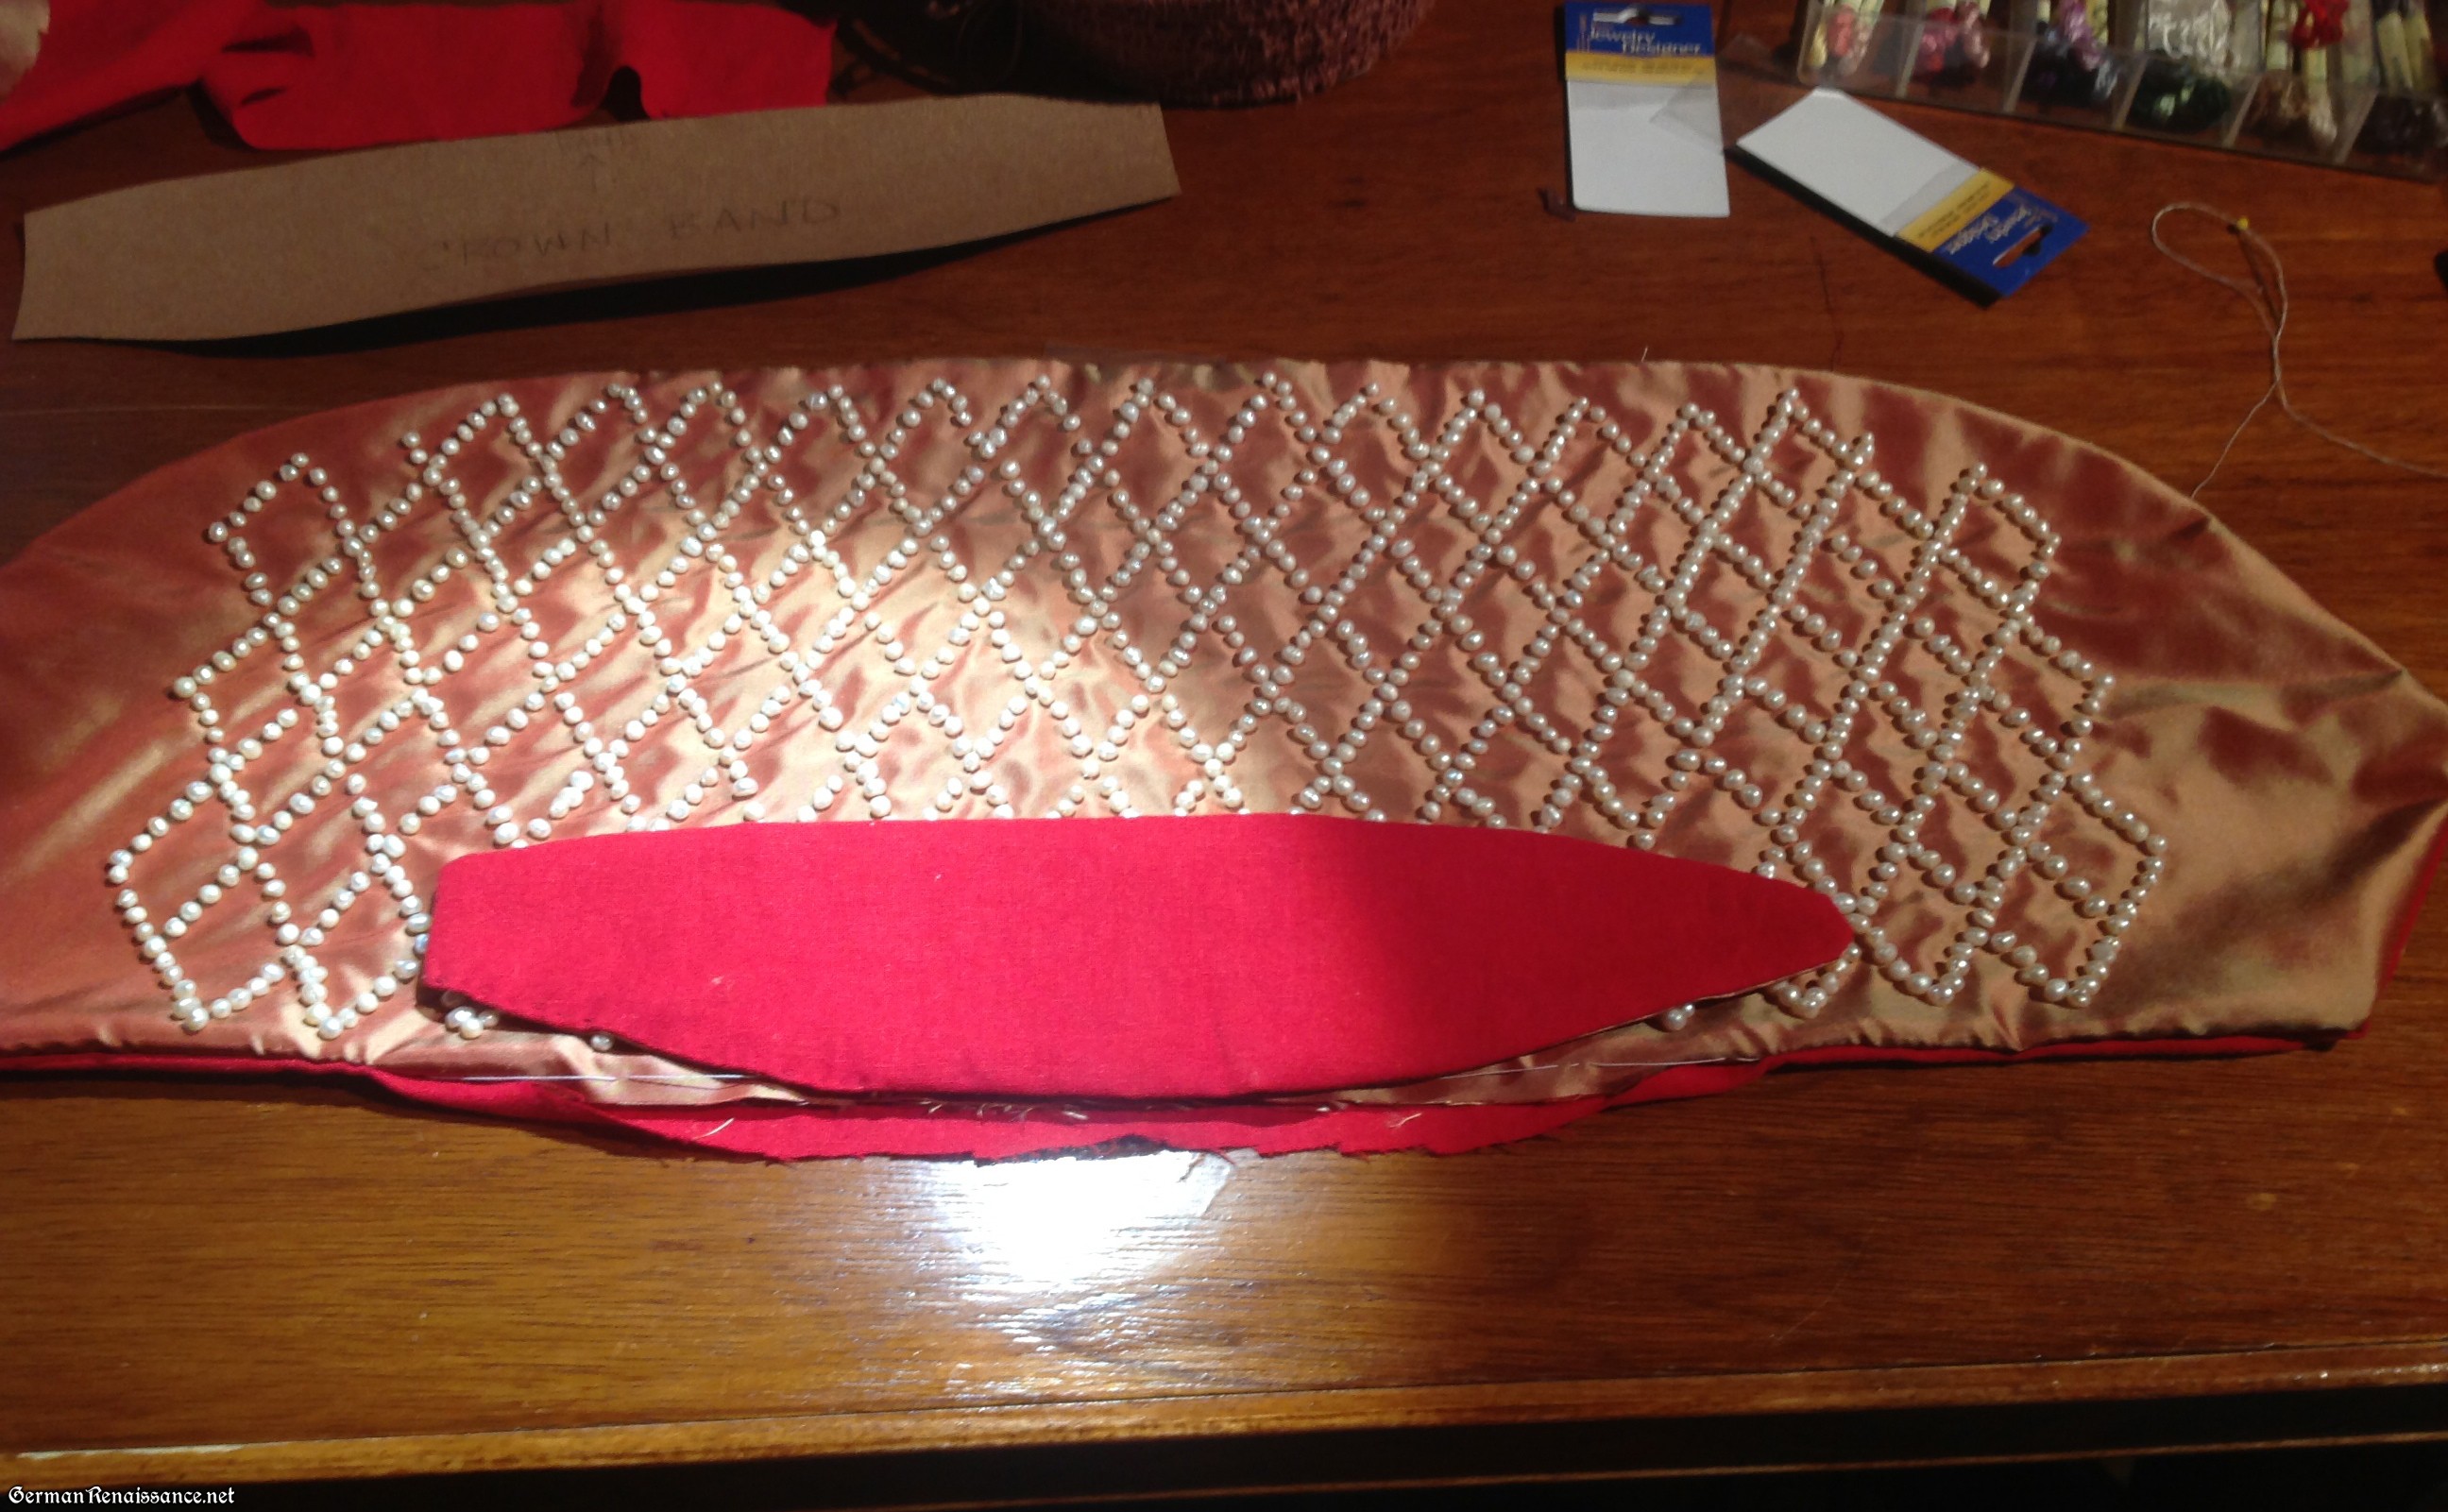
12. Place the crown and straight side of the hood right sides together, then sew together with small stitches. As you did not sew the hood closed here, you’ll want to sew the crown only to the taffeta/interlining in the places where they are not attached to the new linen. Yes, this means your new linen will still be unattached along this edge.
13. Check all your pearls for any issues and fix before you stitch down the lining. It’s easier to do now than later.
14. Make three silk fingerloop braids at least 32″ long. If you’re not sure how, check out http://www.instructables.com/id/Multi-Strand-Finger-Loop-Braiding-or-How-to-braid-/ and http://www.silkwerk.com
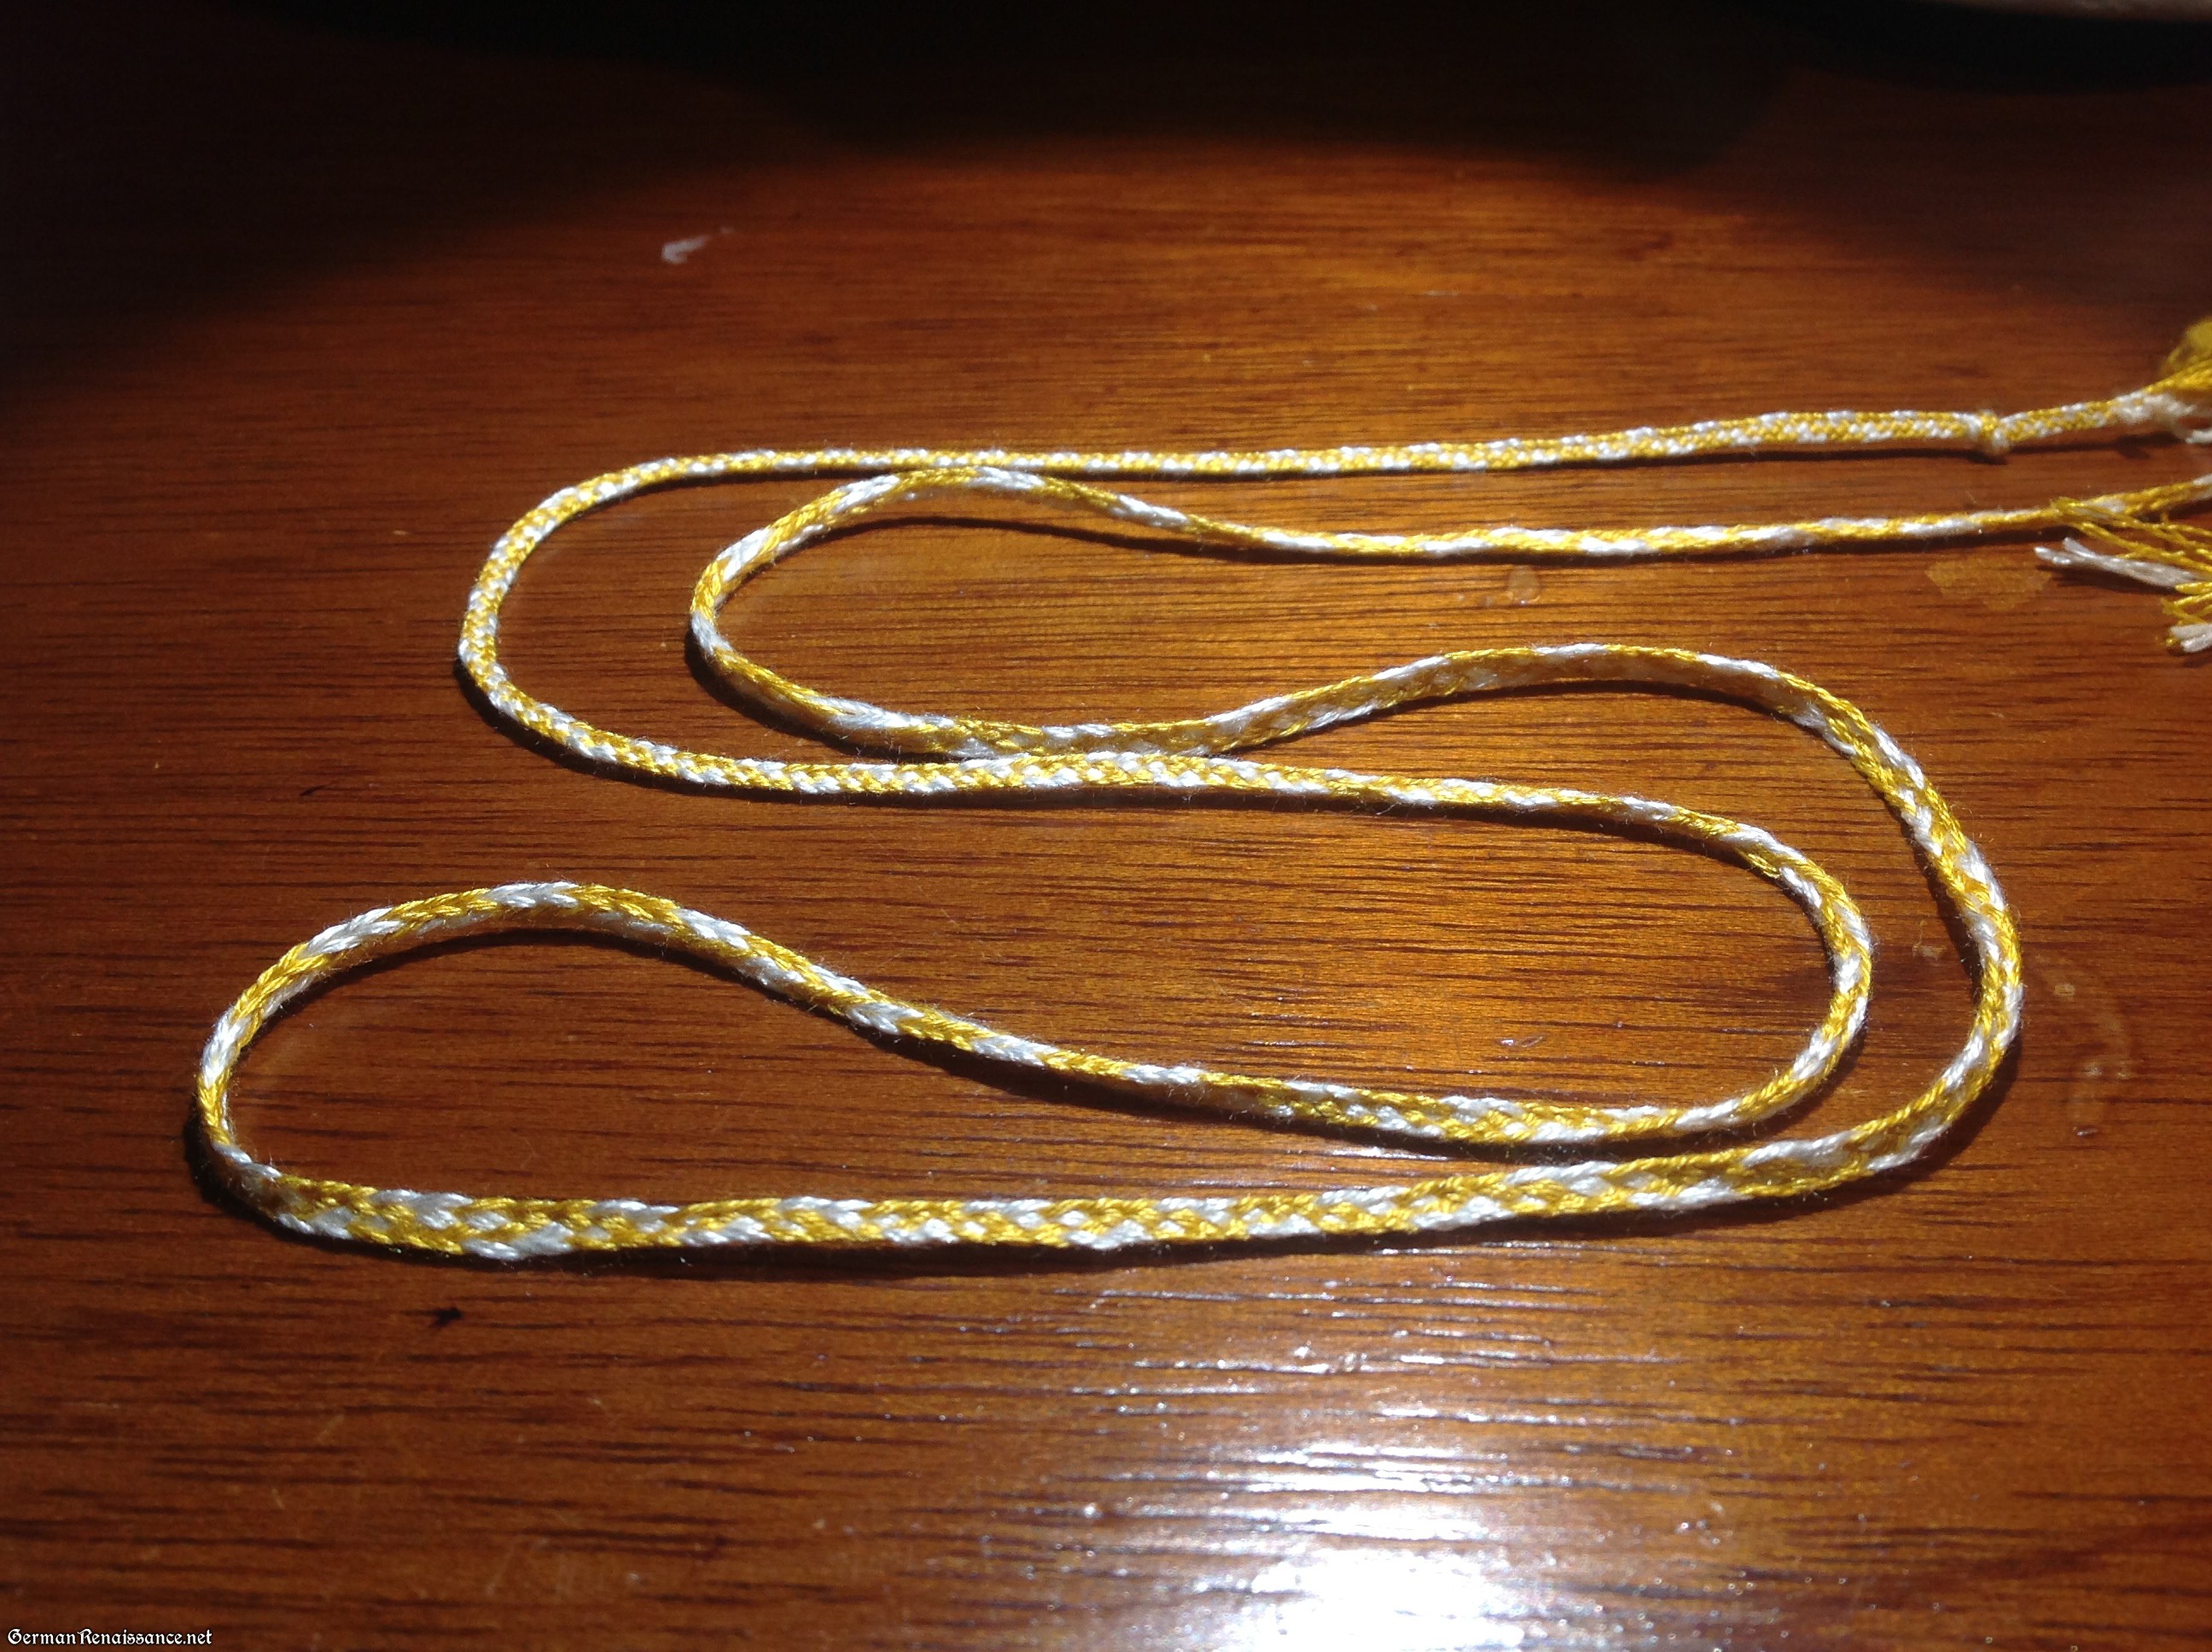
Fingerloop braid
15. Cut out two 3″ inch strips of linen long enough to match your bands. Sew each linen strip onto one edge of your bands, fold over, tuck a braid in from step 14, fold the raw edges in, and stitch down — this gives you a new linen lining to each band, complete with a braid inside it for securing to your head. Try the back band on now to make sure it fit across the top (crown) of your head and just barely meets (or doesn’t quite meet) at the base of your head — if it’s too long, shorten now.
(I apologize for the lack of photos from this point.)
16. Now sew the front band to the crown (the band should just overlap the crown, with the band on top).
17. Sew the back band over the section between the crown and the hood, lining up the edge of the band so it just means the point where the pearls begin.
18. Decide how you would like to gather the bottom of your hood. I chose to sew a casement in the bottom of the hood’s fabric, but another option is to add a length of bias tape or even loops of braid or narrow bias tape to the edge of the fabric. If you decide to sew a casement as I did, first poke two holes at either end of the curved section of your hood using an awl, finish the hole edges with a buttonhole stitch to create eyelets, insert your remaining braid into the holes and tuck into the edge of the fabric, then sew a straight line well above the braid (just under the lower edge of pearls) to create the casement. Now pull the braid tight and tie it to gather up the edge of the hood.
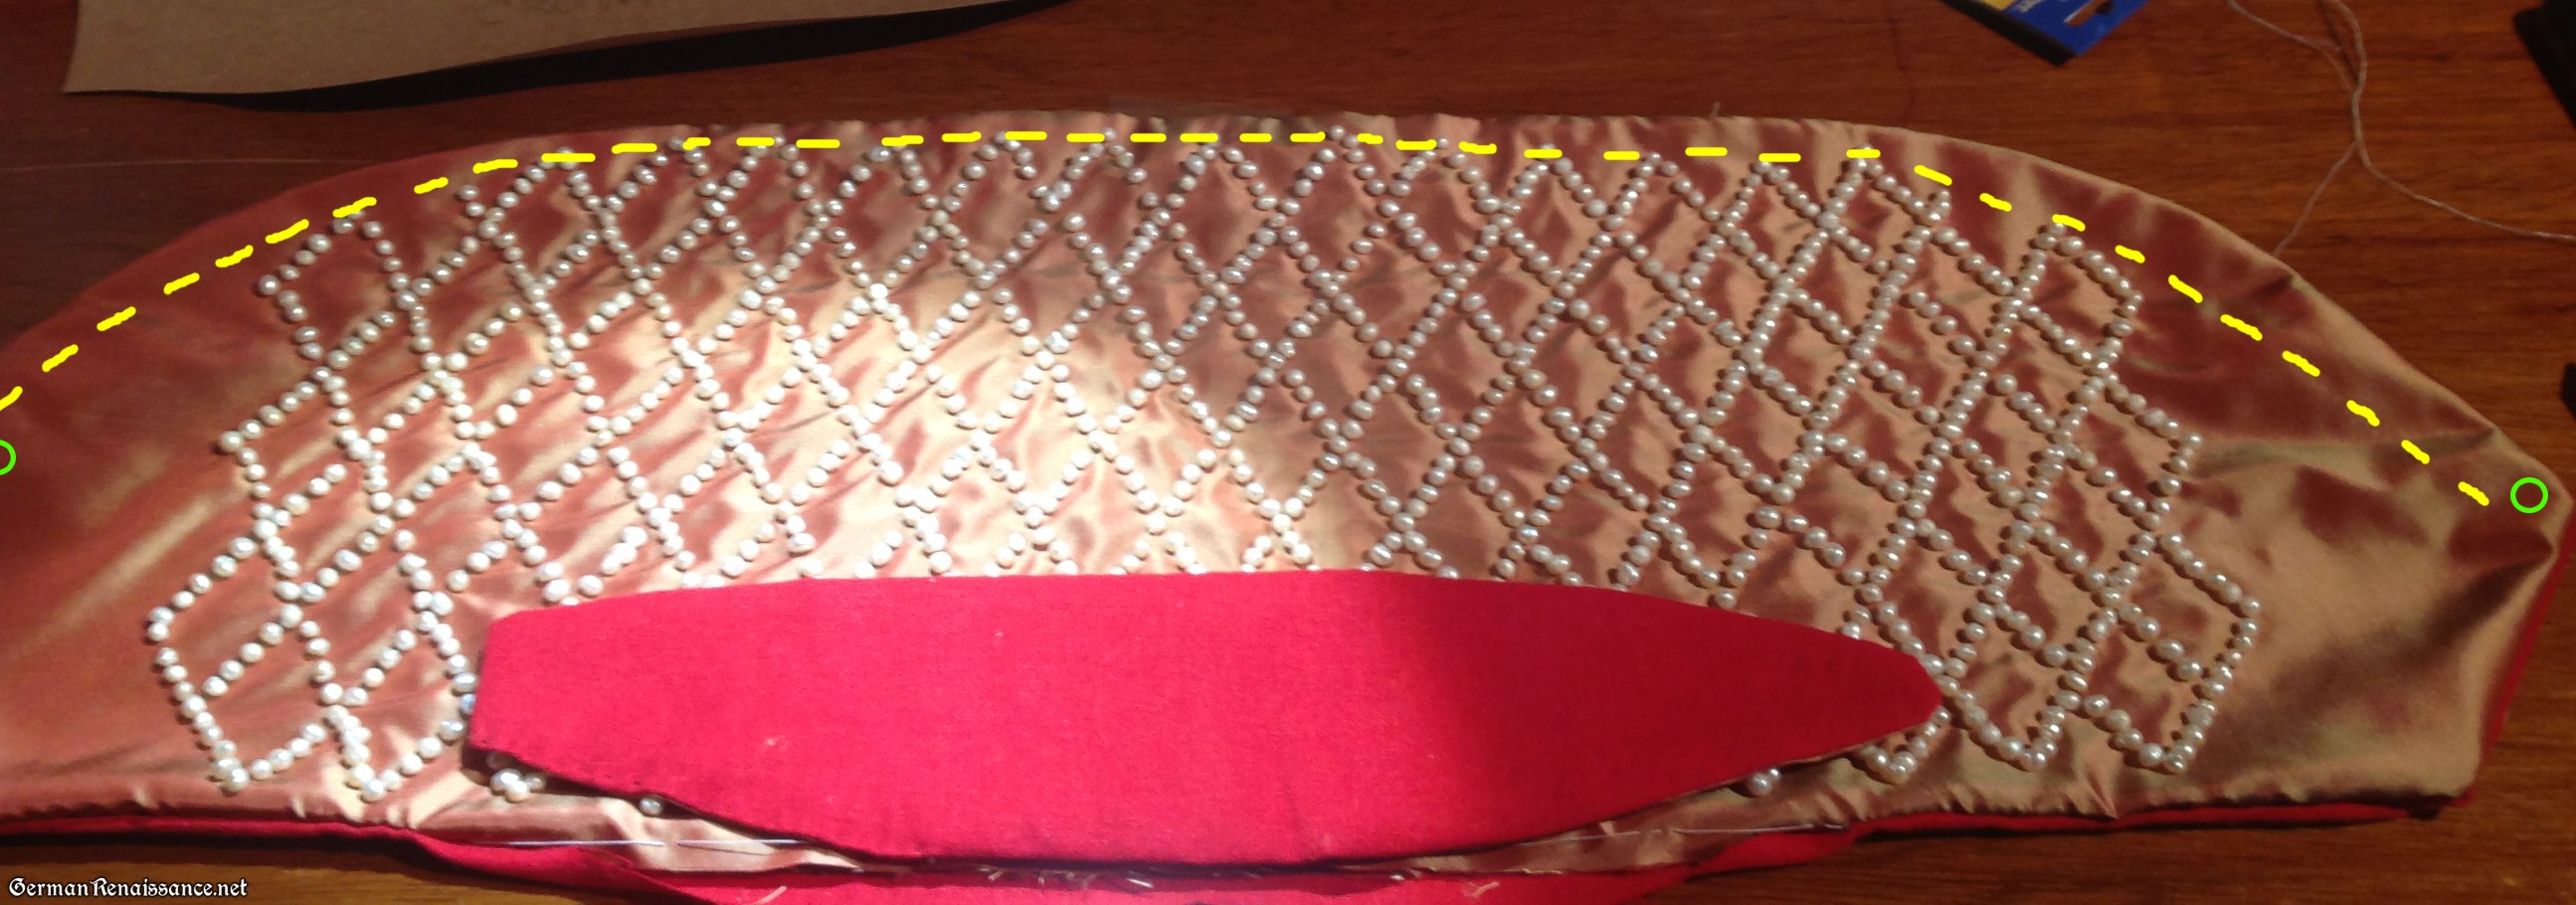
Green circle is placement of eyelets (holes), yellow dotted line is the sewing line for the casement.
19. Stitch the loose lining of the hood to the lining of the crown. There’s no need for these stitches to be super small, as you may want to open this lining up at this point to make adjustments or repairs later on.
20. Braid your hair, add your zopfe (braids) and/or attach your padding, then try on your cap! Tighten the braids for both bands to keep secured to your head, then tuck all braids inside your cap.
Goldhaube Notes
A. If done correctly, you should not need any pins to keep this cap on your head. I have super slippery, fine hair, but my cap still stayed on. It only fell off when I leaned backward, then the weight of the cap pulled it off. If you find you want pins anyway, I recommend sewing small loops to the lining under the front band, then insert the pin into those loops.
B. You do not need to attach pearls—you can use couch gold passing thread instead or embroider gold in a stem stitch. You can also attach the pearls in straight, parallel lines (without the lattice pattern). Check the paintings for ideas.
C. You can wear just the cap, or put a barrett (small or large) or coronet/crown on top.
D. In order to achieve the right look, with the cap bulging on either side of your head, you should have braids or padding here — I don’t think it’ll look right without something to make the cap bulge out. If you want, you can create a special undercap with padding built in, or sew linen-encased-padding (I recommend wool roving) right into the cap (you can see padding like this in the extant flinderhaube which has a similar shape).
Please let me know if you need more detail on any step, or if you have ideas on how to improve this post or the entire goldhaube. I am always open to feedback!
Some high resolution photos for your viewing pleasure (please ignore my spring sunburn):
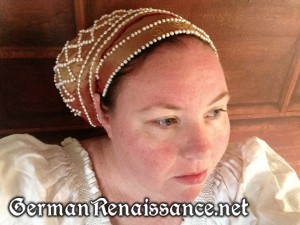
- Wearing the goldhaube — note the close fit to the top of the head and how it extends out on the sides.


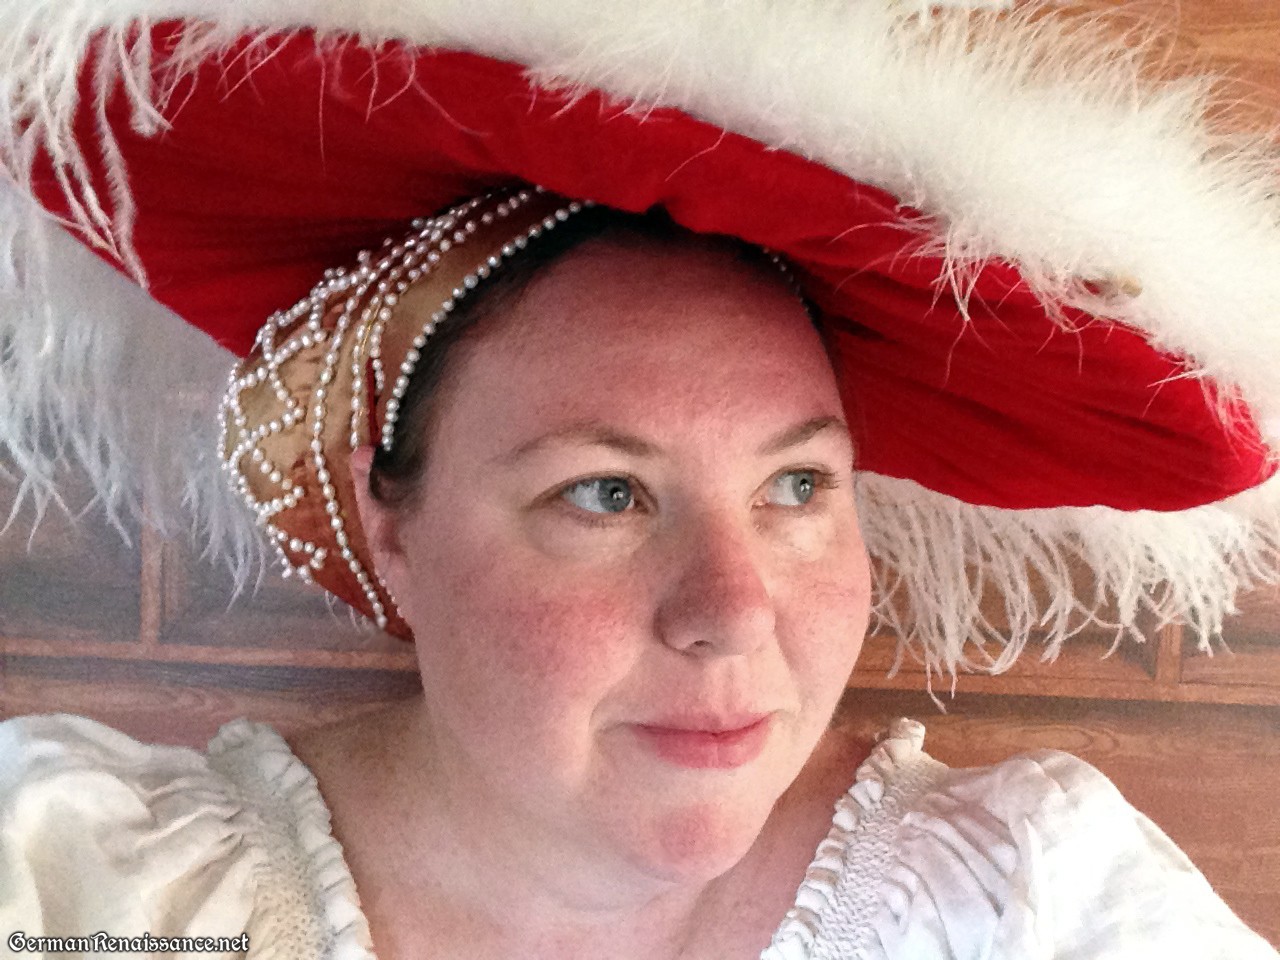
- Wearing the goldhaube under my tellerbarret, as was common in paintings.
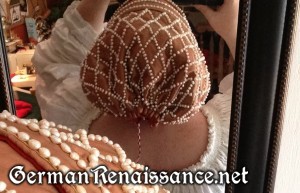
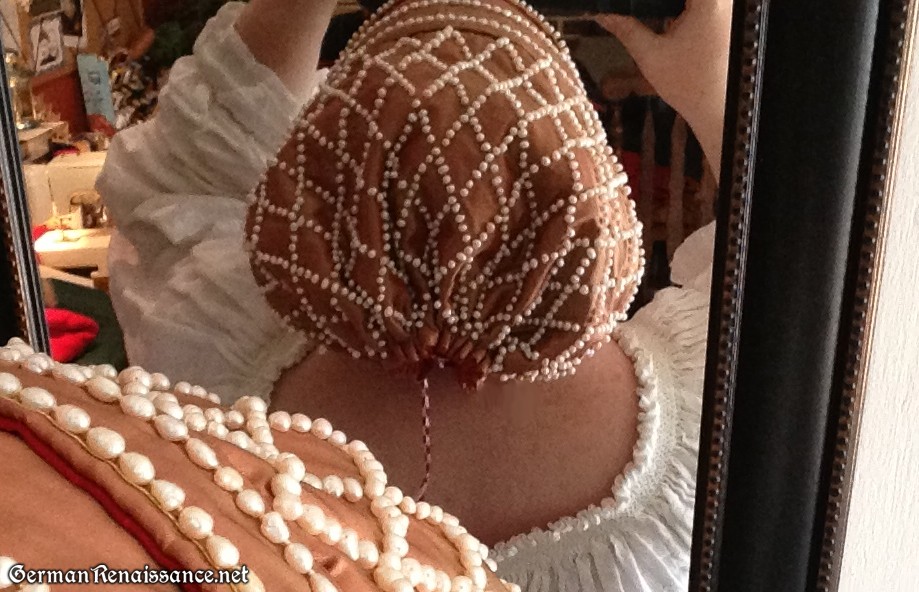
- View of the back of the goldhaube — note the shape!
January 2015 Update:
I had a request for more photos of the goldhaube, so here are five new photos of the cap sitting flat on a table (outside and in). The goldhaube is nearly two years old now and has been worn many times and in many types of weather (including hot Pennsic weather). It’s holding up pretty well, I think. If I were to re-make this again, I would change two things. First, I would attach the pearls using the method I’ve detailed elsewhere in my blog, as I think it’s much neater and stronger, and I don’t really care if it doesn’t have the same spacing as my inspiration image. Second, I would flatline the cap as I think that would make the drawstring at the back cinch in tighter, though it’s not a really big deal and doesn’t bother me greatly, in all honesty. I hope these detailed photos help those who are trying to make the cap!


November 2015 Update
I’ve been wearing my goldhaube more frequently now that I have a fancy coronet (made by Master Lothair). I thought I’d share two more tips that I’ve discovered:
1. Because I found I could put the goldhaube on and off without undoing the ties at the nape, I decided to sew up the sides so it became closed at the nape. Once I did that, I found the goldhaube became even more stable than it had been.
2. The more padding you can get in the back of the goldhaube, the better it stays on your head. I have my goldhaube stuffed with wool roving now and it stays on my head, even when leaning backward, without any pins. I can wear it for 12 hours without any adjustment or slippage.


Honey, your goldhaube is simply wonderfull! I would never want to take it off, if I were you! Now I must make myself one too!
Thank you ever so much for this great tutorial, it’s spot on!
When I couch pearls this way I like to use gold or silver embrodery thread. Not the metalic sewing thread.But the much heavier floss used in embrodiery. I also double it, not only for streangth but to add an extra bit of bling.
Thank you again! So inspireing as well as informitive! Lady Cate of Artemisia
So now are you going to make that wonderfull collar, from the example pic? I wonder how many thousands of pearls that will take. LOL! Please tell where you got your pearls from. I have been looking on line & you really scored a deal at $70.00.
You rock girl! Your pattern does too! I am so going to credit you & your work when I enter mine at A&S. Lady Cate of Artemisia
You mean the gold collar with jewels that so many of these women wear in Cranach’s paintings? If so, then yes. I’ve already got some idea on how to make it with brass, stampings, crystal jewels, and perhaps some gold leaf. I will blog about it when I start work! 🙂
As to the pearls, I was gifted some about 20 years ago. They were on a necklace that was entirely too gaudy and chunky for me to wear in mundane life, and had just been sitting dormant in my jewelery box. The rest came from Jo-Ann’s and Hobby Lobby — look in the bead section for the natural freshwater pearls (hard to spot, but they’re there). They were about $4-$5 for 60 pearls, and they were on sale when I bought them. I should note that I had to go to several stores to find enough, though. I -think- this is the item online at Joanns.com: http://www.joann.com/real-natural-round-pearl/zprd_01776533a/
I look forward to seeing what you make! Please share a photo of it when it’s done. 🙂
Lady Cate,
not sure if this is too late but check out this website
http://www.pandahall.com/ProductSearch?keyword=freshwater+pearls
I have ordered jewelery items from them before and find they have good prices, So far I’ve been really happy with what I’ve ordered. The shipping is pretty steep though. Comes directly from china
Inge
Thank you for telling me about Joanns. I didn’t think about them. And that’s the best price yet. I am presently working on the collars. I will post my version when I can. Cate
I love your work. Maybe we can get a yahoo group together to do some experiments for the collar…I would love to have a place to try and figure something out for my dress. You have given me hope (as I am terrible with trying to figure it out on my own!) thank you for all your hard work.
Emelote
Ealdormere
Thank you! Would be happy to get a group together for experiment — not just the collar, but many other things. If we use the GermanRenCostume Yahoo Group to chat about it, others could chime in, too! Are you on that list? They are at http://groups.yahoo.com/group/GermanRenCostume/ — I find them VERY helpful!
I WOULD LOVE TO BRAIN-STORM WITH YOU!
BUT I AM TOTALY IMPRESED WITH WHAT I HAVE SEEN YOU DO SO FAR.
I JUST GOT A NEW PHONE, & I AM GOING TO TRY & SEND PICS. OF MY VERSIONS OF GERMAN COLLARS TO GERMANRENCOSTUME THIS WEEKEND FOR COMMENT. NOT A TECHY SO WE SHALL SEE HOW IT TURNS OUT.
CATE
I am on this group already! We should maybe look at doing a Google+ hangout once and a while to talk about what we find or to show what we have done! 🙂 So excited to get started on my Cranach gown when my sewing room is back in order! I also have a lot of hi-res Cranach painting pictures from my trip to Germany a couple of years ago. (yes I went there just for those paintings!)
Thank you so much for posting this. You always look so lovely! While I only have one German Renaissance gown, it’s my most beautiful piece of garb because it was my wedding gown, and I’ve been wanting a cap to complete the outfit.
Elizabethe (Midrealm)
Thank you so much for posting this! You always look so lovely, and I’ve been wanting a cap for my German Renaissance gown.
I originally saw your post on the German Ren list. I just wanted to say you really got the shape of that Haube. Beautiful and inspirational work. I love your site!
Louise
Fantastic. I am green with envy!
My dwindling stock of freshwater pearls came from a jeweler friend in the East, but did you check Fire Mountain Gems?
Your goldhaube is simply wonderful, and I lust after your barret.
It looks as if you are wearing an second golden cap under the actual Goldhaube, or what is this front band right next to your hairline?
I am wearing just one gold cap. The front band right next to my hairline is part of the single goldhaube (cap) — it’s made to look as though it as several layers.
I have been searching a long time for a pattern to make my own Goldhaube for my Cranach court gown. Yours is really the best one I could find! Actually I try to make a sample pattern but it seems a bit difficult for me. I would be very pleased if you could describe some more details about the construction of the Haube. Where does the back band end, in the neck? Did you sew both ends together? What is the width of the crown? Where does the front band end, behind the ears? I would be very glad to hear from you.
Regards
Hi, Britta! The back bend is attached along the length of the flat end of the haube, so it ends at the back of the haube at the nape of the neck. When I pull the ties tight in the casing, the two ends of the back band meet. I did not sew them together, however — I just let the drawn ties keep the shape of the hat and it works fine. The width of the crown is 14.5″. The front band ends behind the ears. Remember, it’s important to have the proper shape underneath the goldhaube to get the right look — either real braids (if you have thick hair), fake braids, or stuffing at the lower sides of your head. 🙂 Let me know if you have more questions!
Hi Genoveva!
Thank you so much for your reply. Now I understand better the construction of the Goldhaube and for the right shape I will create fake braids as well although I have long hair. Since the manufacture of these braids by the Zopfmacher was quite common here in Germany during the 16th century, I like to have them as well. I already have a stuffing in my actual Goldhaube (which is nice but not so authentic as yours), but I have seen the construction of your fake braids and I like it very much. I once tried to create them of silk but the braids are too slippy in the hair…
Britta from Germany
Pingback: Katla’s Ärmelrock (sleeved dress) « Research Dumping Grounds
Hi Genoveva! Thank you very much for the recently posted photos of your Goldhaube, they are really very helpful! On one pic I can see a small white band, it seems to come out of the front band of your Haube. Do I understand correctly, you tie two bands in the neck to hold your Haube – the yellow band (coming out from the back band) and the white band (coming out from the front band)?
At present I make my Goldhaube and hope to get it finished soon!
That white band is a little grosgrain ribbon that I inserted into the channel of that band when I was constructing, in case I decided I needed a second ribbon to stabilize the cap on my head. I have used it sometimes, and not other times, so I’m undecided if I want to keep it. But in the meantime, I haven’t pulled it out just in case I decide to replace it one day with a fingerloop braided cord (like the others).
Pingback: A Cranach Gown for Twelfth Night- Part 1 - Argent Kraken
Pingback: A Cranach Gown for Twelfth Night - Argent Kraken