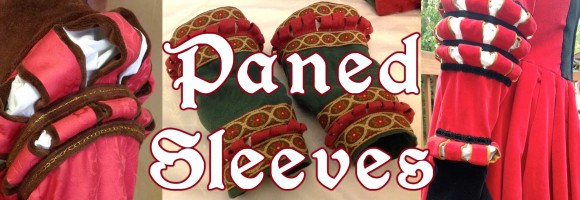
 Paned or “slashed” sleeves are seen on many German Renaissance garments. The simplest method of achieving this effect is to simply cut your sleeve material in straight lines (on the bias) and then bunch the fabric up onto your arm. I’ve done this with the red wool on my black tie-on sleeves. But, I wasn’t entirely pleased with it. The sleeve would slip down on my arm, unbunching, and was generally a nuisance. I’ve since attached some twill tape to the inside of the sleeve, near the seam line, to keep the slashes bunched together, but it still is not ideal. Despite the fact that the wool is well-washed (so slightly felted) and cut on the bias, it still wants to fray enough to feel “messy” to me. None of the paintings show fraying. Maybe the artists didn’t paint it in, or maybe the slashes were more finished. It’s hard to say.
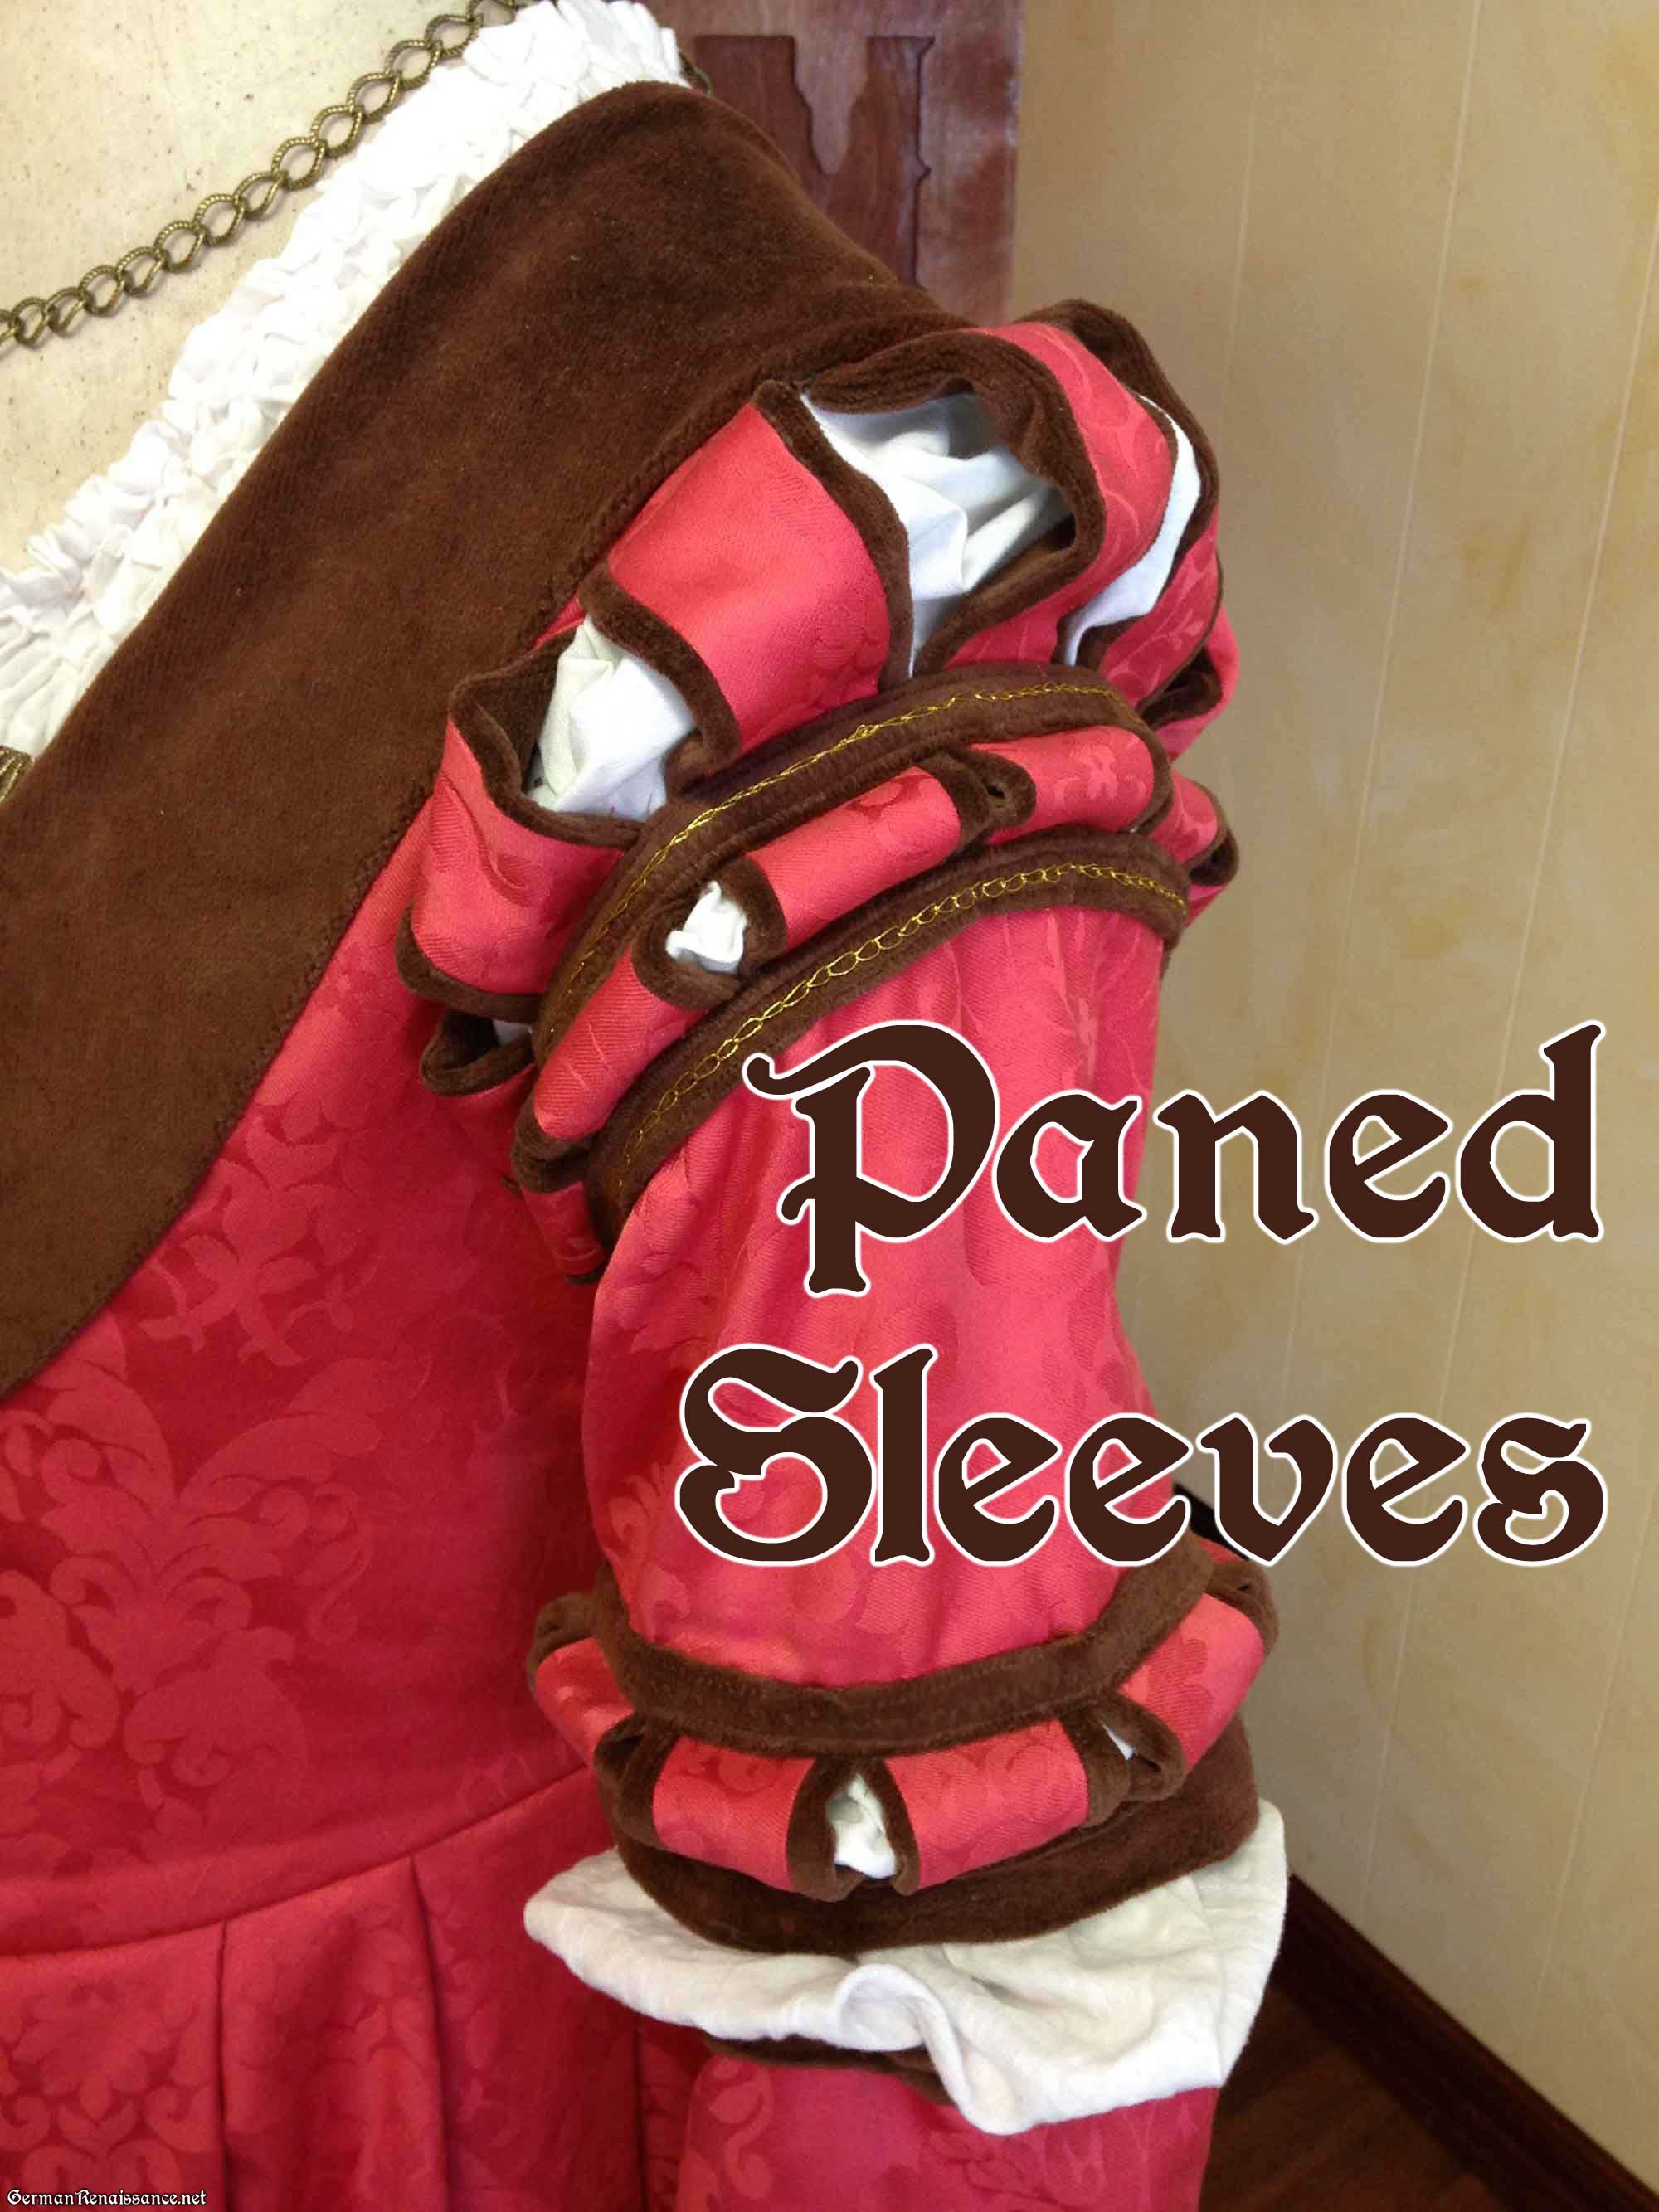
Since then, I’ve experimented with another way of creating this sleeve. Several of the paintings show outlines on either side of the panes, as if they are lined with another color of fabric. Some paintings also appear to have added the panes, rather than simply slashed them from the sleeve fabric. I’ve also seen at least one extant garment where the white undershirt is “faked” — a fabric panel was placed inside the panes to give the appearance of an undershirt. These observations have led me to this particular method of creating paned sleeves. It’s considerably more time consuming and labor intensive, but the results look very polished and you don’t have to worry about where your sleeve is at any given time. There’s no fraying, all panes are lined, and the “pouf” of the white fabric underneath is built in. I really quite like it and I pass it along to you in the event it is helpful.
What You Need:
- Your sleeve pattern (with a sleeve cap patterned in)
- Enough fashion fabric to make at least four sleeves
- About a yard of a second, medium-weight contrasting fabric — avoid anything too light or too heavy
- About a yard of white linen
- Trim, braid, tape, or extra contrast fabric
- Scissors, thread, needle
How to Make the Paned Sleeve:
1. Cut out four sleeves from your fashion fabric and two sleeves in a white, lightweight cotton or linen. Be mindful of where the front and back of your sleeve is, as a good sleeve pattern is not symmetrical. I like to make a mark on the fabric (to remind me later) when I cut if it’s not immediately obvious.
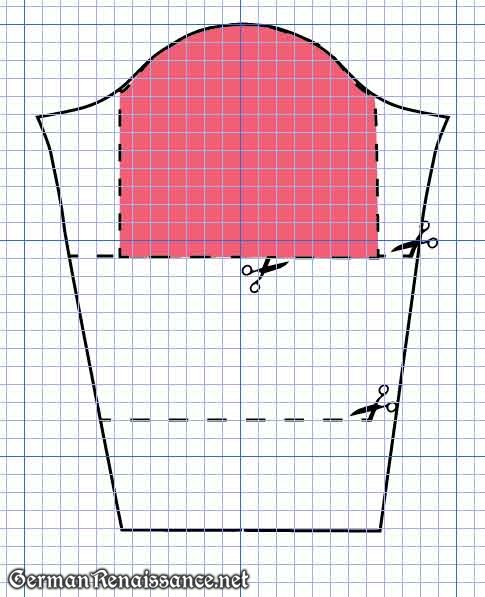
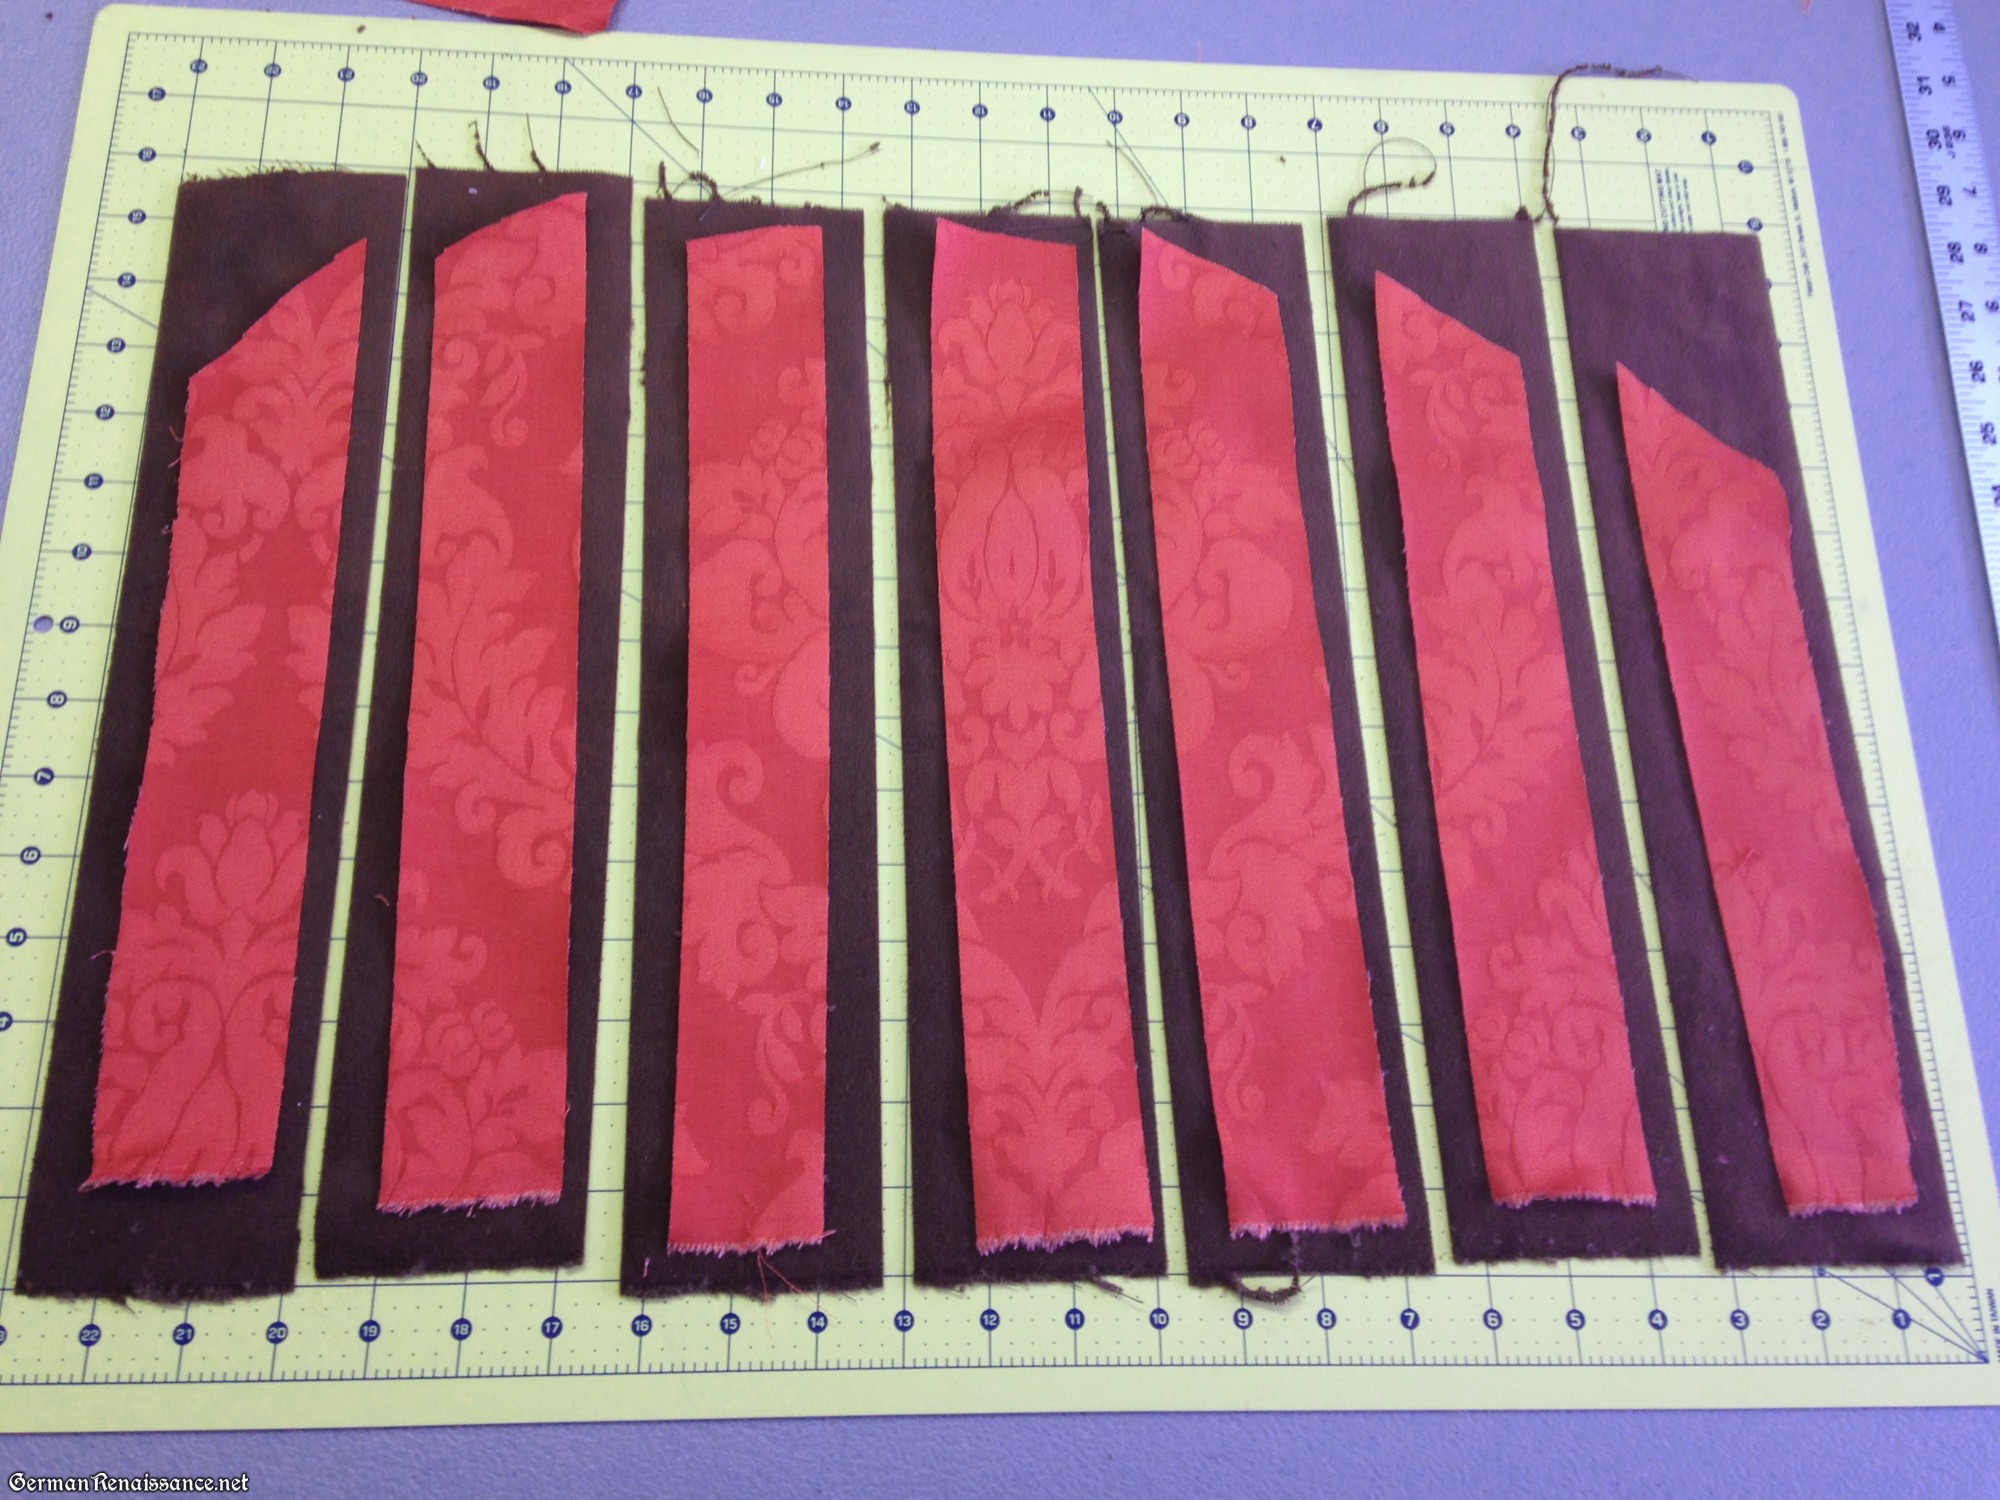
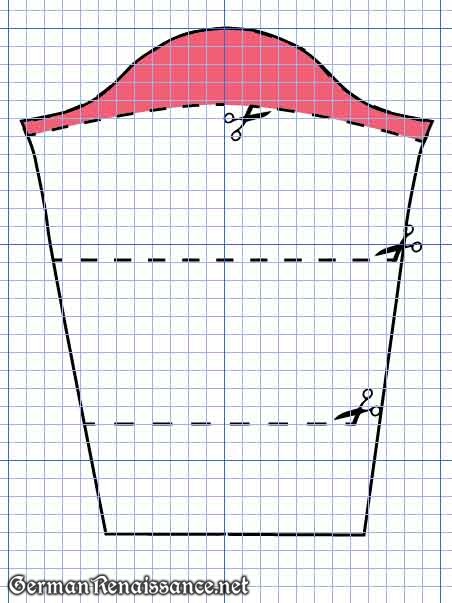
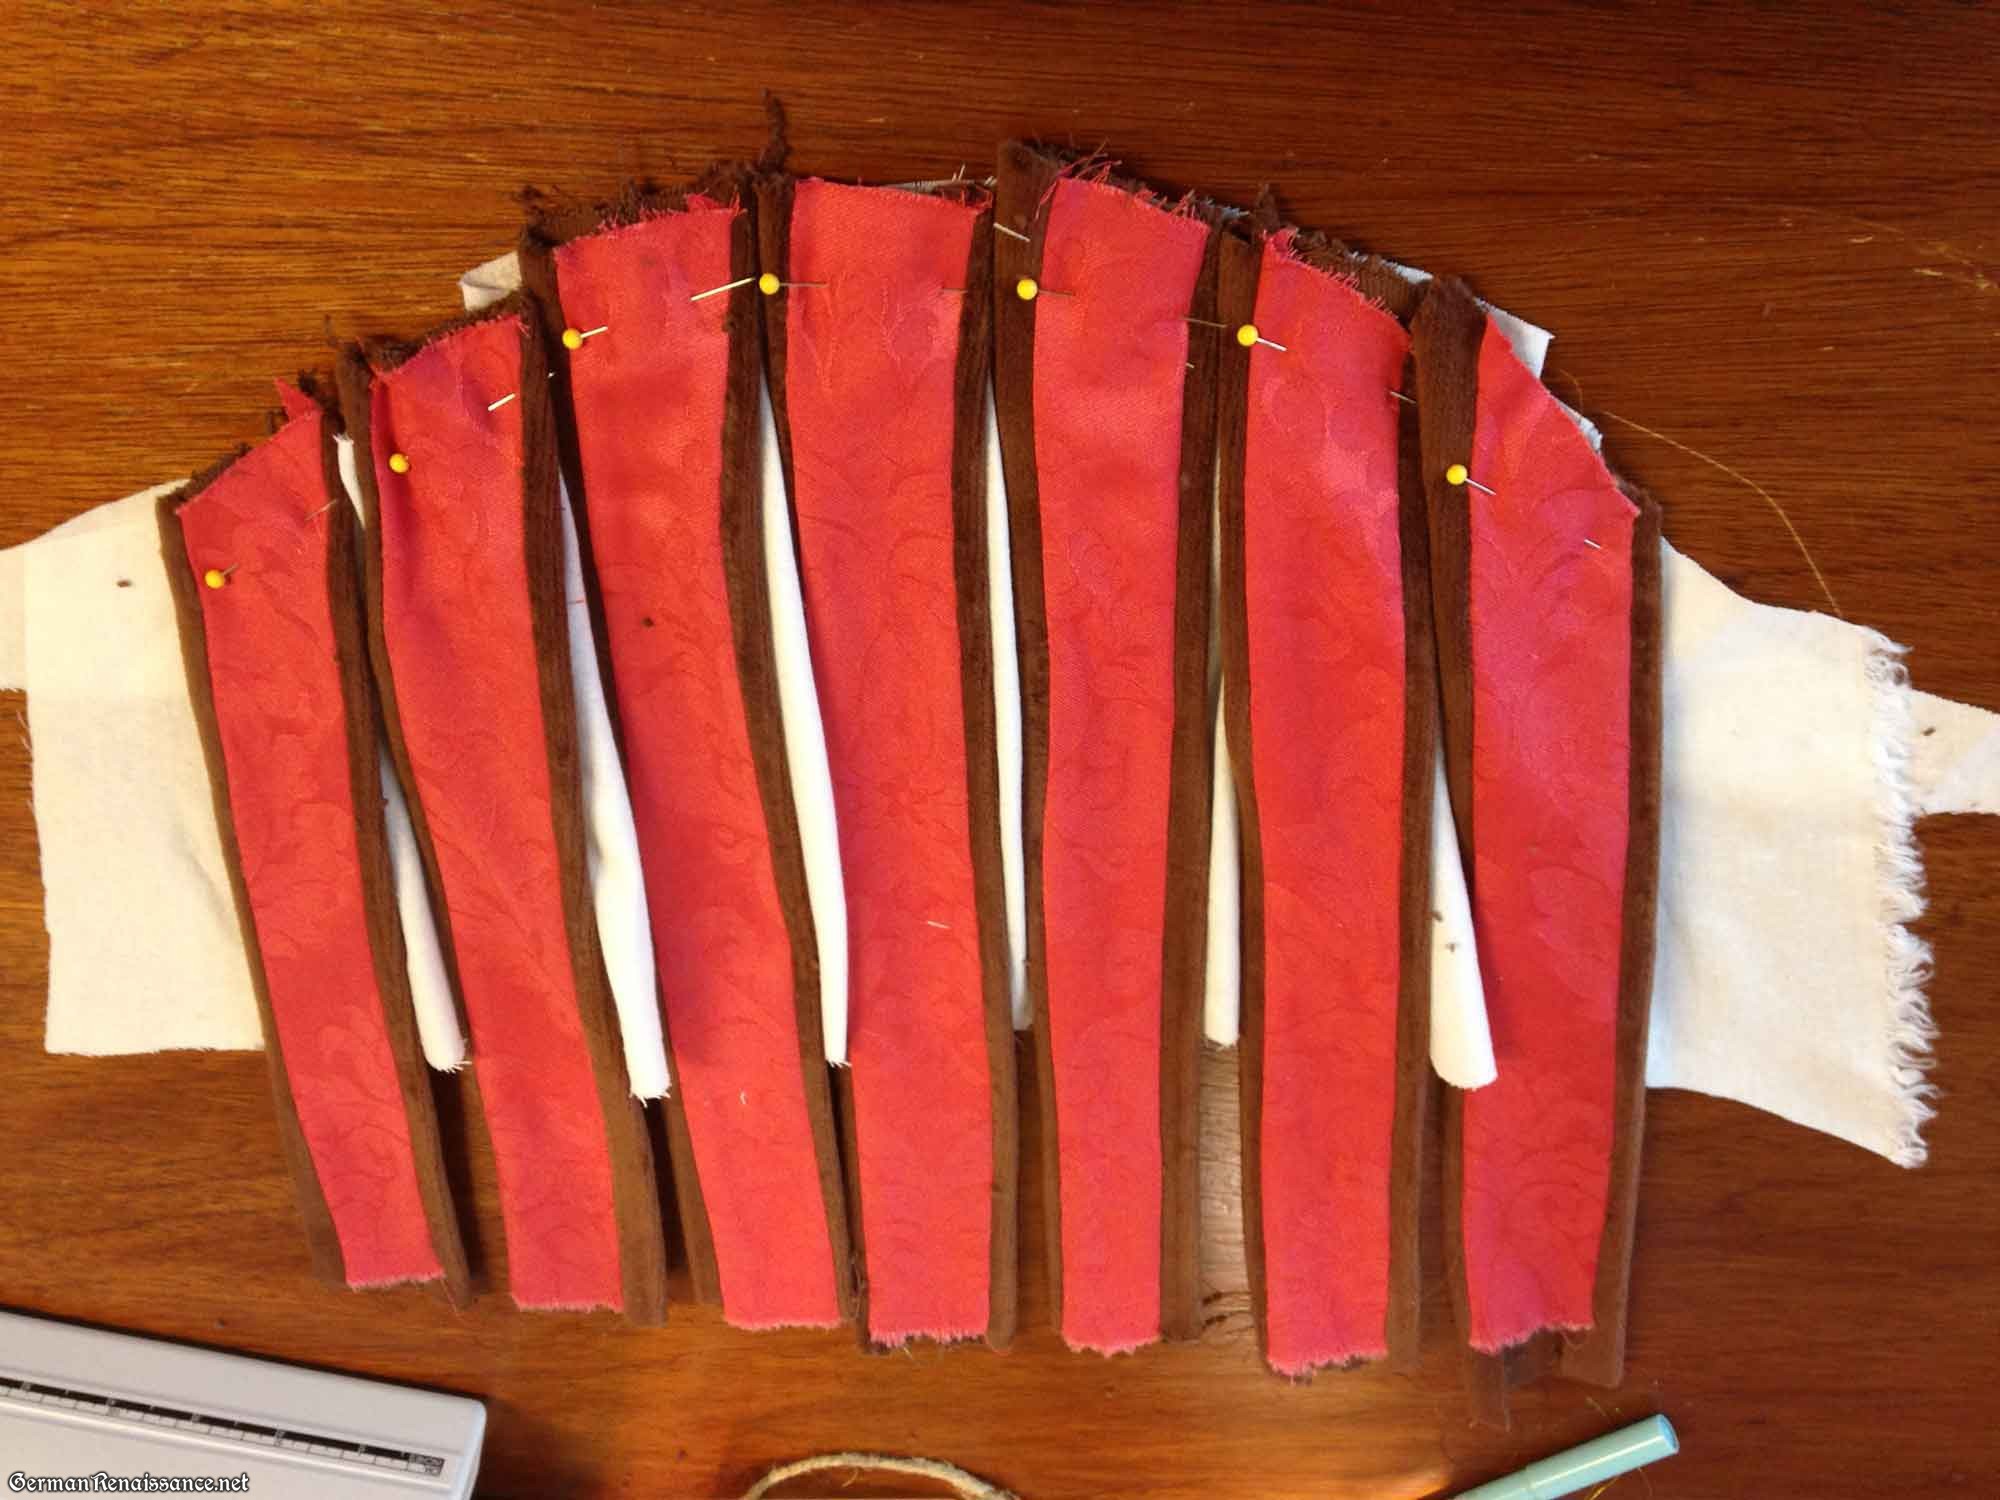
2. Take two of the fashion fabric sleeves (a left and a right) and cut them horizontally where your want your groupings of panes to appear. For example, it’s common to have three groupings — top of sleeve (sleeve cap), middle of sleeve (elbow), and bottom of sleeve (a bit above wrist area).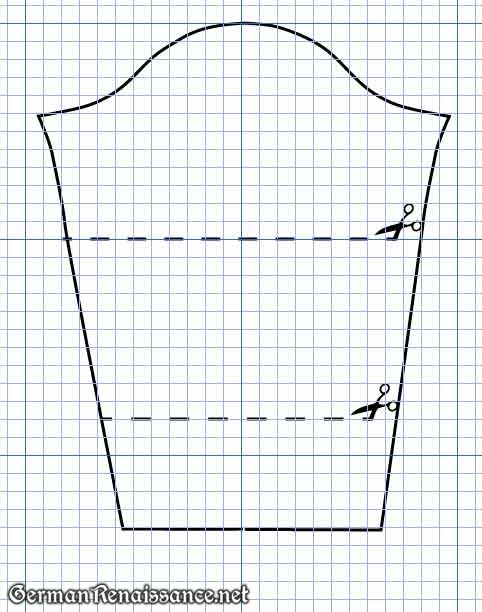
3. Cut your sleeve segments into equally-sized vertical strips. I recommend they be between 1.5″ and 2″ in width, but in general you want to cut them a bit wider than you wish your finished pane to be. Note: For the top panes of a sleeve, you’ll find it more comfortable if you only have them on the sleeve cap, which means they won’t be under your arm. As that’s a bit more complicated, I’ll show how to do that in the photos below. Here you can see the top of my sleeve (the sleeve cap) plus some additional length, cut into 2″ strips.
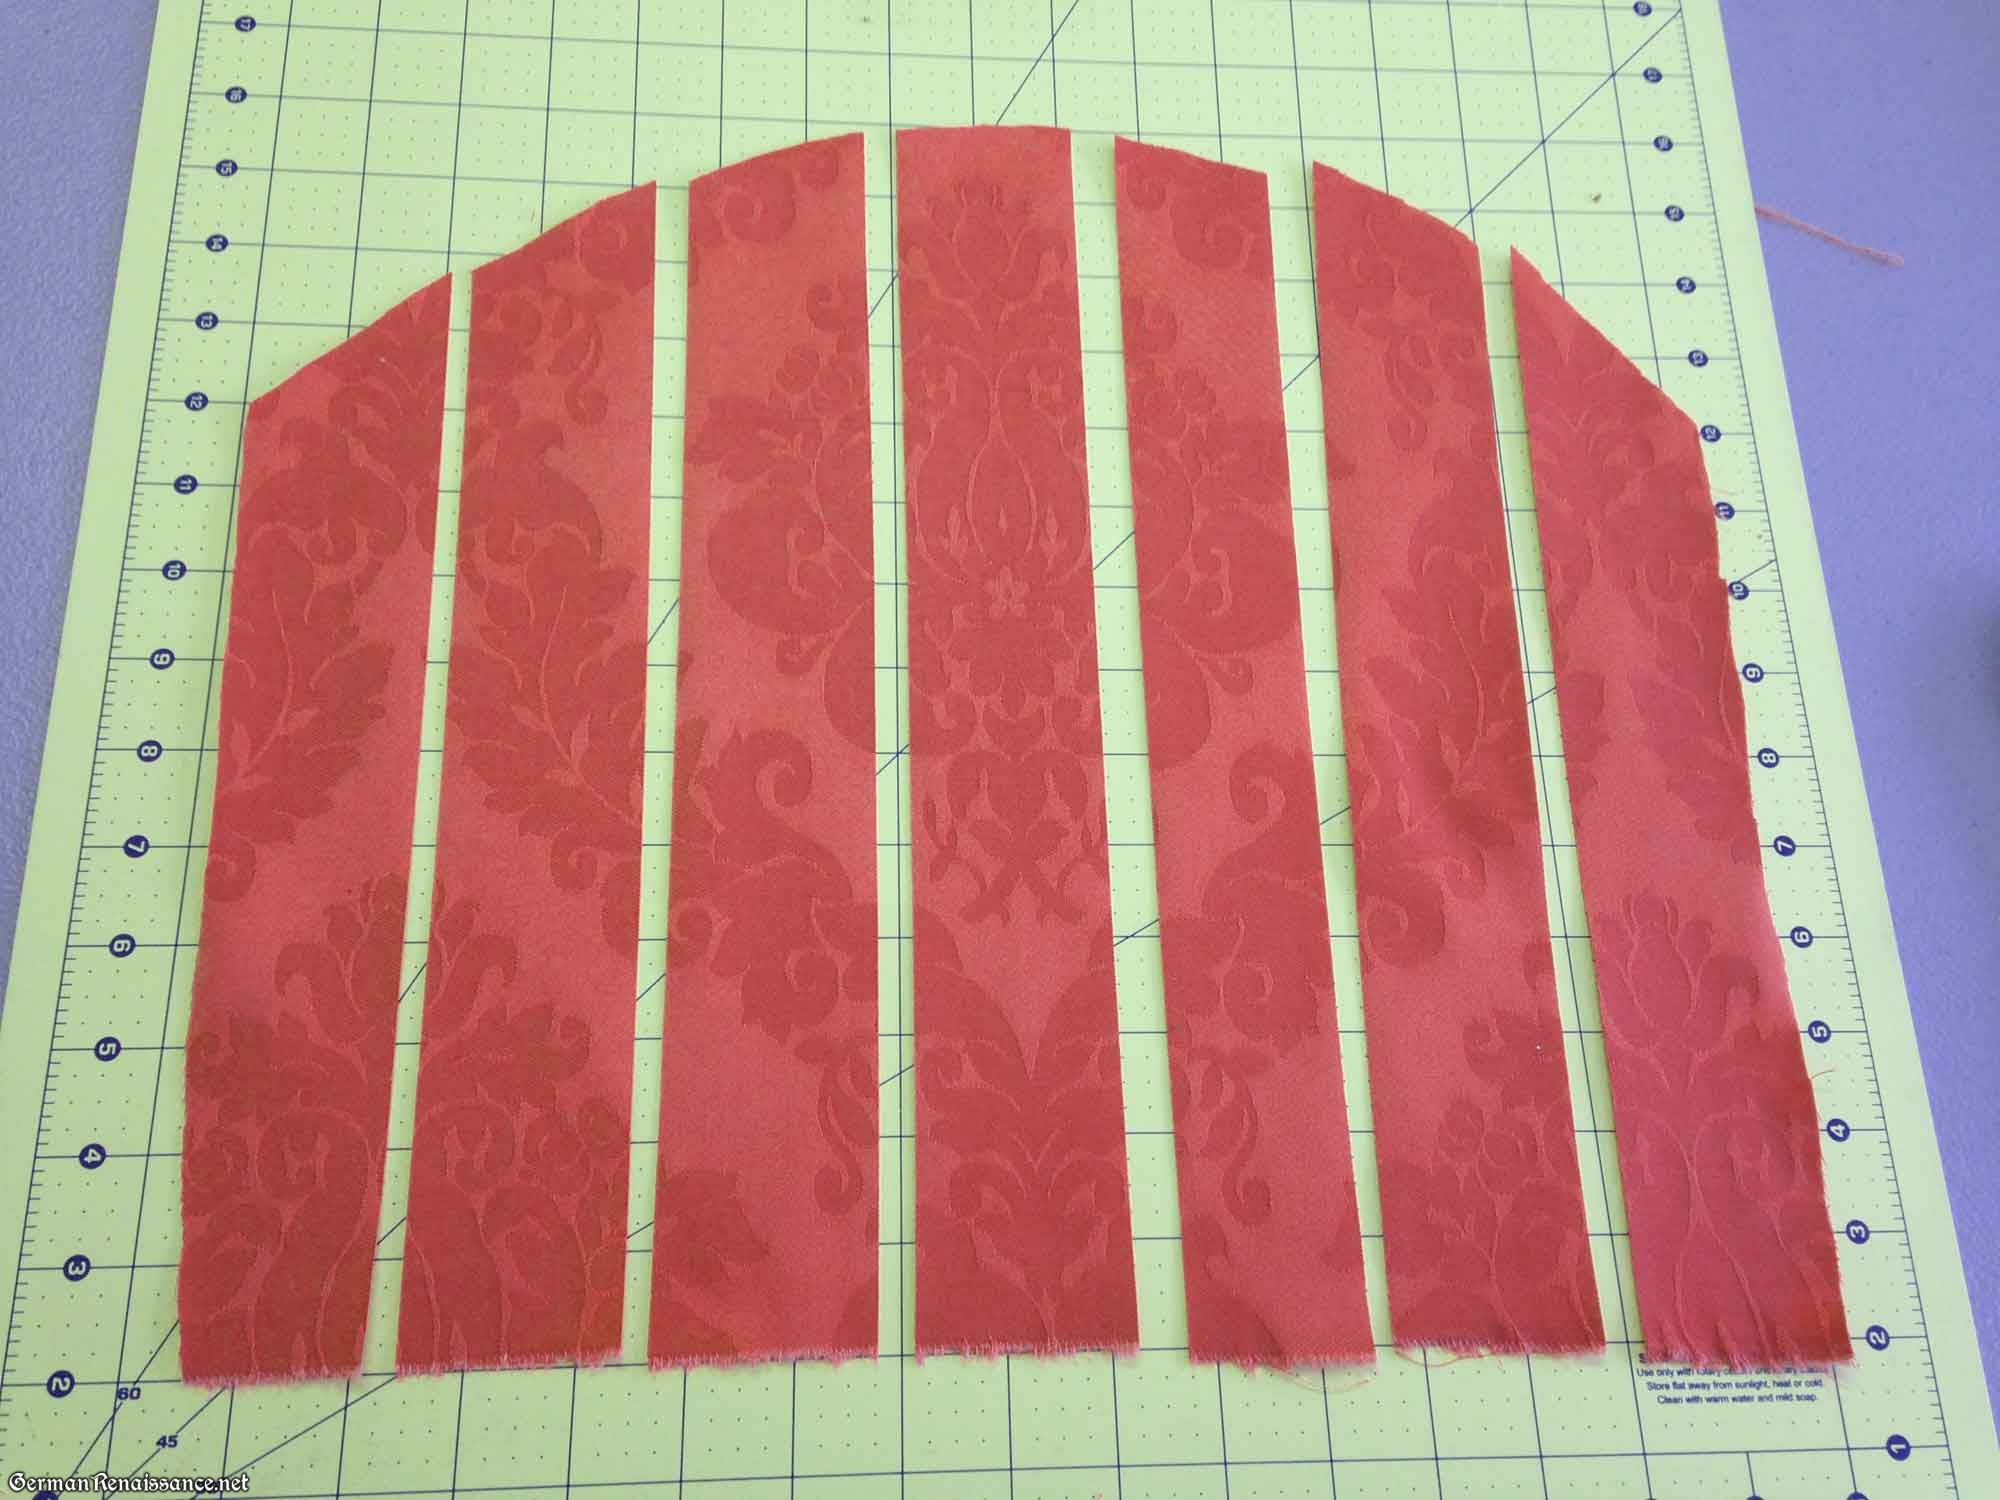
You can see where this piece came from in the sleeve in this diagram:
4. Now cut out a piece of your contrasting fabric (in my case, it was velvet) that is about 50% wider. Cut it into the same number of strips as you did in step 3, which means you should end up with slightly wider strips than your fashion fabric strips.

5. Put your fashion fabric strips on top of your contrasting fabric strips, right sides together.
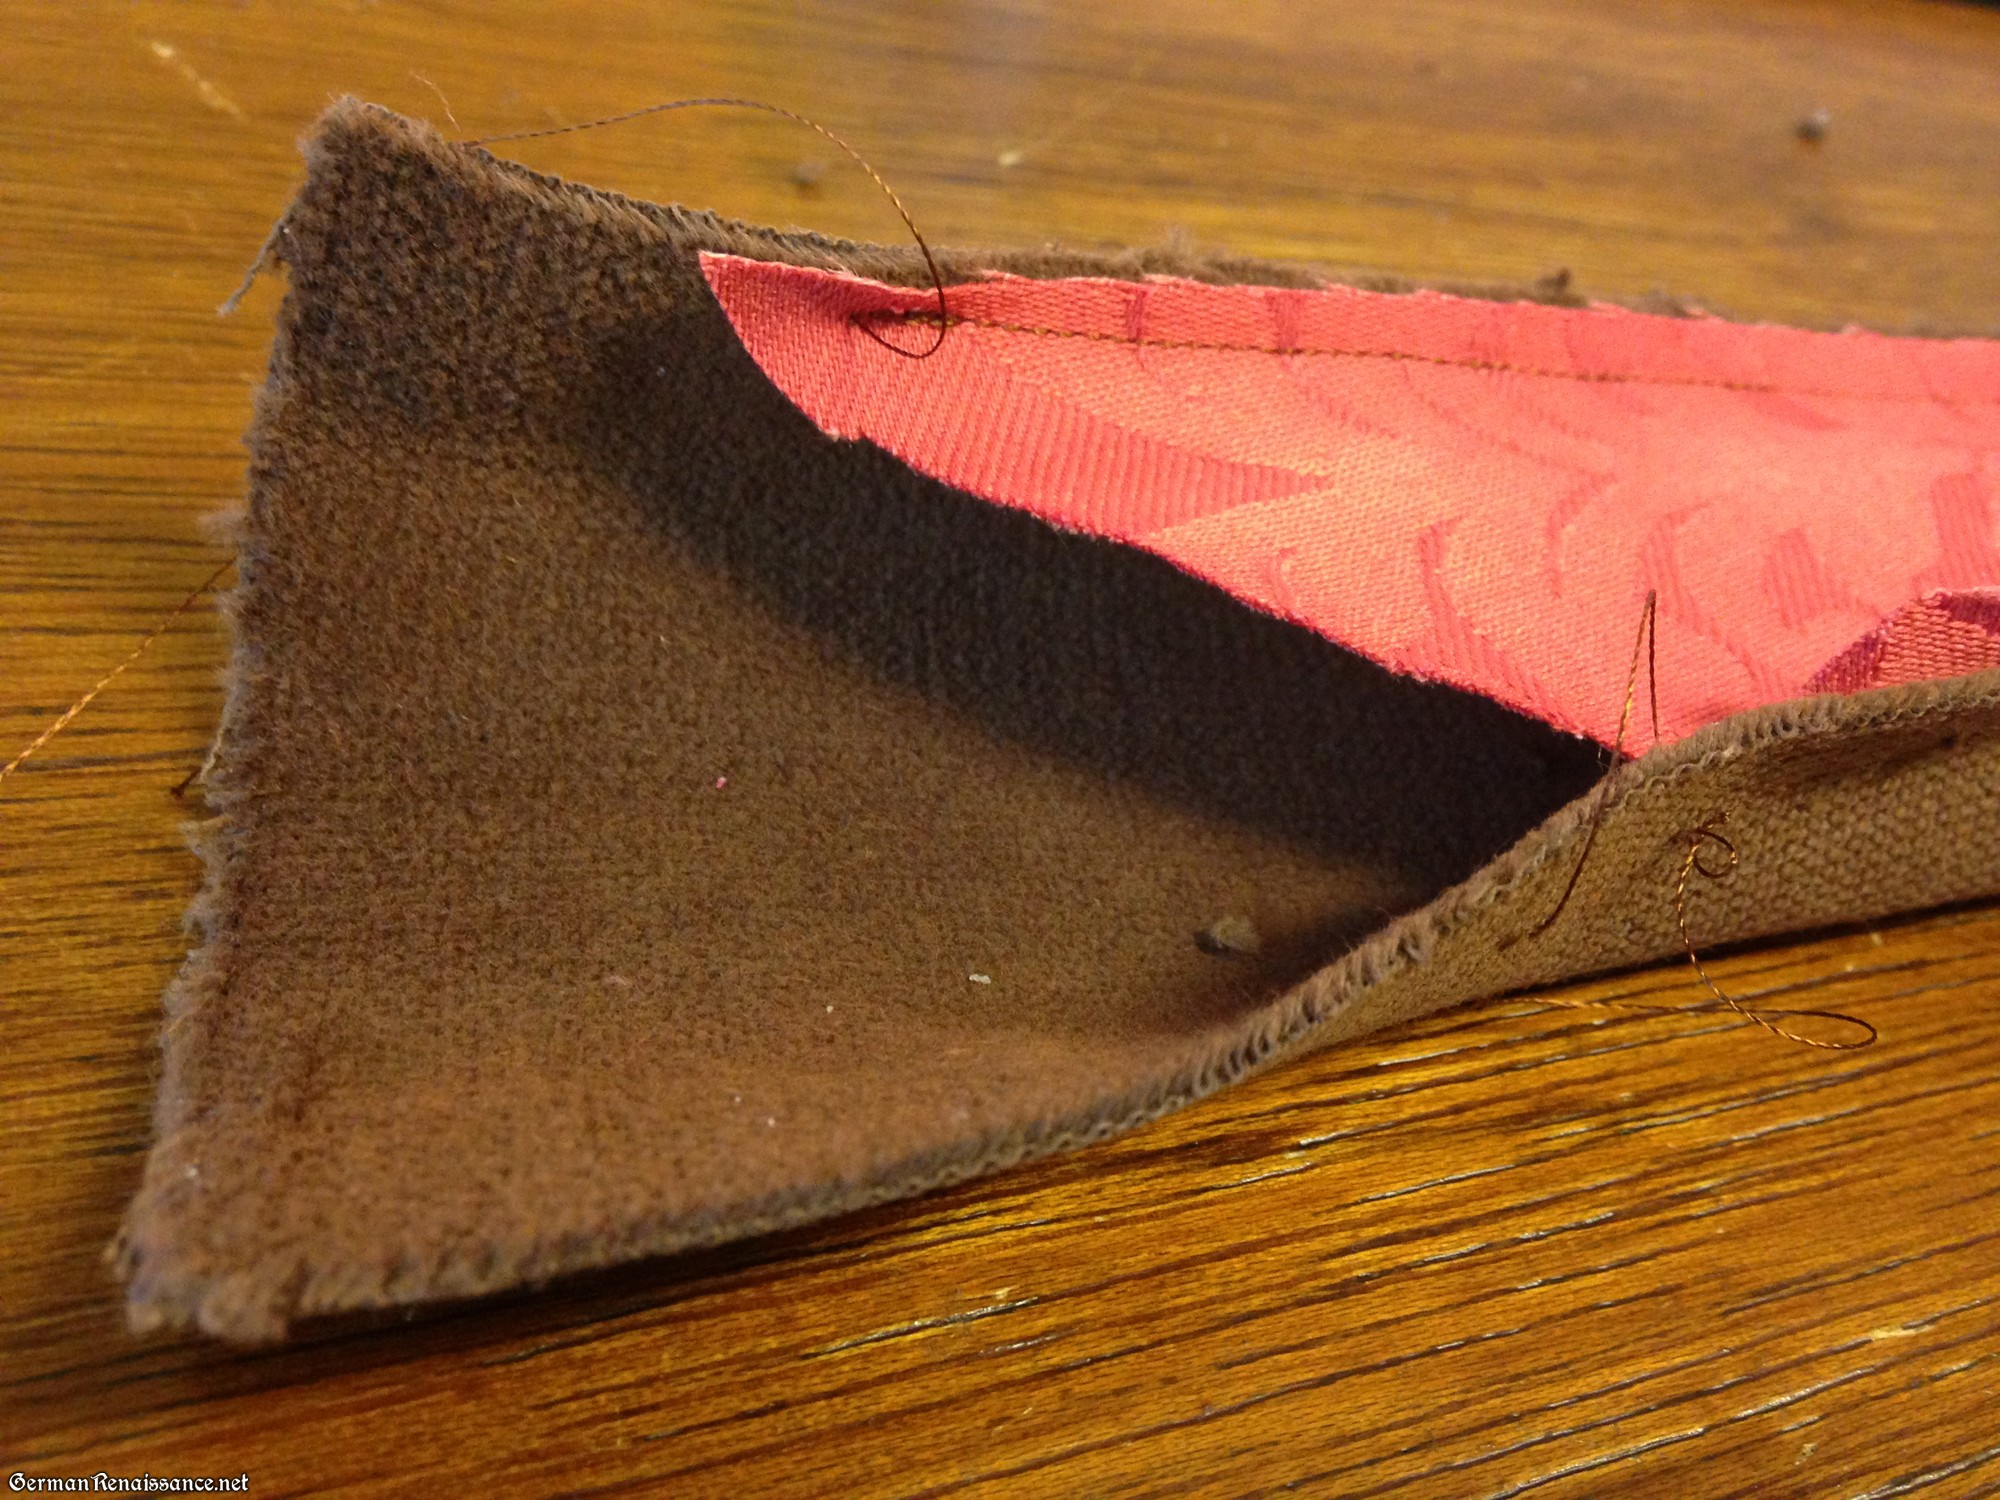
6. Sew 3/8″ from the edge along one side of the strips: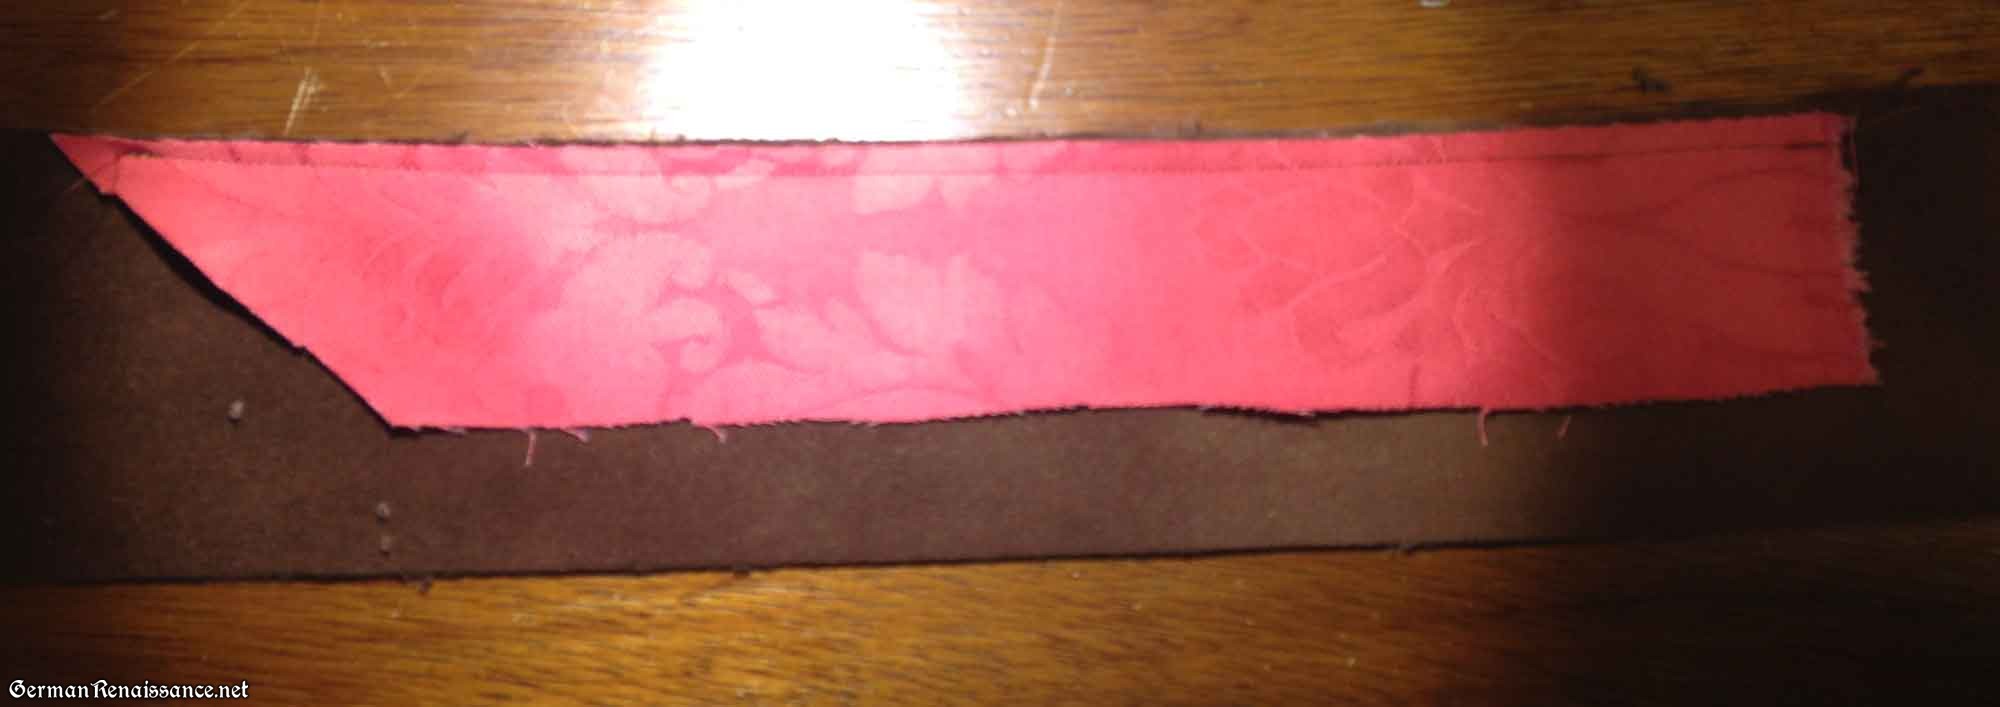
7. Turn the strip 180°, line up the unsewn edges of the strip, and sew down the other side:
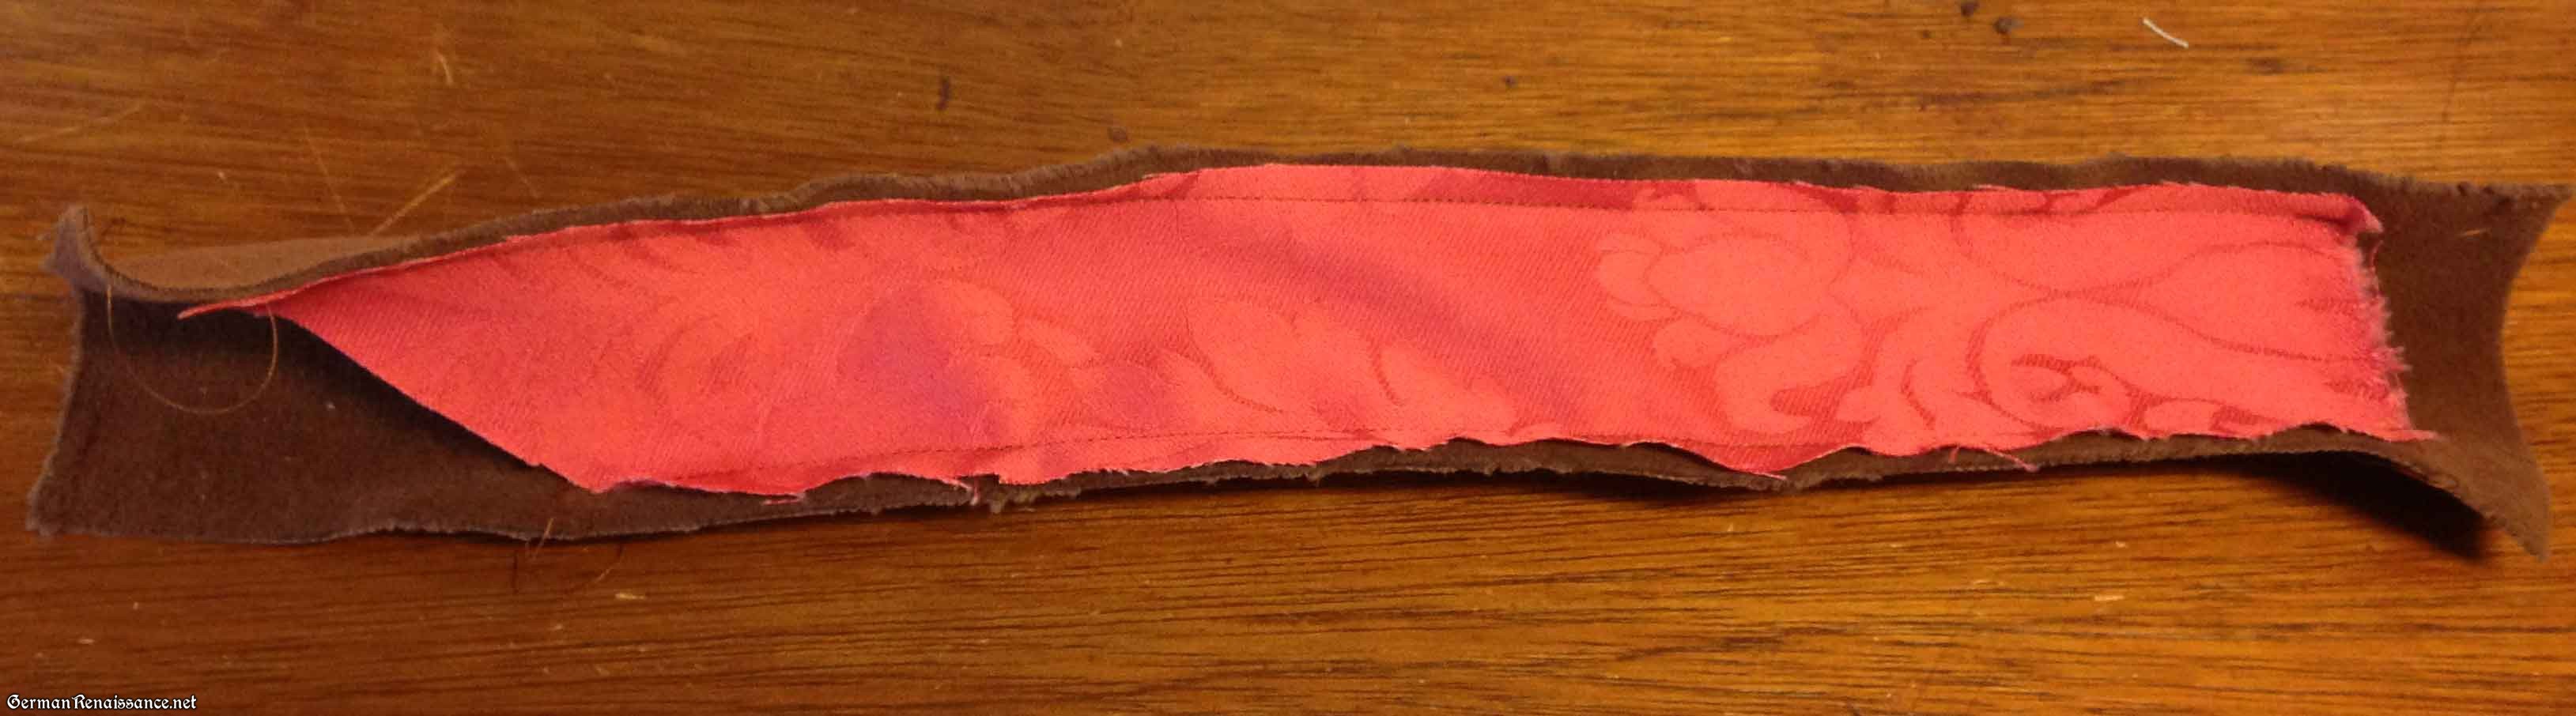
Your sewn strip will have a D shape because the contrasting fabric is wider. Here’s a close-up view so you can see what I mean:
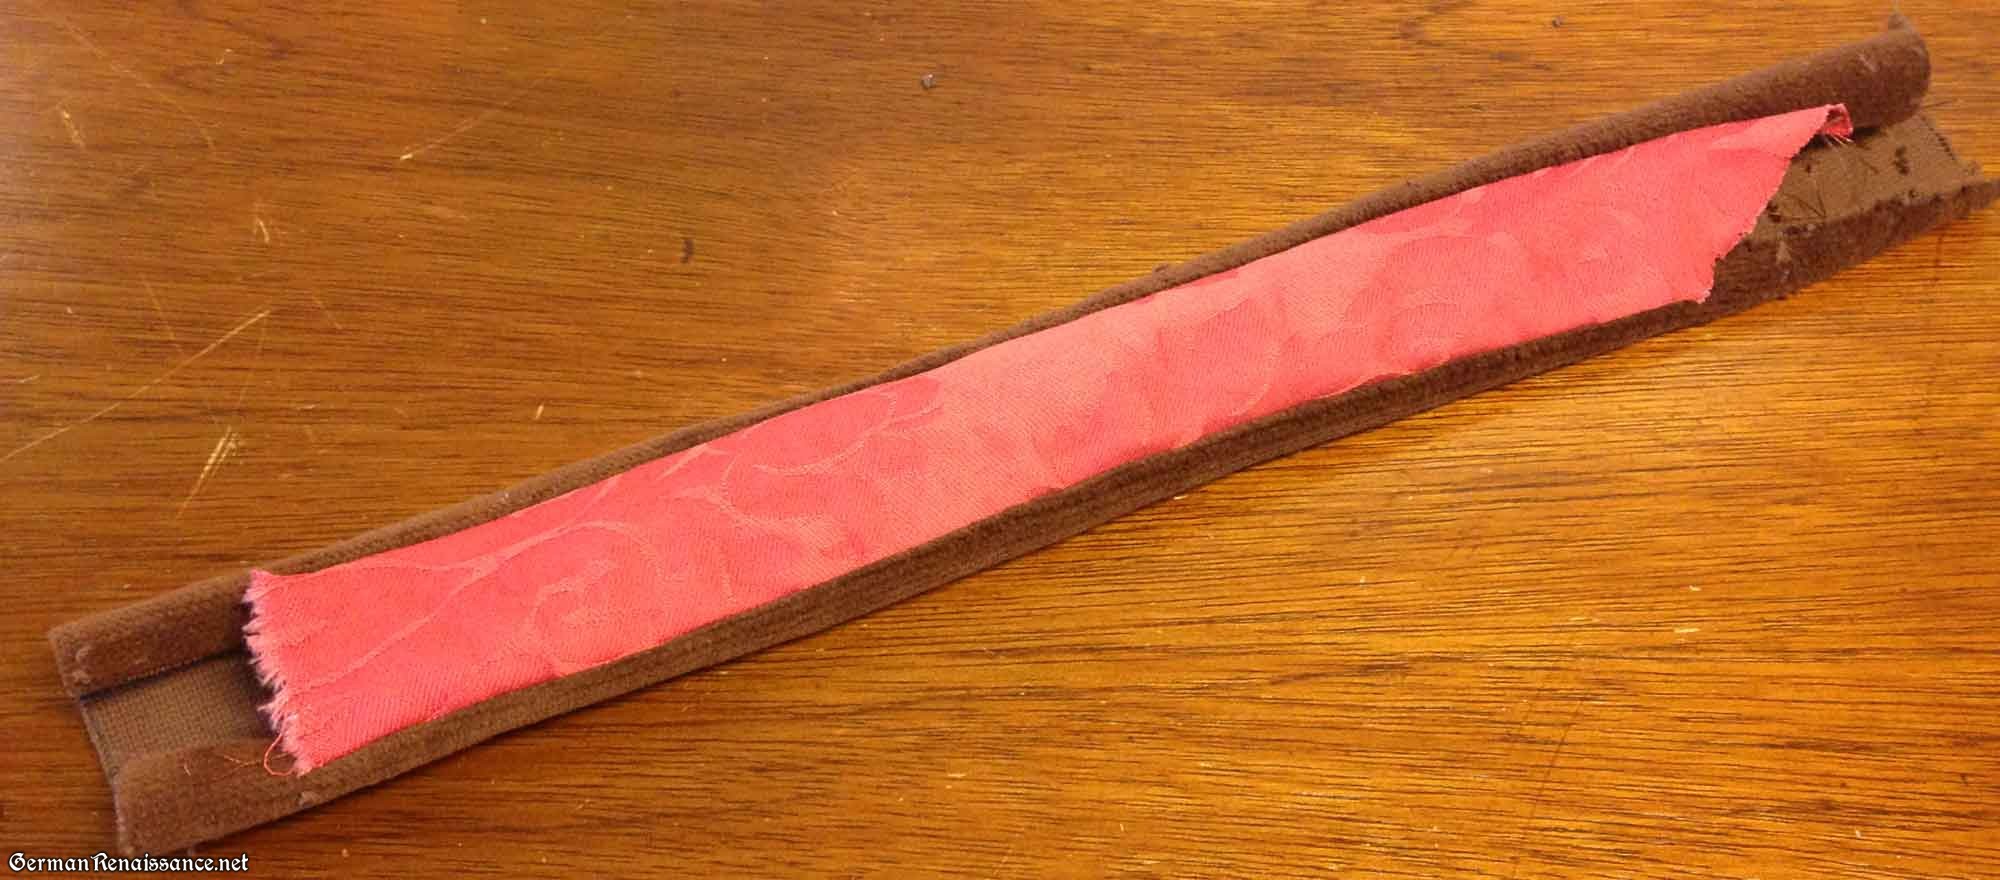
8. Repeat steps 6 and 7 to sew all the strips. Then turn them all right side out (watch my video to learn how my technique to do this if you do not have a tube turner). Iron them flat so that the contrasting fabric shows equally on either side.
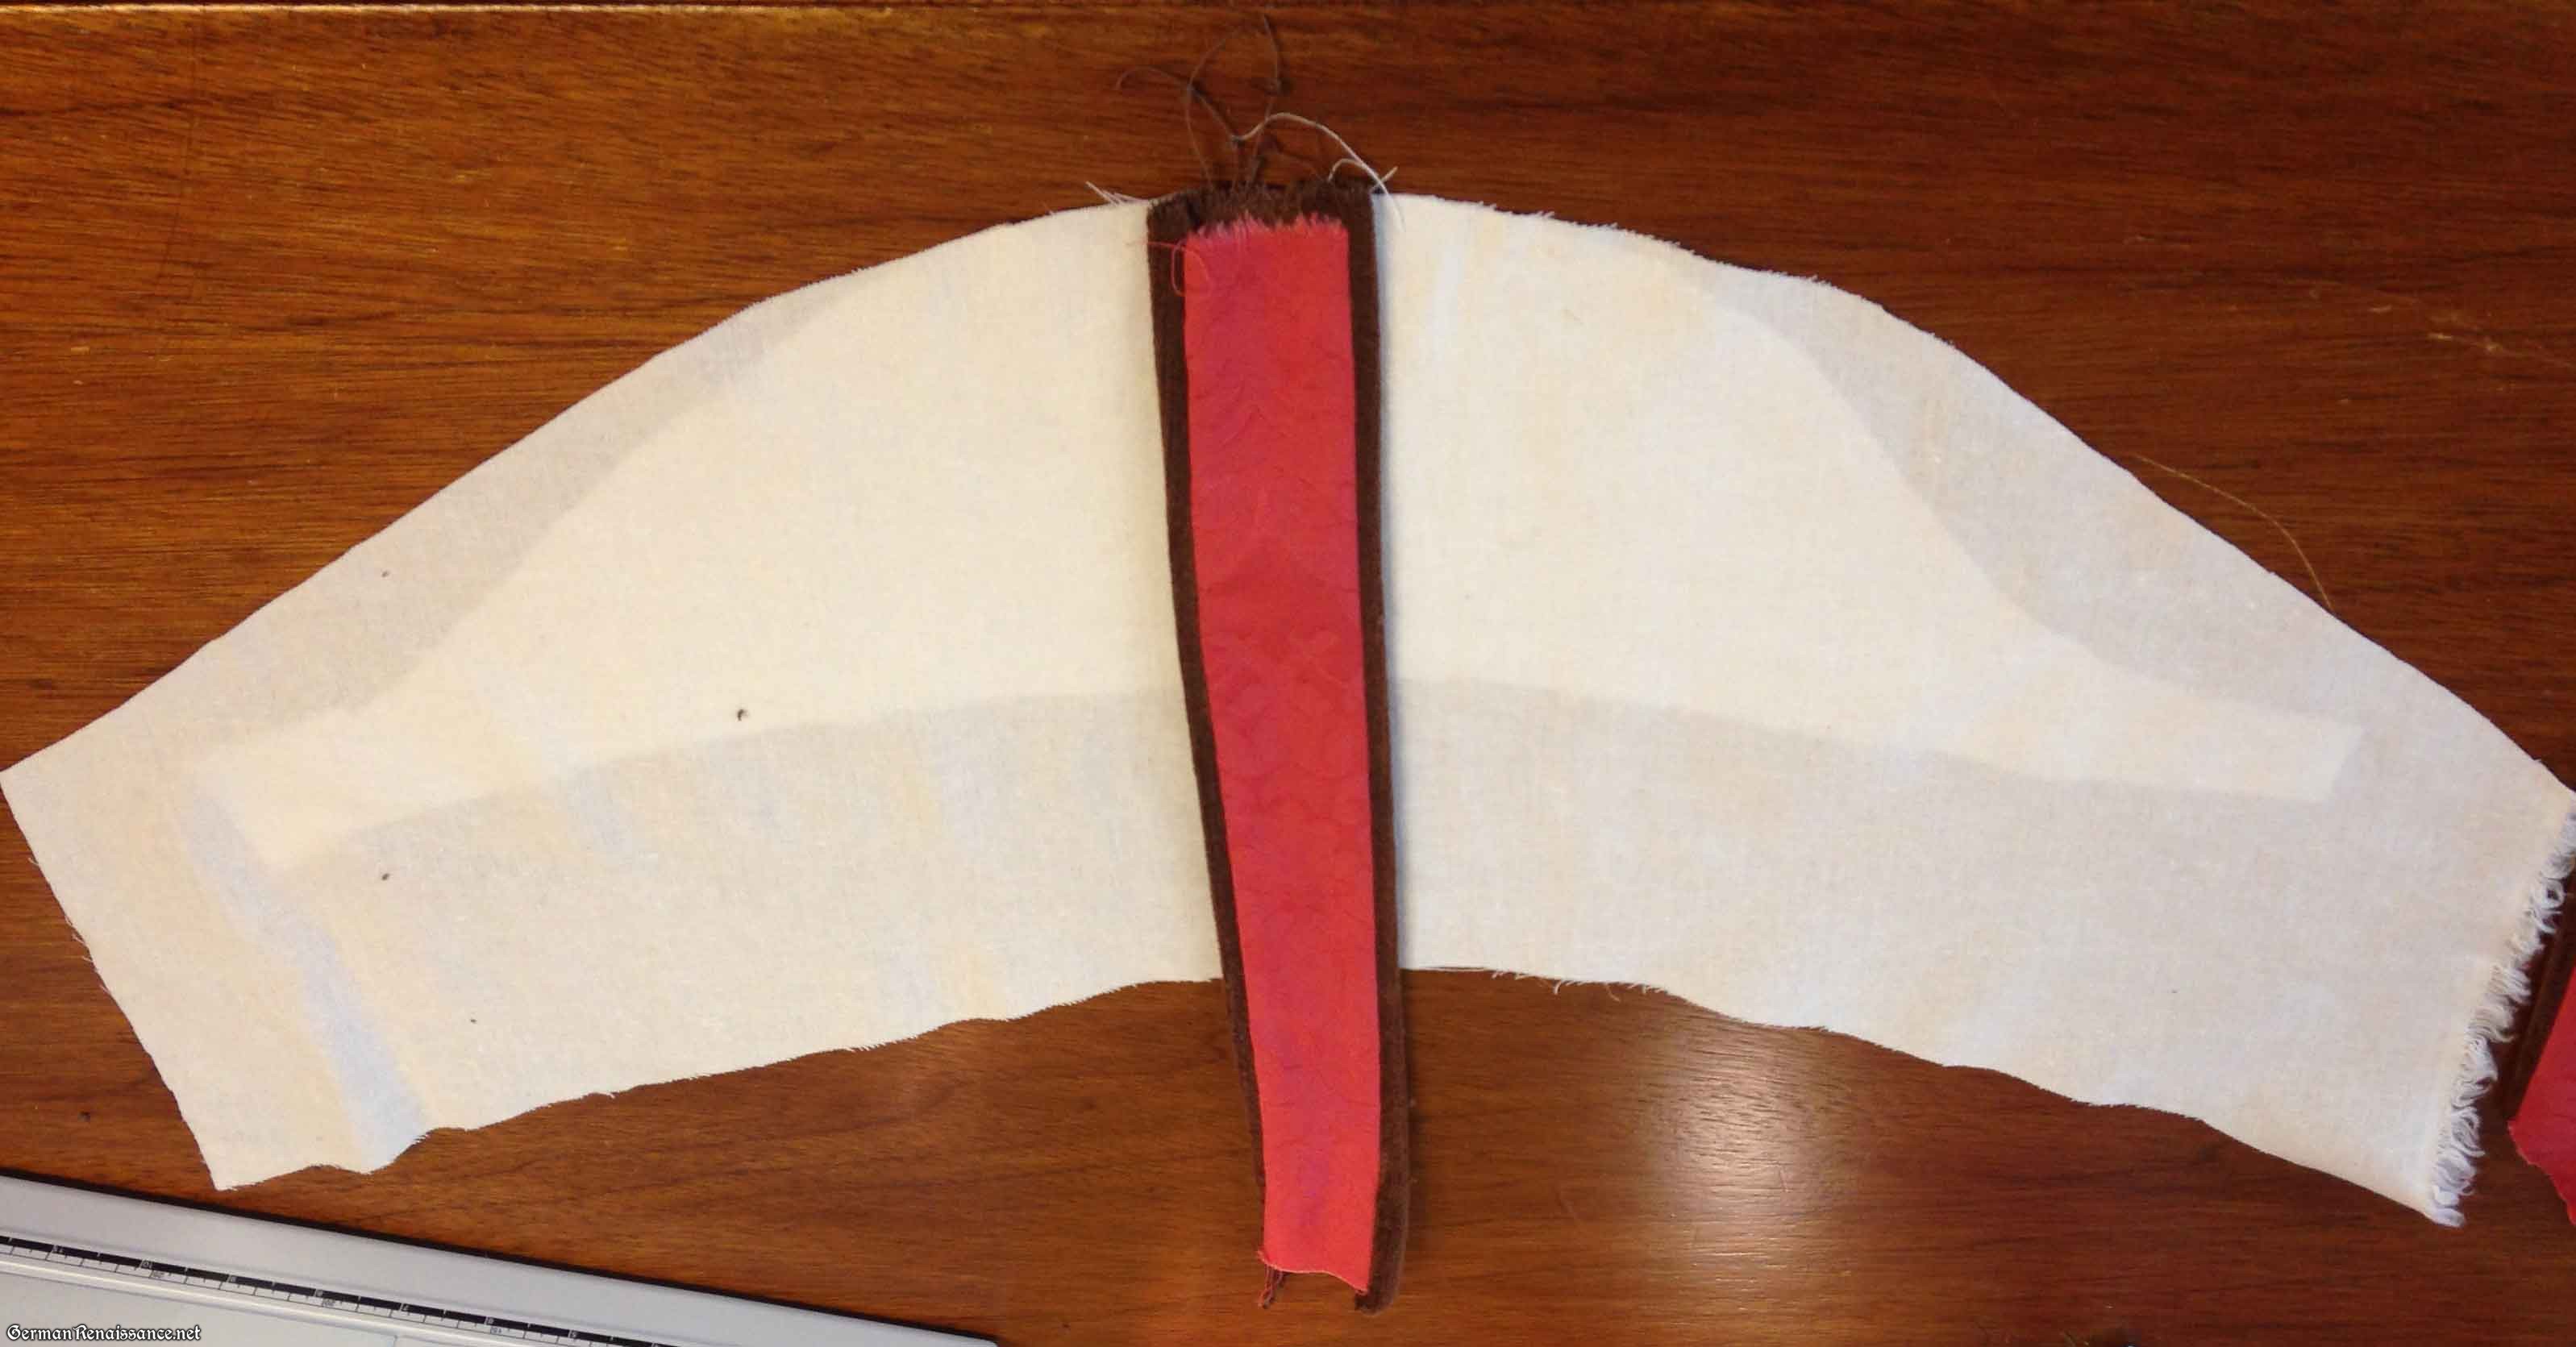
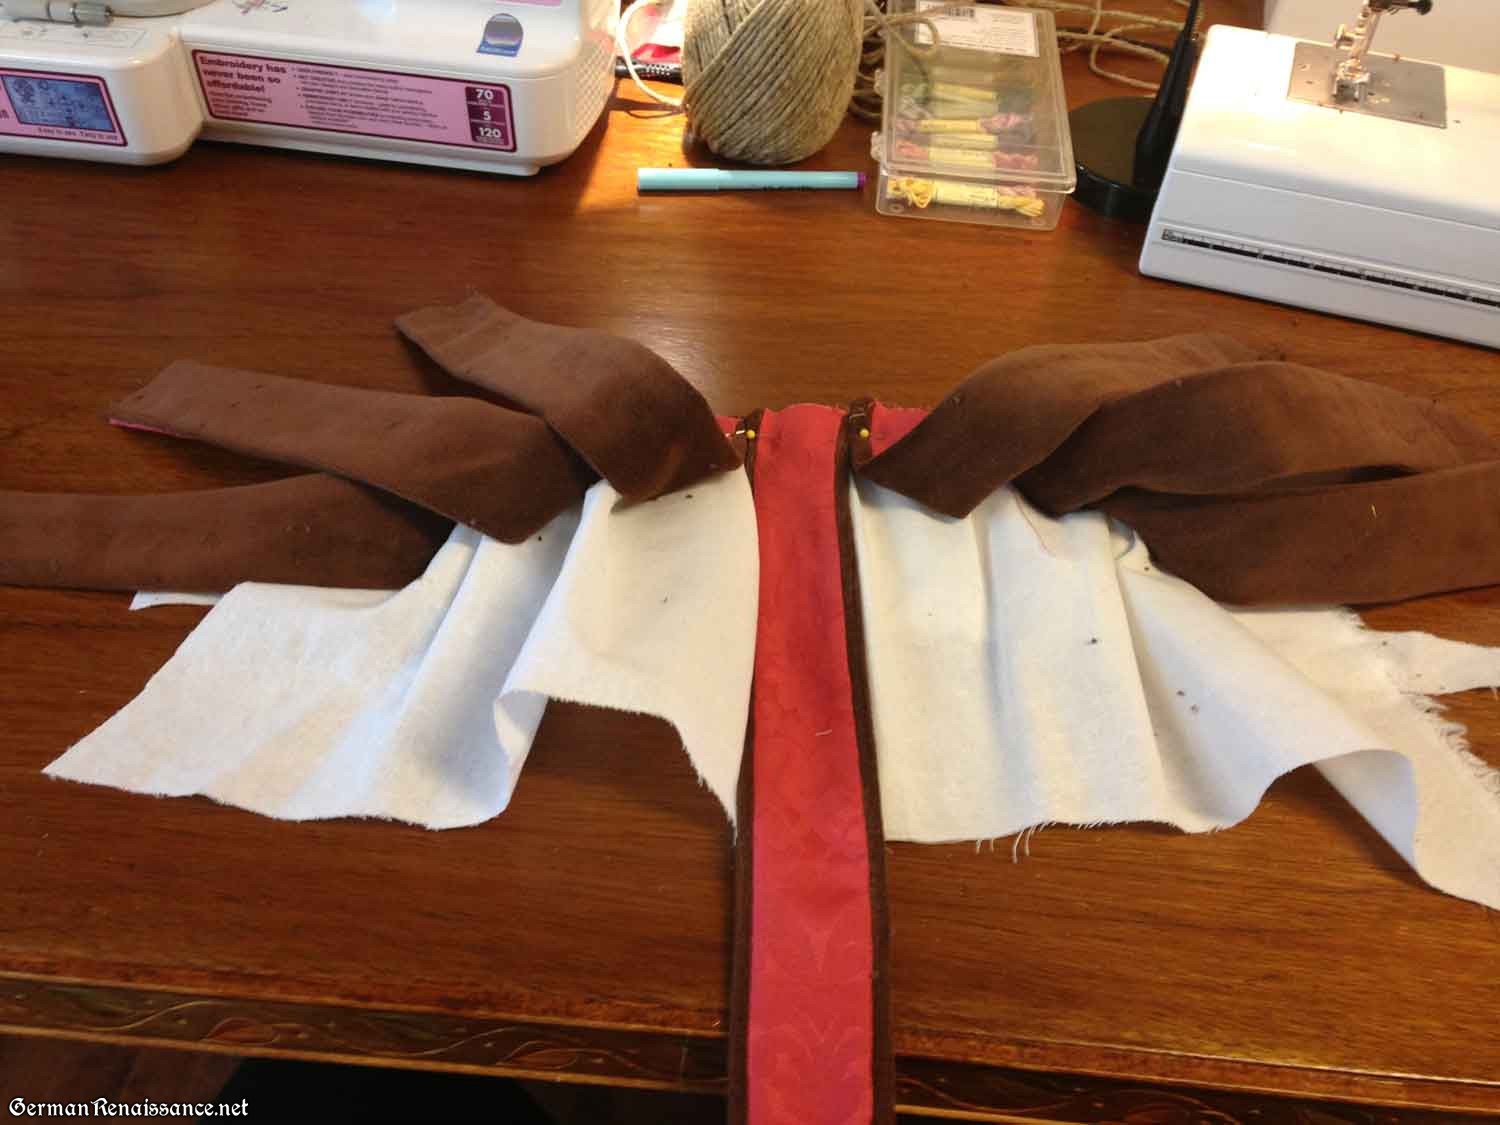
9. Cut a piece of white, lightweight cotton or linen in the shape you want your panes to appear on your shoulder, plus 1/2″ for seam allowance (so you may keep a little bit under the arms as it will later be hidden/removed in the seam allowance). I like to put a curve in the sleeve cap as I think it looks more flattering than a straight line PLUS I’ve seen that in period portraits. We will call this the pane foundation. Here’s a diagram of what I mean:
10. Now cut out a piece of the same white fabric, but bigger and longer than your sleeve cap. This will become the pouf inside your panes. So the larger, the more poofier. For your sanity, I recommend you don’t go too big — it’ll be hard to fit it in. Here was my pouf panel.

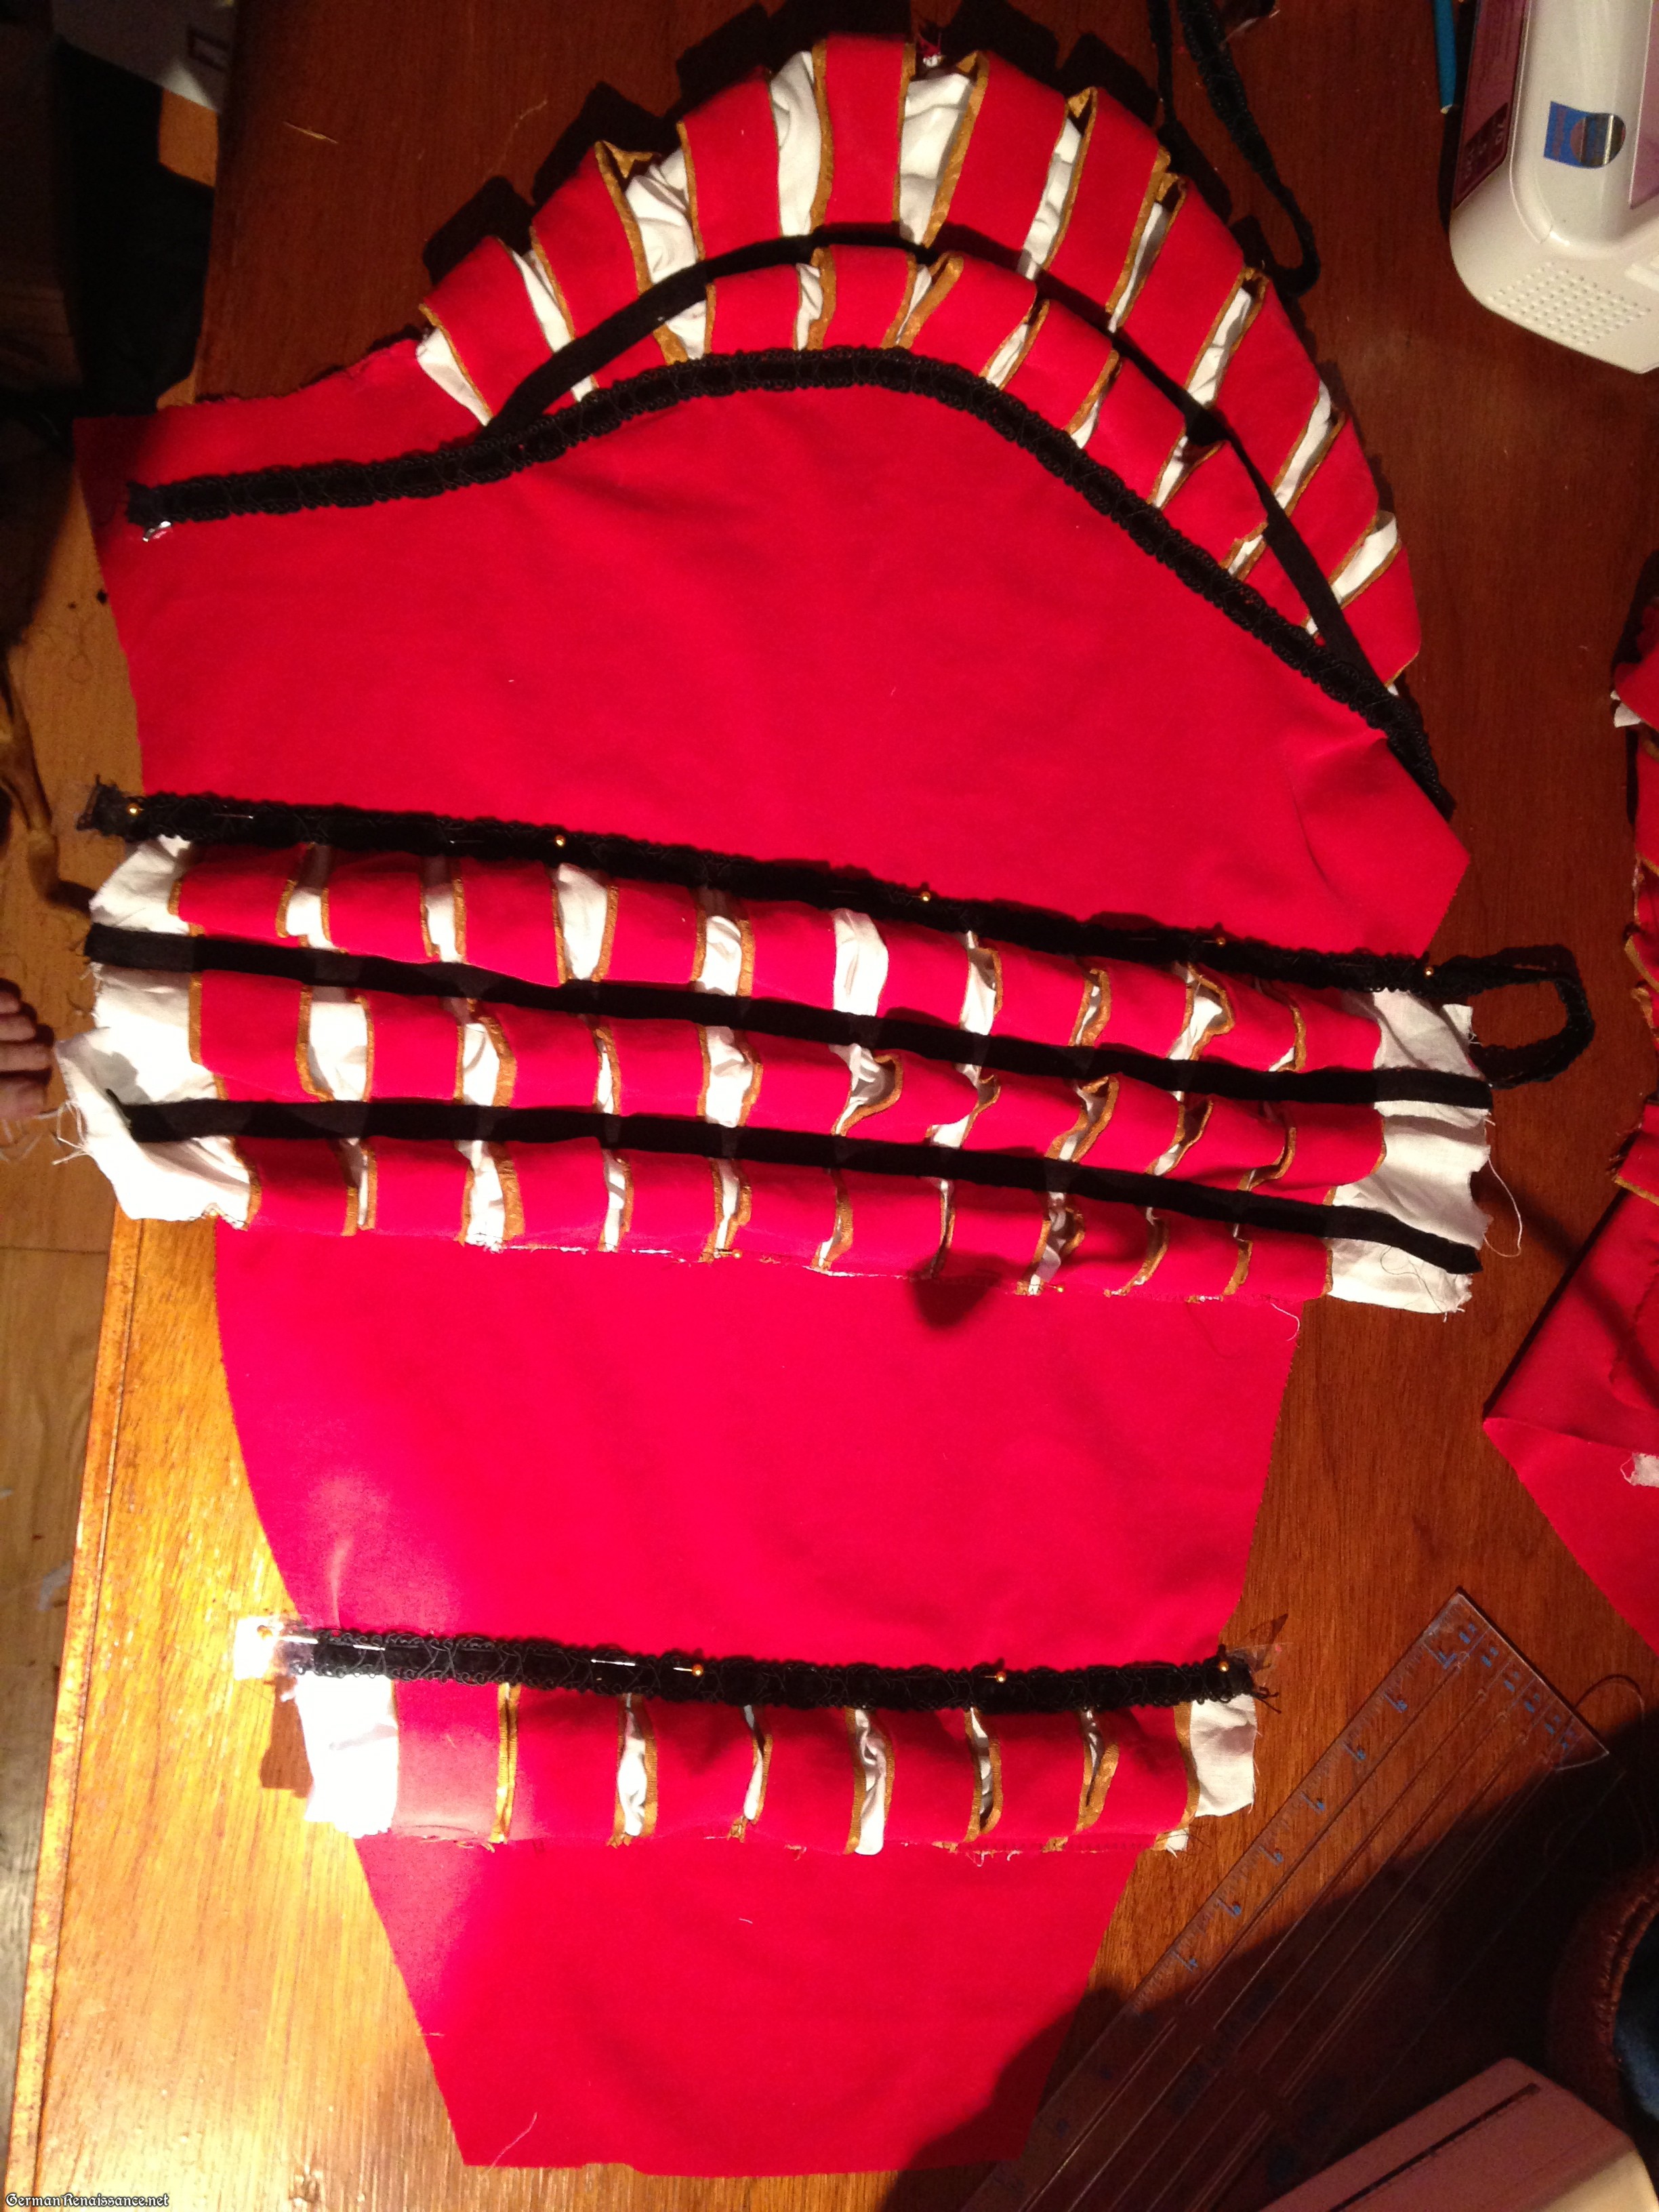
11. Lay out your pane foundation and your pane poof on the table, then lay the middle pane on top, lining up top edges. If your fabric has a pattern, as mine did, be sure you’re putting the correct pane in the correct way! Now pin them together at the very top, just inside the seam allowance.
12. Continue laying your panes across the fabric, but pinch or fold the pouf panel fabric as you go and then pin the panes and panel down to the foundation. Your goal is to have a little extra fabric for each pane you place, so that the fabric wants to peak out from between the panes. Don’t fold too much in, or you won’t have enough when you get to the last pane on either end — you want at least a couple of inches left. Here are my panes with the pane fabric folded between them.
13. Flip all but the center pane out of the way, like in the picture below.
14. Fold or push up the white pouf fabric so that the bottom lines up with the bottom of your foundation fabric. Then position the pane where you want it sew the bottom edge down and pin in place. Your goal is to have your pane gently arc over the pouf. You may want to pin and experiment with how it looks on your sleeve before sewing down.

15. Continue pinning all panes over and through the pouf fabric and foundation fabric, remembering to fold/pinch the fabric slightly in between the panes as well.

16. If your panes will have multiple curves, pin your panes down how want them to ultimately appear, as I did in the photo below.

17. Now trim your panes so they are flush with the top and bottom edges of your pane foundation and sew where you’ve pinned.

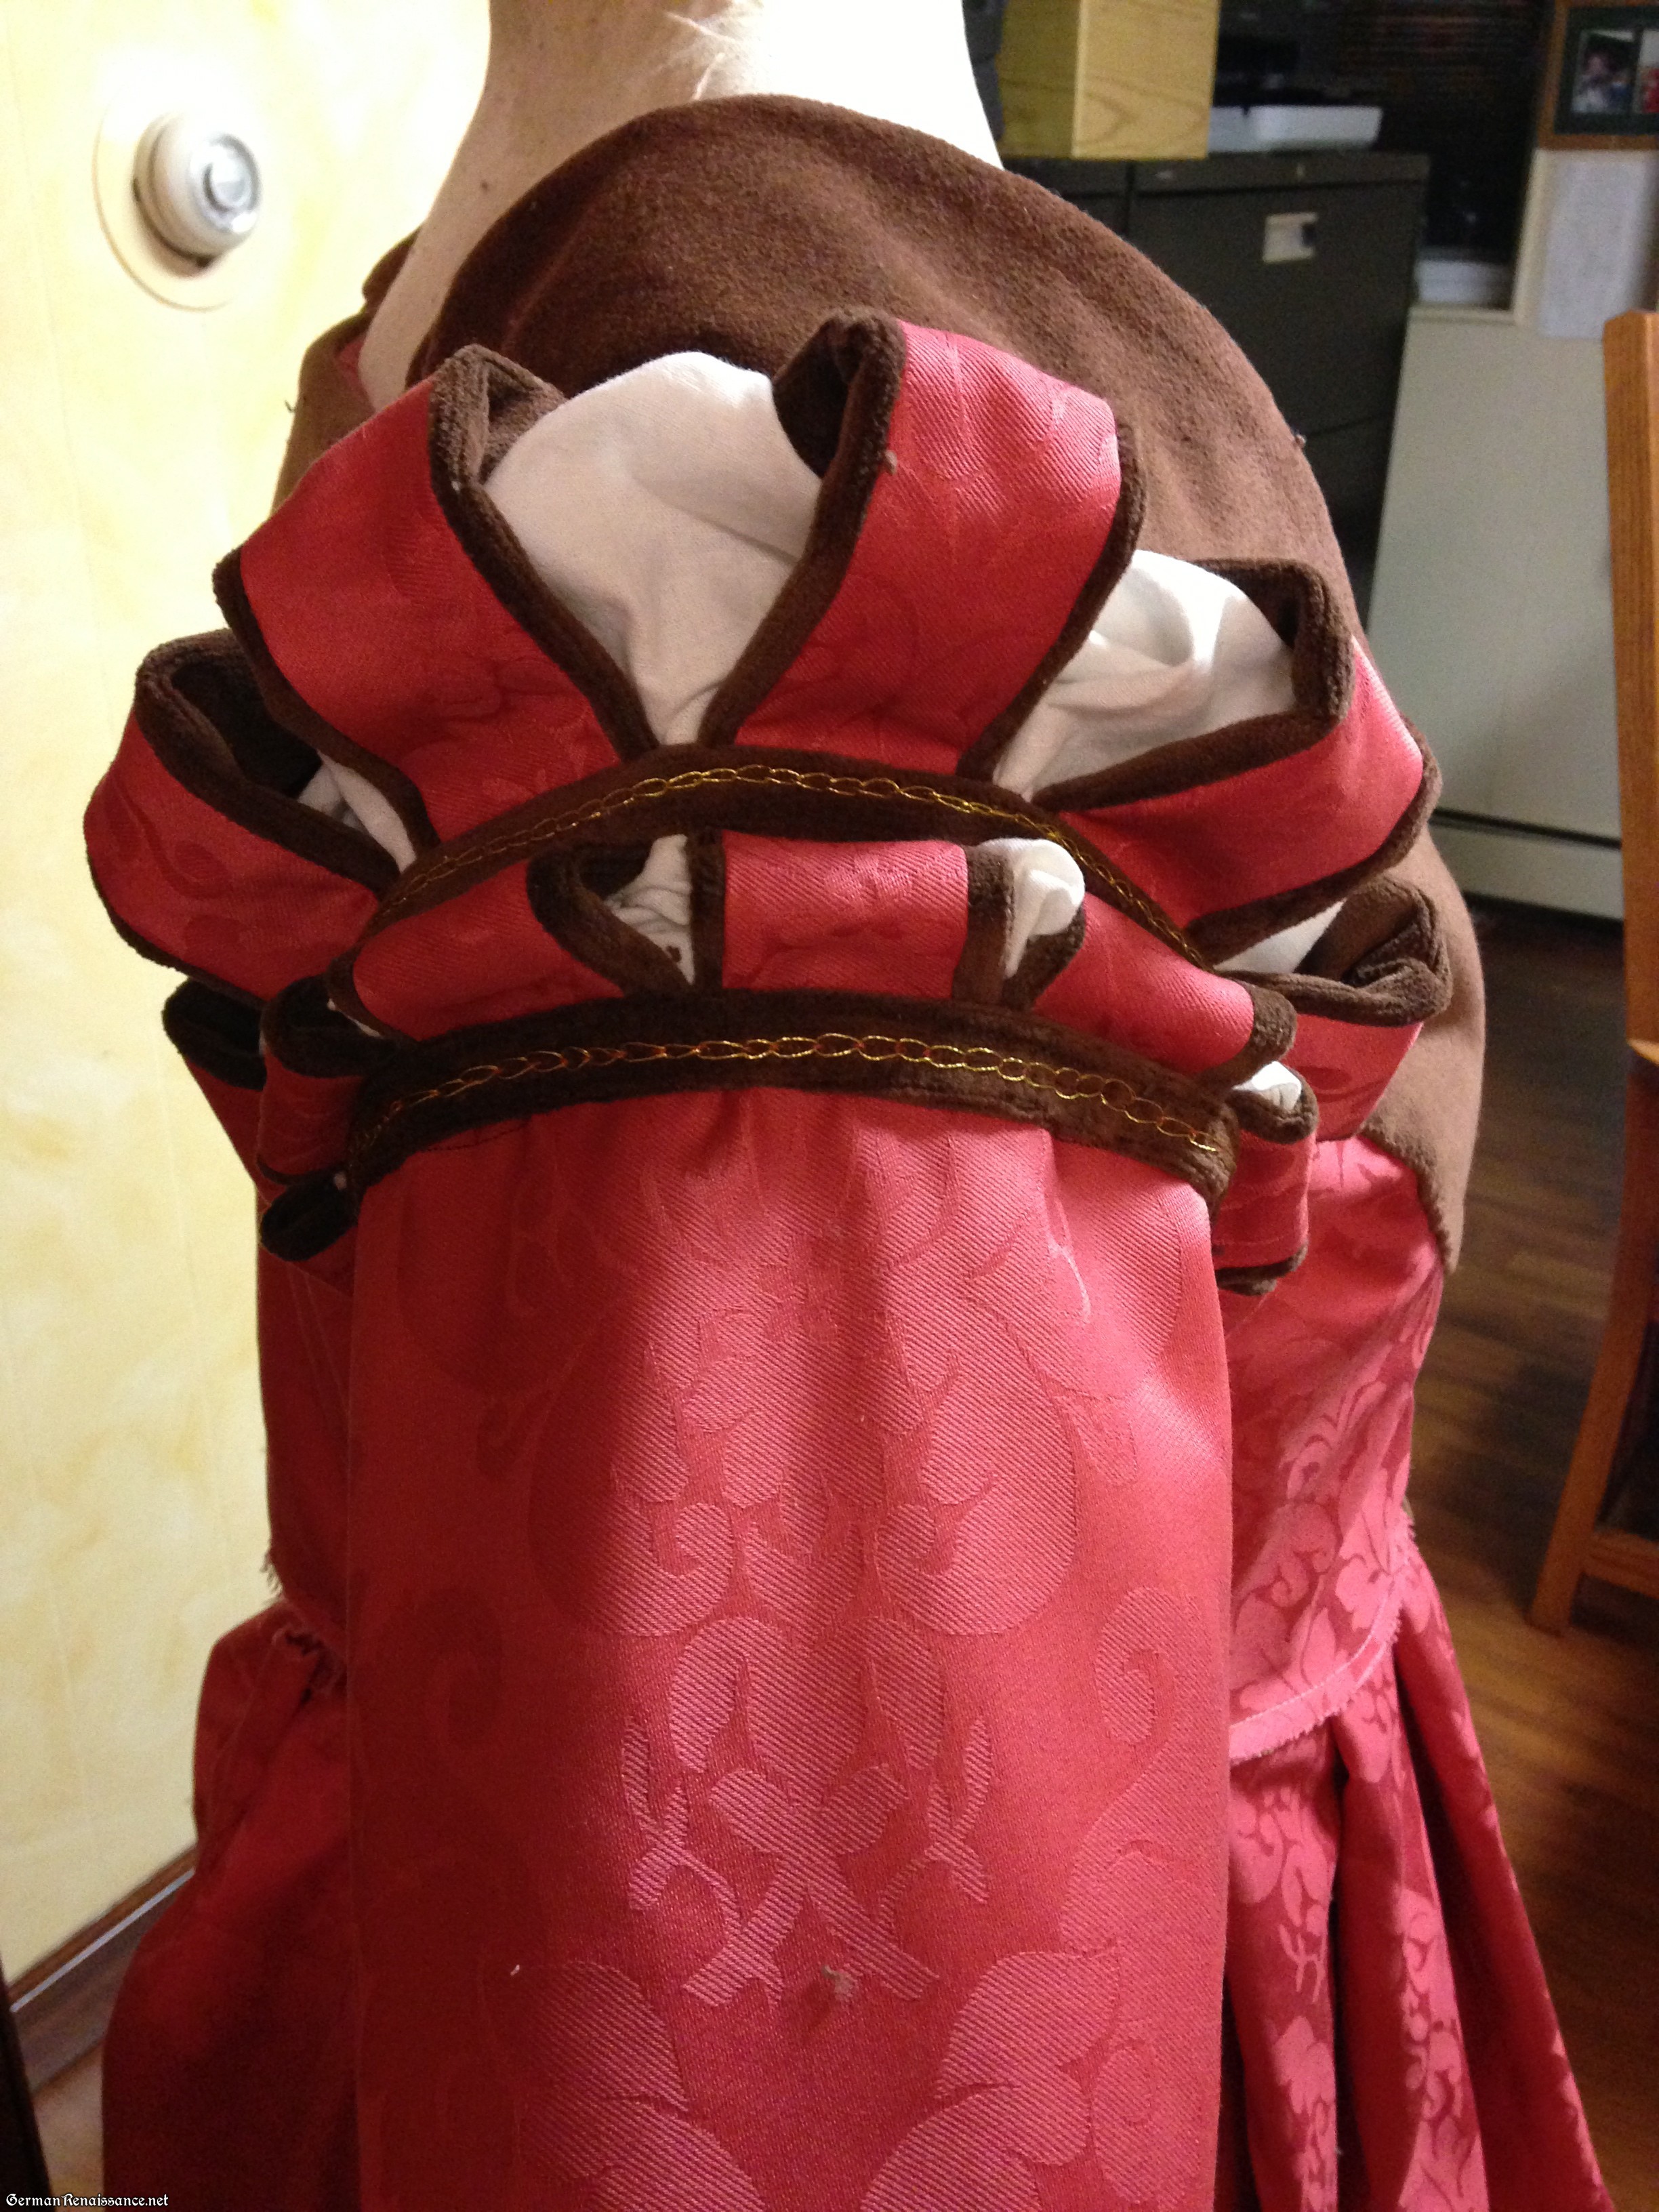
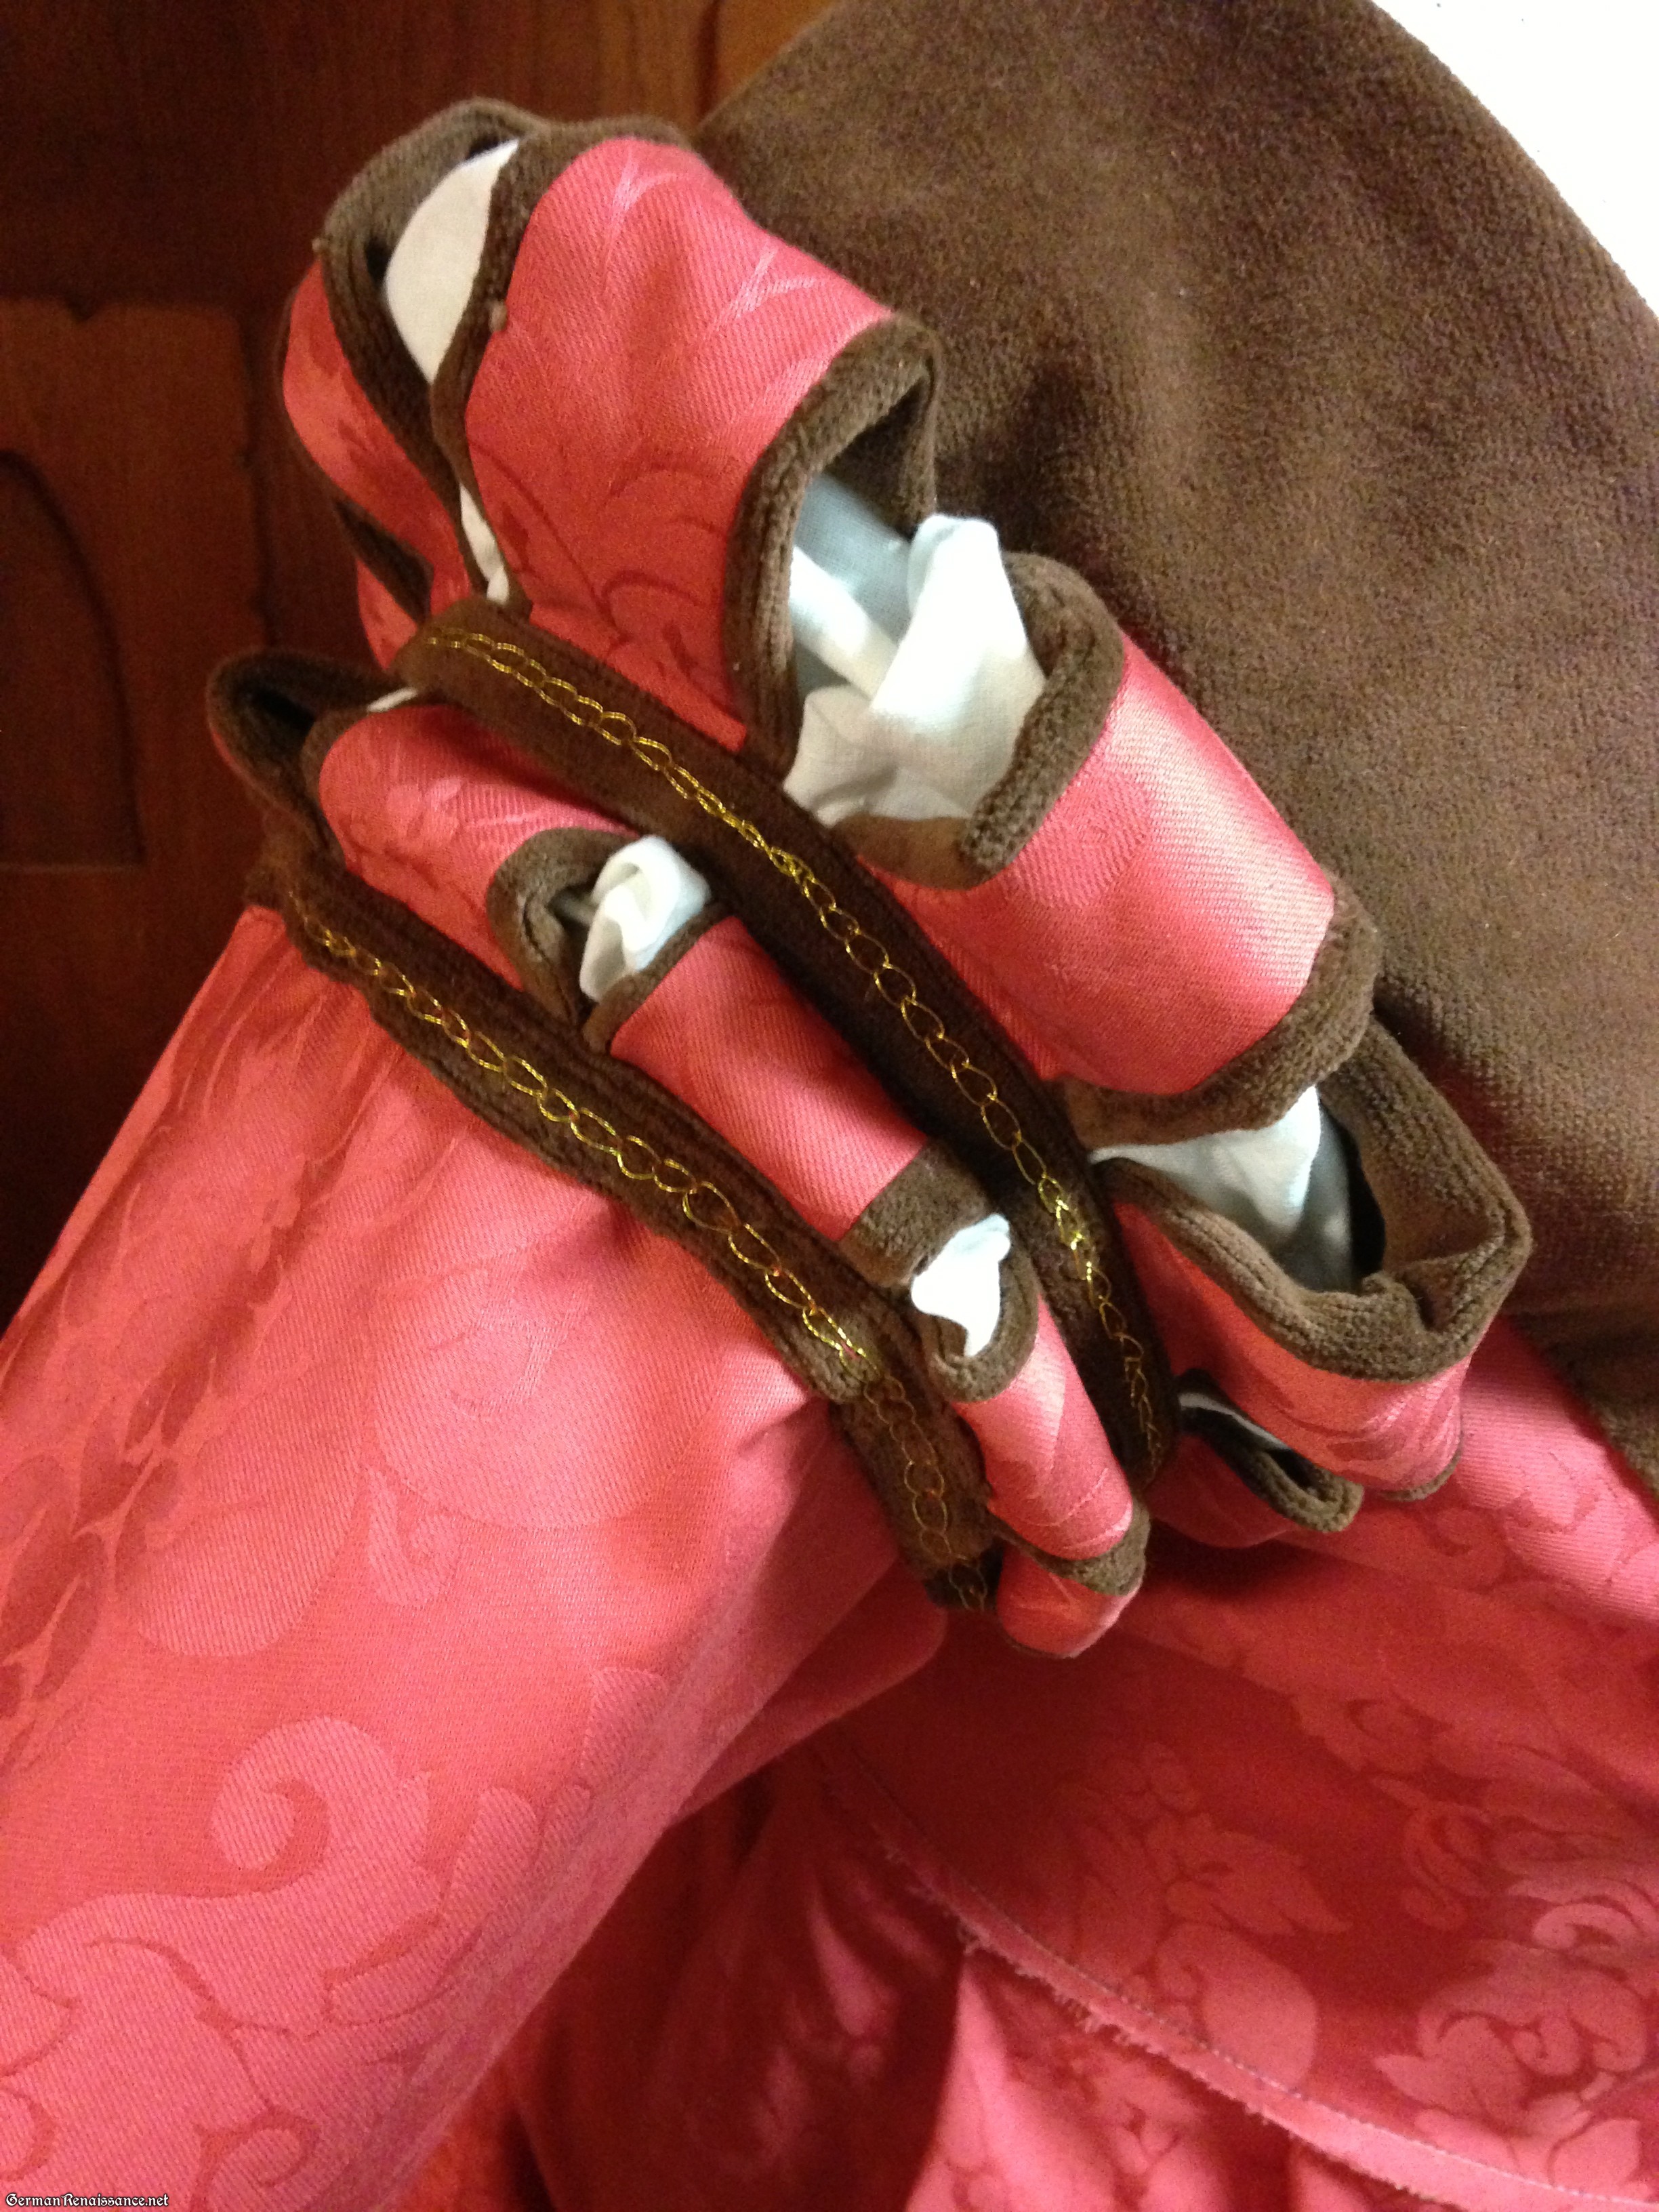
18. Now position and pin the material you plan to edge your panes, such as a trim, braid, tape, etc. I made strips of fabric from the brown velveteen and put a simple chain stitch in gold thread on top of it.
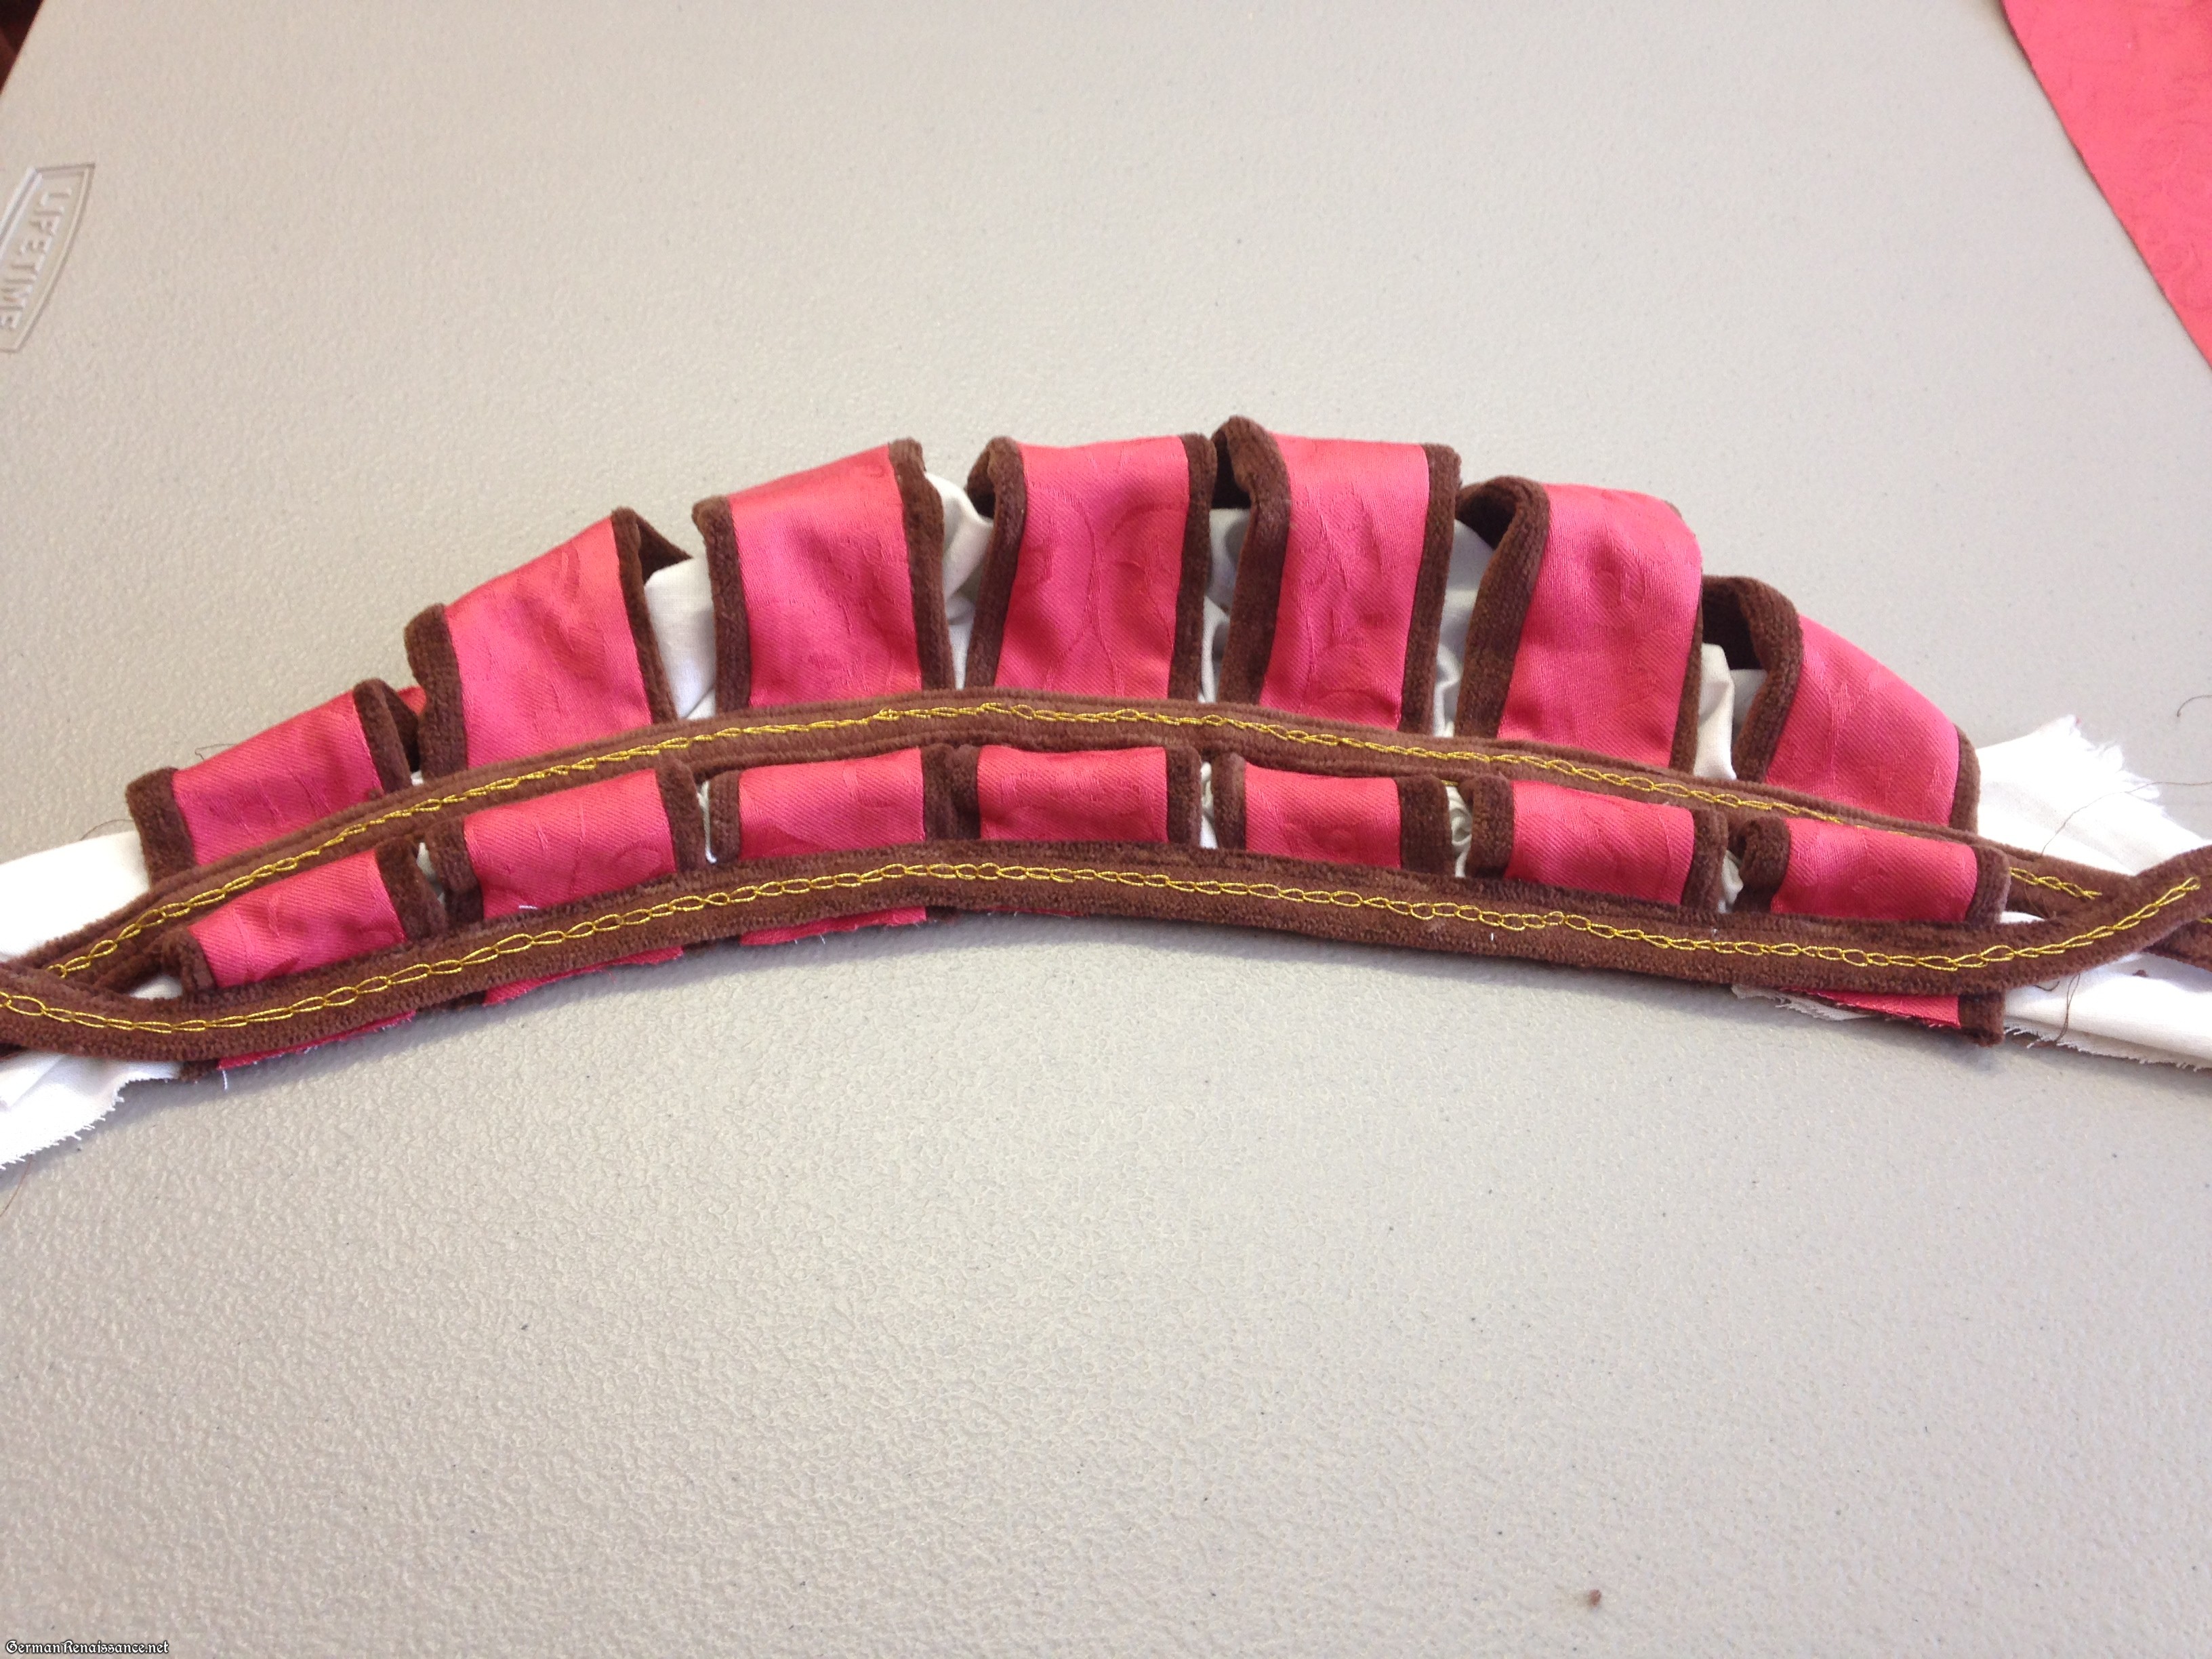
19. Now position and pin the pane to your sleeve and sew down:

20. Repeat as necessary for any other paning, such as at the elbow or wrist (common places to see it). If you position paning lower on the sleeve, where it will go the full circumference of the sleeve, be sure to leave enough fabric at the edges (especially your pouf material) so that when you sew the seam on your sleeve, your paned section is seamed neatly with the pouf material overlapping but the panes not overlapping. This can be a little tricky, but if you leave enough material, you can fiddle with it until you get it right.
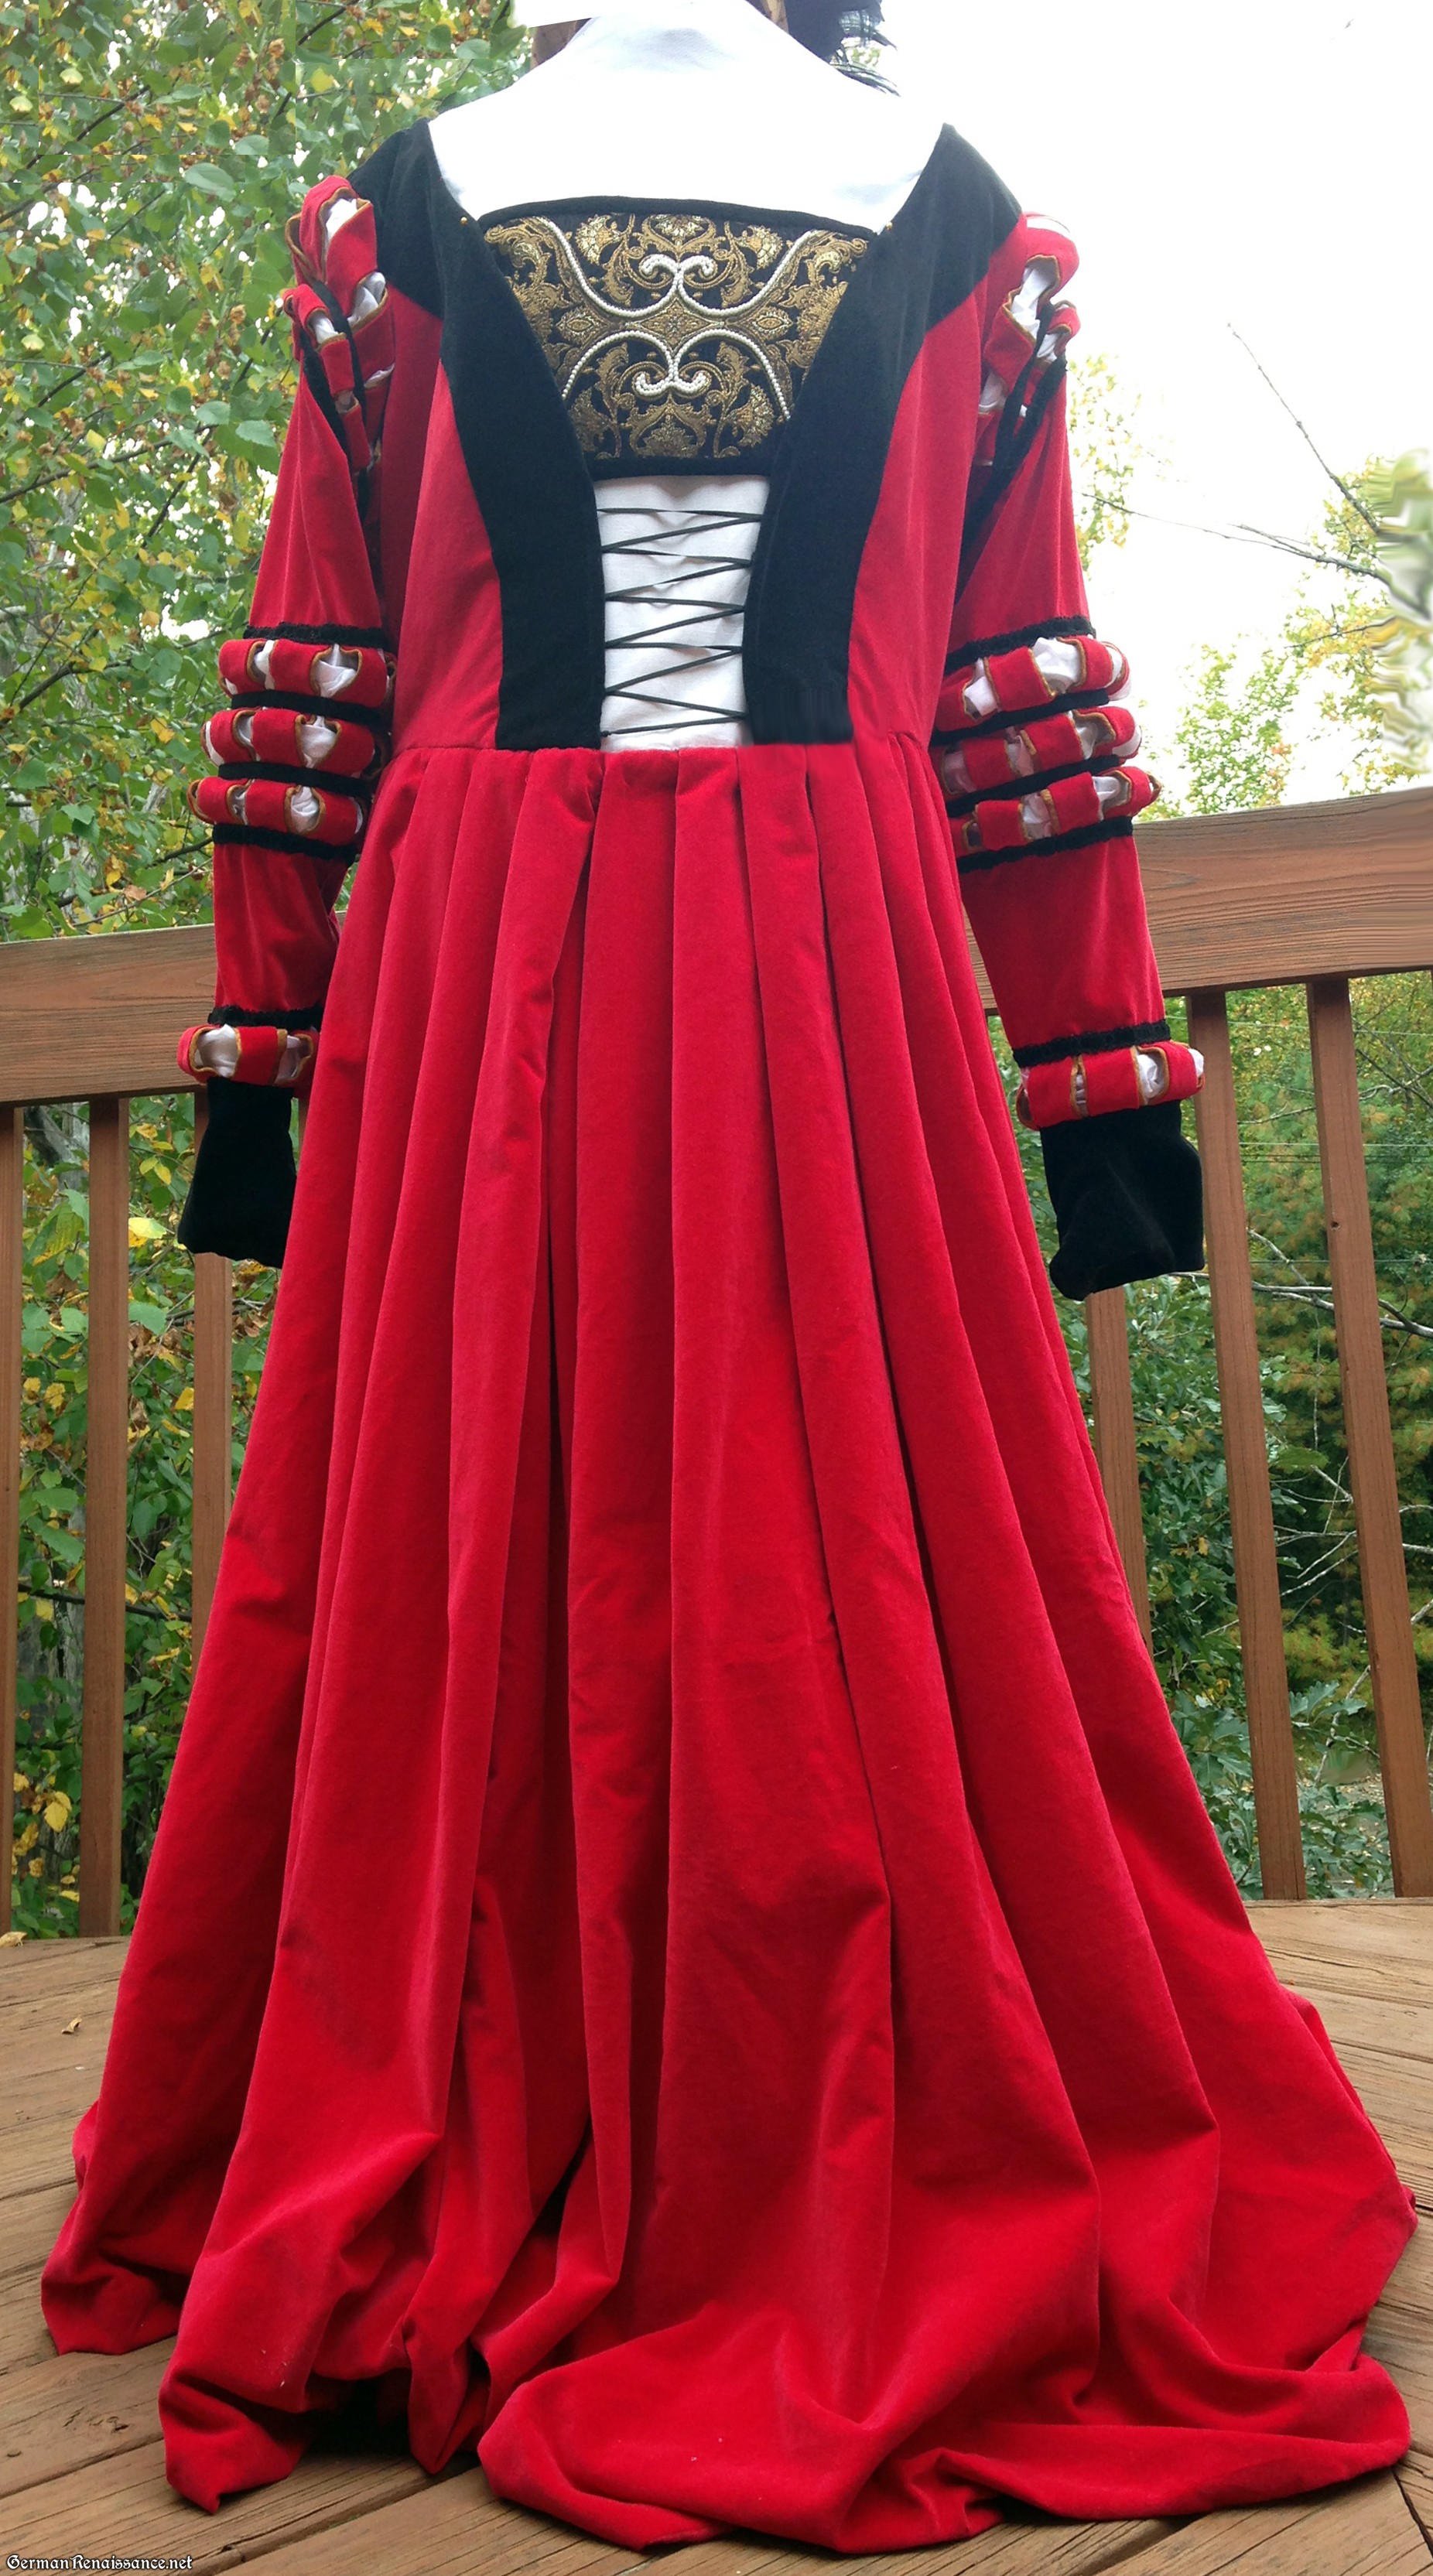
Here are pictures of various paned sleeves I’ve made so you can put all this into perspective:
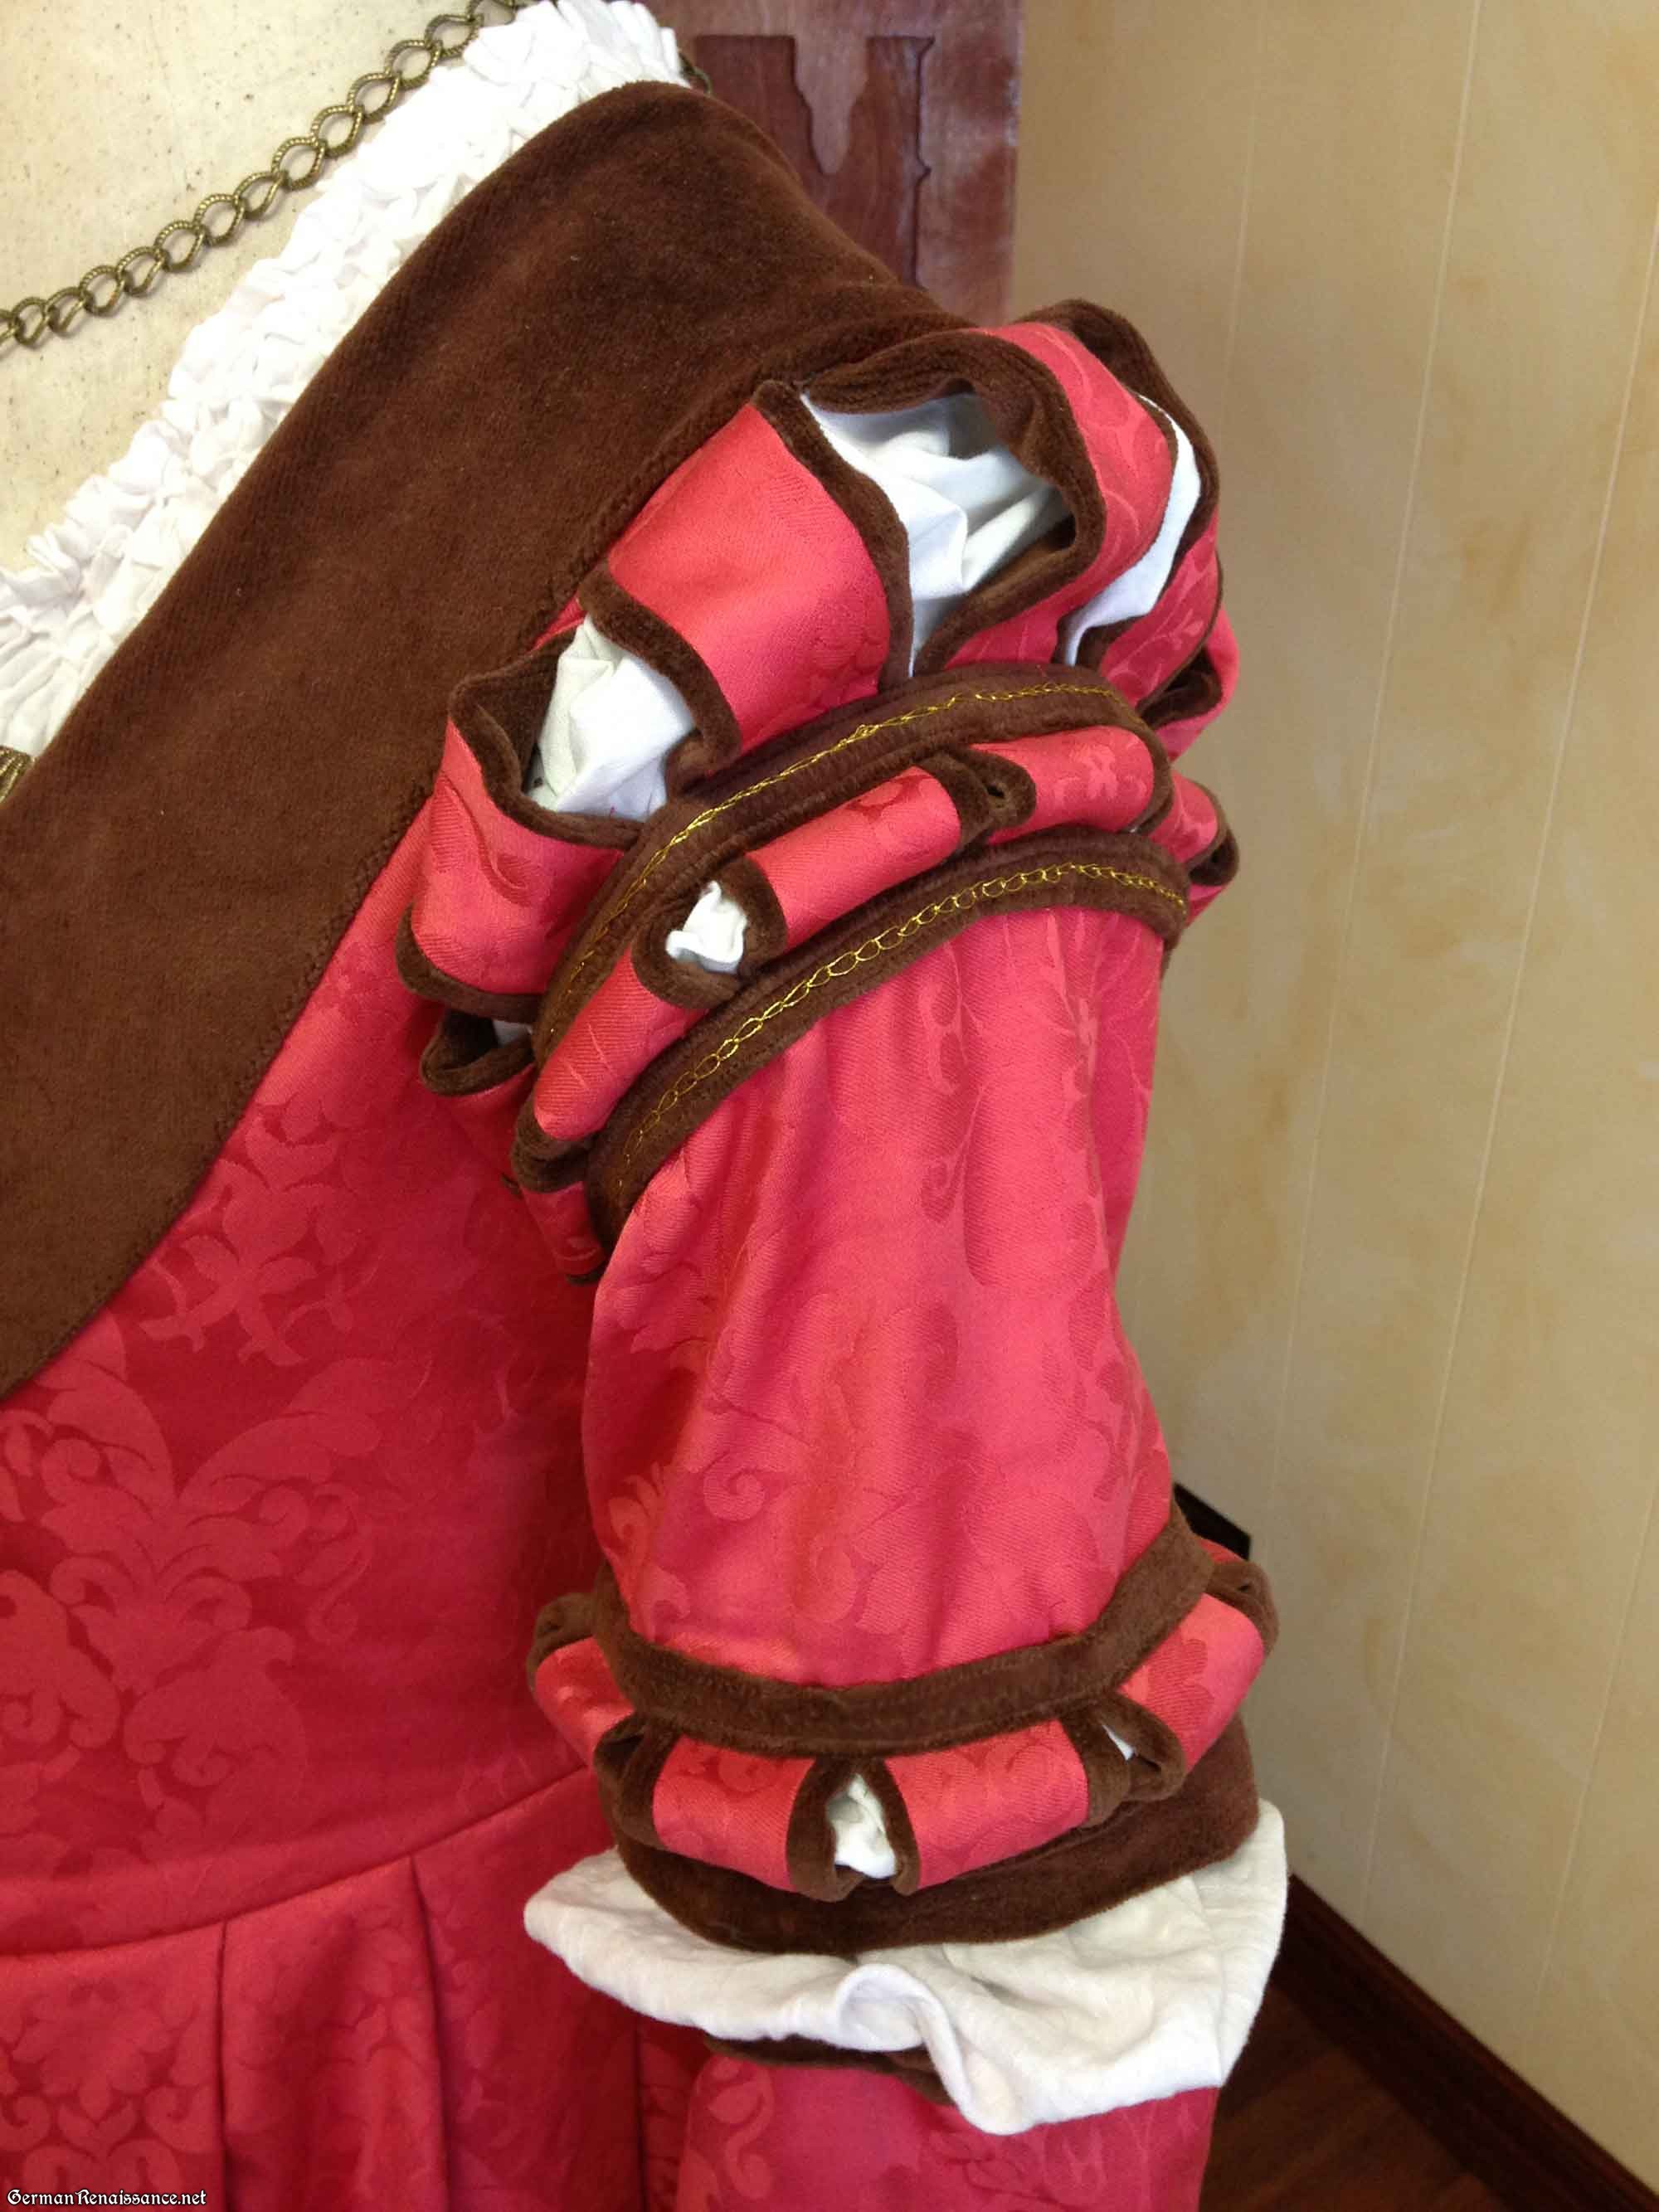
Paned sleeves on my pink damask gown:

Paned sleeves on Baroness Katayoun’s saxon court gown:


Lower sleeve
Saxon court gown on my dress form (different size than gown)
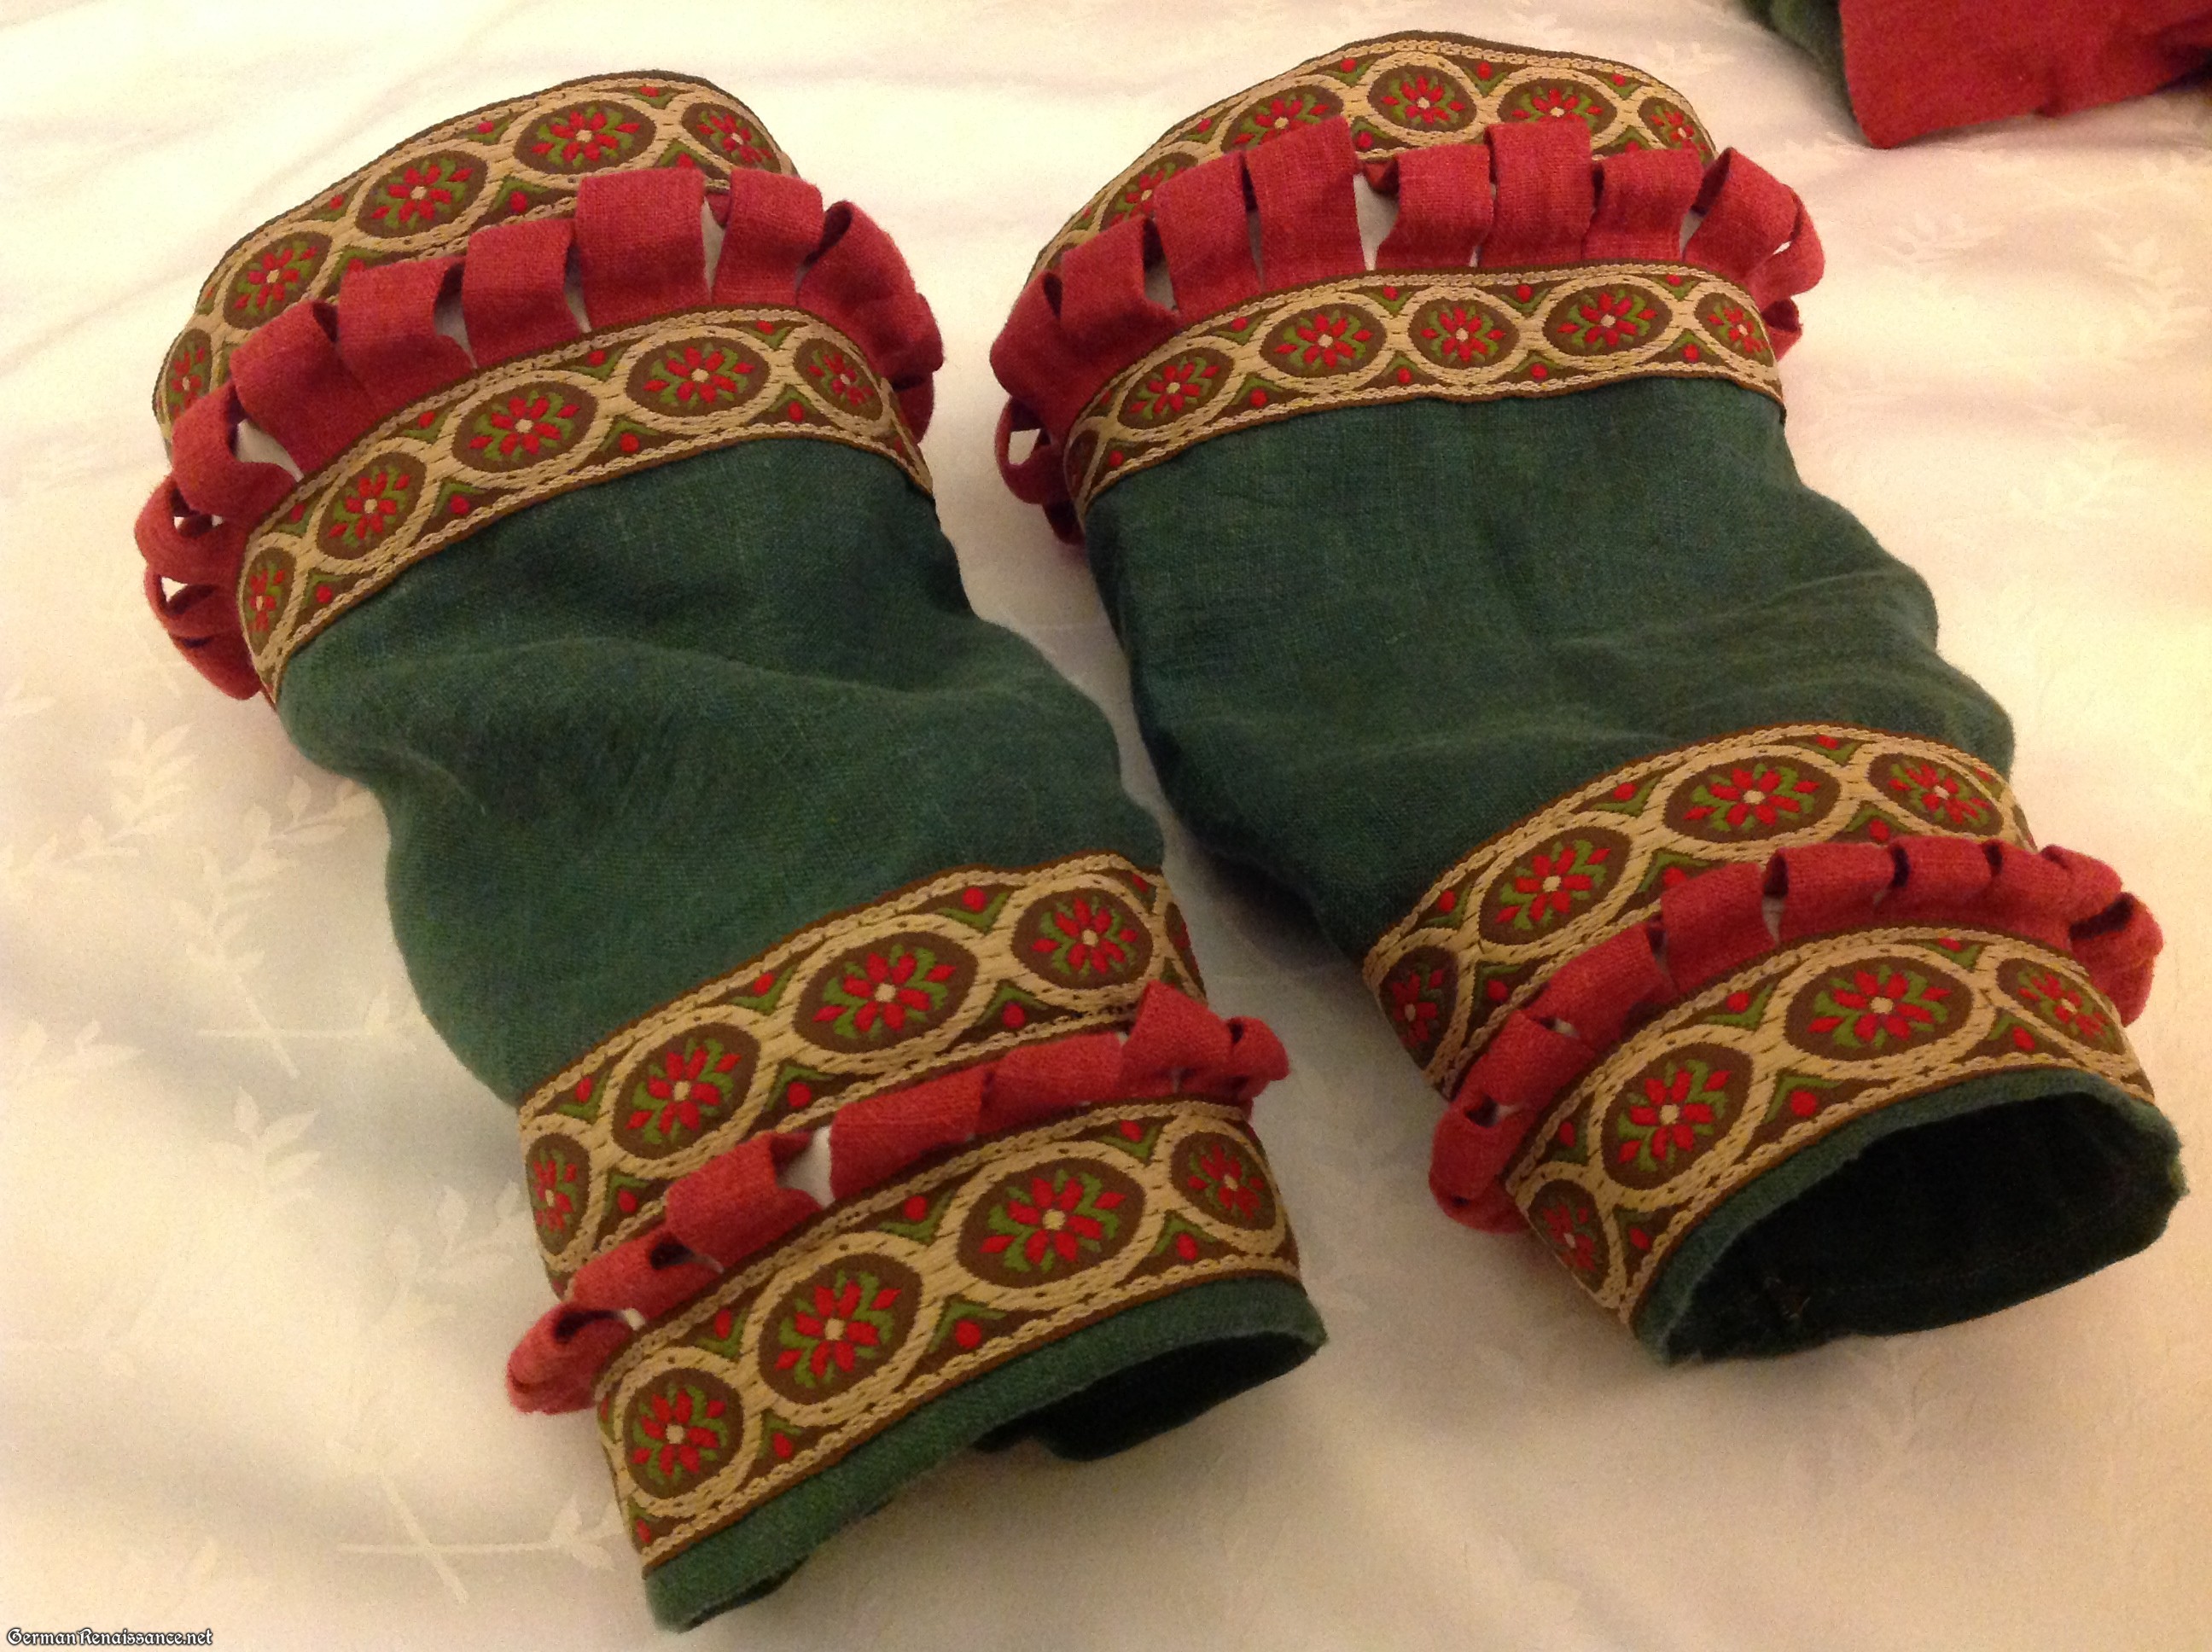
Green sleeves for a lightweight linen camp dress (in this case, the panes are just narrow red linen tubes, ironed flat):


This is great! Thanks for the tutorial!
For my Blue dress (http://research.fibergeek.com/category/garbclothing/16th-century/kampfrau-trossfrau-1530s/1540-blueblack-swiss-gown/) The straps on the sleeves are made of wool cut on the straight. By cutting them on the straight I avoided a lot of fraying.
I do love those sleeves on your blue dress. Everytime I try to cut wool on the straight grain, it frays like no one’s business. Poor Alexander has a pair of black wool hosen with straight-grain cuts that have frayed so badly he looks like he rolled in black threads. Did you use a special wool? Or a special technique? How thick is your blue wool?
The blue wool is super super thick and super fulled. Think med-heavy coat weight.
This makes it so much easier, and so much sense too. I wonder if the original garments in some instances were constructed and sewn like this?
I believe so — I’ve seen it on an extant garment from that time period and now cannot remember where! When I find it, I will link it so I do not forget again.
Thanks for so generously sharing your pattern. It was a huge help. Even though I had to modify it quite a bit since not only didn’t I have enough fabric for 4 sleeves, I didn’t really have enough for two. 😉
Happy to hear it helped!