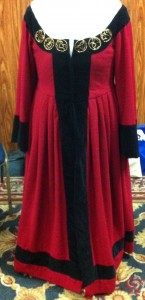
I’ve had several people ask for the pattern for my dark red German goldwork gown, which is based off Dorothea Kannengiesser Meyer’s gown as painted by Hans Holbein the Younger in 1516.
To make a basic version of this gown without any fancy embroidery, you’ll need the following:
- 6.5 yards of outer material, such as wool (60″ wide)
- 1 yard of lining material, such as linen
- 1 yard of interlining material, such as linen canvas or cotton canvas
- 3 yards of guard material, such as velveteen (cotton velvet)
- 2 yards of 1/8″ grosgrain ribbon
- 1 yard of seam binding
- Silk thread in the same color as your outer material and your guards
- Black hooks and eyes
- Tailor’s chalk or some other sort of non-permanent fabric marker
- Good scissors
- Strong needles (sewing machine optional)
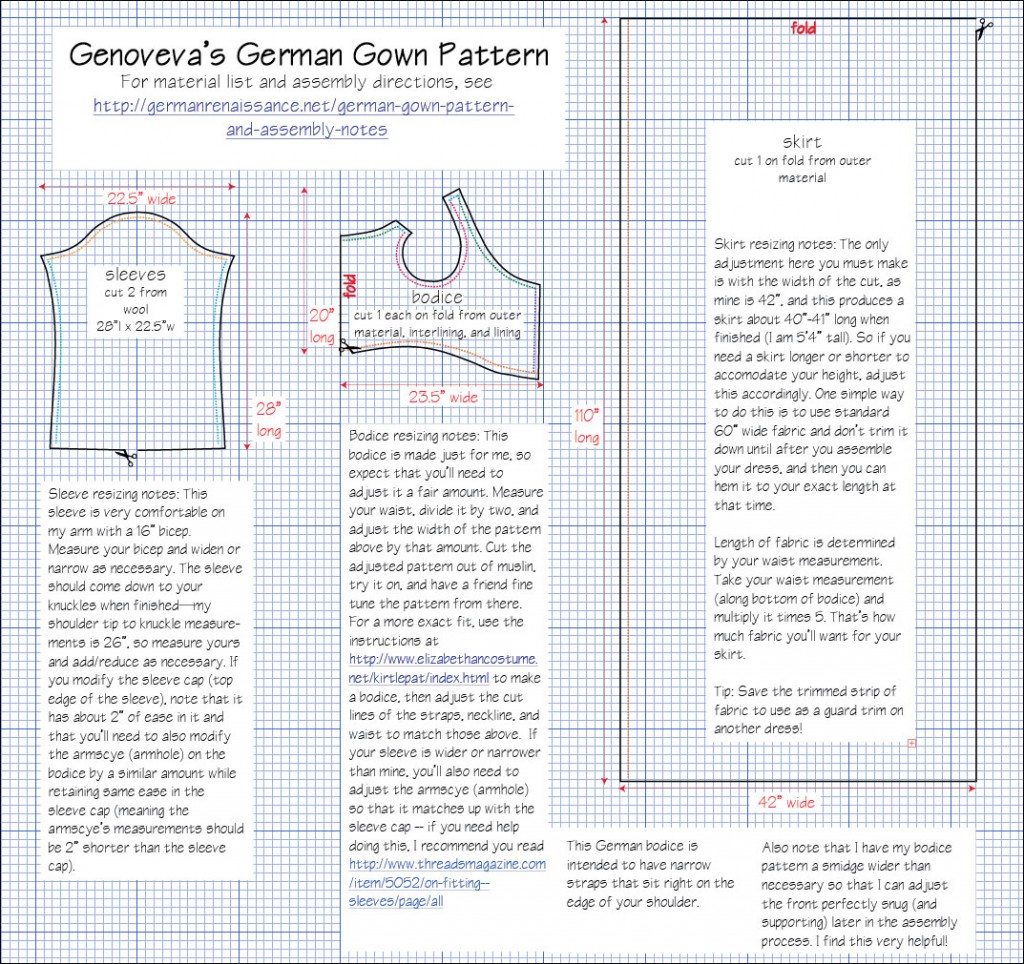
Here is the cutting pattern: German-gown-pattern.pdf (click to download)
Instructions:
- Adjust the pattern closer to your measurements. I recommend cutting a bodice out of muslin and making further refinements first. Note: As this dress has an open front (unless you choose to sew it closed), you’ll need an underdress and you’ll want to be wearing it, and your smock underneath it, when you fit your gown. If you don’t have a suitable underdress already, you can make one out of linen and linen/cotton canvas (as interlining) using this pattern — just omit the sleeves and the guards. Make the underdress first, good and snug, and it’ll also serve as practice for the main gown.
- Wash and press all your materials (steam your velveteen gently from the back with an iron). I prefer to wash my wool in my machine washer and dryer, but not all wool will react well to this and not everyone likes the slightly fulled appearance that usually results — test a sample before you wash all your wool!
- Cut out your material according to the cutting pattern above (pay careful attention to fold lines).
- Lay the outer material and interlining material on top of one another, wrong sides together, and pin them together. Now sew them together around every edge and treat them as one piece of material from this point forward.
- Match and pin the straps of your bodice outer material together (right sides of outer material together), try it on to make sure it fits right, then sew the straps together along the blue dotted line (or your adjusted line). Sew the straps of the bodice lining, too.
- Place the bodice lining against the bodice outer material, right sides together, and pin your ribbon 1/2″ from the top edge of your bodice (along green dotted line marked on the pattern) and sew together along the ribbon line. Then sew down the two front edges (purple dotted line) of your outer material and lining. Try it on and check to see if the front bodice edges fit around you — the edges should just meet and it should feel a little snug. If it is too large, mark where it should be with your chalk and resew along your new line. Tip: Don’t be afraid to make this bodice pretty snug if you’re using a material that is naturally stretchy, such as many wools and linens. Those times I sewed my bodice edges conservatively because I was leery of it being too snug, it ended up being too loose. Linen, in particular, will stretch as you wear it from your body heat. But if your fabric is synthetic, it may have considerably less stretch in it. If you’re not sure how your bodice will behave, sew the edges conservatively, put it on over whatever other garments you plan to wear, safety-pin it closed, and wear it for a while … then decide!
- Once your bodice fits perfectly, trim the seam allowance to half its width, clip the curves, and trim the corners. Turn right side out and press edges.
- Moving on to the sleeves, fold them in half lengthwise (right sides together) and sew along the blue line marked on the pattern.
- Turn the sleeve right side out and place it the armhole of your bodice (which is turned inside out), so the right sides of the sleeve and bodice are together. Pin the top edge of the sleeve into the armhole, right sides together, sleeve seam at bottom of armhole, with as few puckers as possible. (If you find that the sleeve is puckering too much, hand-baste the top edge first, then pull the threads of the basting to gather sleeve cap until it fits perfectly in the armhole.) Once the sleeve is set in perfectly, sew it to the bodice. Repeat for other sleeve.
- Sew the lining to the bodice around the armhole, then cover the seam with seam binding and sew it down.
- Moving on to the skirt, first sew a rolled hem along both short sides of your material (this gown is open in the front by design — if you prefer it be closed, you can sew it together with a French seam instead).
- Make rolled pleats along the top edge of your skirt until it is the width of your bodice (use my Rolled Pleats Calculator to help you determine where to start your next pleat). I like to start my pleats in the middle of the back skirt and roll them inward from that point. This creates a more voluminous point in the back and a neater, flatter front. Once I have my pleats where I want them, I like to sew along the top edge of my skirt to keep them in place.
- Pin your skirt to the lower edge of the outer material of bodice, right sides together — do not pin to your bodice lining yet. Once it is pinned in place, sew together — you’ll probably need to do this by hand with double-stranded silk thread because the material will be quite thick now.
- Once your outer material is sewn to your skirt, turn the dress inside out and fold the edge of your bodice lining under so it covers the raw edge of your skirt, then hand-sew down to your skirt. It can be tricky to do this without avoiding wrinkles that show when worn, so pin first and try on before sewing to ensure you have a smooth fit.
- Put the gown on, have someone help you mark the hem (should be just above floor length), mark it with chalk, trim as necessary, and sew the hem with a hem stitch. I also covered my inside hem seam with seam binding, but that is optional.
- If you’ll be applying velveteen guards, put the gown on, pin the front edges together, drape the velveteen around your shoulders (have a friend help), make sure it lies flat and smooth, and pin it in place.
- Now draw a chalk line on the velveteen where you can feel the top edge of your bodice underneath.
- Unpin the velveteen from your gown and lay flat — you should see a big curve. Measure inside this curve 1″ and draw another chalkline. Then measure outward four inches from this inside line and draw another line. This will be your top bodice guard. Cut out along the outer curve lines.
- Turn your bodice inside out and pin the guard to the inside top edge/green dotted line (right side of velvet against the wrong side of your bodice). Sew the guard to the inside top edge of bodice (green dotted line on pattern), clip the curves, and fold the guard up and over the edge of your bodice. Turn the lower guard edges under (clipping curves as necessary to have it lie smoothly), and hand-sew down to the bodice (stop about four inches from each end).
- Cut two four inch strips of velveteen the same measurement as the top of your bodice to the edge of your skirt (50″ in my case). Pin the edges of the velveteen strip to the edges of your bodice and skirt (right side of velveteen against wrong side of wool), then sew, fold around (tuck under top guard), press, and hand sew to outside of gown. Now finish sewing down the top guard to cover the edge of the front guards.
- Cut out a 6″ strip of velveteen the same circumference as your skirt (about 180″), press edges in 1/2″, then hand-sew to the bottom edge of your skirt (I prefer not to go right to the very bottom, leaving a few inches of the skirt material showing).
- Cut out two 6″ strips of velveteen, each about 23″ long (or however wide your sleeve is at the bottom edge). Sew each strip together at its short ends (French seam), press seam, turn inside out, pin to inside edge of your sleeve (right side of velveteen to wrong side of sleeve, line up seams), sew, fold over and around the outside of your sleeve, tuck upper edge of velveteen under, and hand-sew to your sleeve.
- Attach hooks and eyes to the front edges of your bodice (purple line on pattern), being careful to sew through all layers of your material to ensure a smooth fit when worn.
- Check for stray thread ends and clip, press your gown, and you’re done!
I recommend you wear this gown with a pleated smock with a wide neckline that just shows above the gown’s edge!
Many thanks to Mistress Melisant who helped me fit the pattern, adjusting the strap so it would lie closer to the edge of the shoulder, and offered advice about sewing the top guard, using a ribbon to keep the bodice’s top edge snug, and using hooks and eyes. She also graciously read through these instructions and noted places I could clarify or expand upon, which I have (though I’d still like to do a photo tutorial on rolled pleats). Thank you!
Please let me know if you have any questions about constructing this gown. And if you make one, please let me know!
You can view the original A&S competition documentation on this gown, which received a first place award, at http://germanrenaissance.net/files/RedWoolGoldworkGown.pdf


You look lovely. You should try to recreate the headdress next. I love your blog. The only trouble I had was when I tried to see the documentation, I got an error message.
Celia Vencil
SCA: Lilias MacLeoid
(misplaced German Citizen living in Scotland at the family homestead with my {third born}Husband)
Thank you, Celia! I’ve corrected the link to the documentation and it now works. As for recreating the headdress, I have thought about it — what’s holding me back finding the right fabric for it. I’m not sure if it is silk or a very fine linen. Last year I’d experimented with a variety of silks and linens, hoping to find something that draped the same way, but I did not find anything. If you, or anyone out there knows, please tell me!
How about a shirt weight cotton or linnen for the under hood, for support, & a hankie weight in about 3 to 4 yds. long and 2 feet wide to help the veil to get the right drape. Cate
Alought I have been messing around with the “Brain Bag”, I am not sure that I really want to wear it all day. But I am known to change hats & jewlery several times an event. LOL
Greetings, thank you for such a wonderful website. It is very helpful to those of us who are, at best, novices in the sewing world. I noticed that you were planning on putting up a pattern for a Cranach gown. I would love to do this gown for our 12th night in January. Any chance it will be out soon?
Thank you! And the Cranach gown pattern is now up at http://germanrenaissance.net/cranach-saxon-court-gown-pattern-materials-and-construction-notes/ 🙂